6.5 Radio Frequency Identification
Radio Frequency Identification (RFID) is a technology that uses wireless communication between an object (or tag) and an interrogating device (or reader) to track and identify it. The tag’s transmission range is limited to several meters. Readers and tags do not necessarily require a line of sight.
An integrated circuit (IC) and an antenna are usually present on most tags. As well as storing information, the microchip manages communication with the reader via radio frequency (RF). In passive tags, there is no independent energy source and they rely on an external electromagnetic signal from the reader for power. An active tag is powered by an independent energy source, such as a battery. As a result, they may be more powerful in terms of processing, transmission, and range.
Required Components
In this project, we need the following components.
It’s definitely convenient to buy a whole kit, here’s the link:
Name |
ITEMS IN THIS KIT |
LINK |
|---|---|---|
Kepler Kit |
450+ |
You can also buy them separately from the links below.
SN |
COMPONENT |
QUANTITY |
LINK |
|---|---|---|---|
1 |
1 |
||
2 |
Micro USB Cable |
1 |
|
3 |
1 |
||
4 |
Several |
||
5 |
1 |
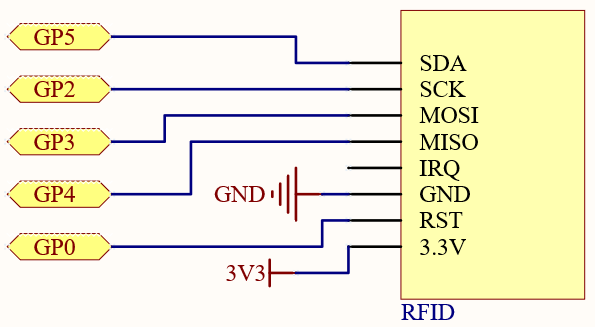
Schematic

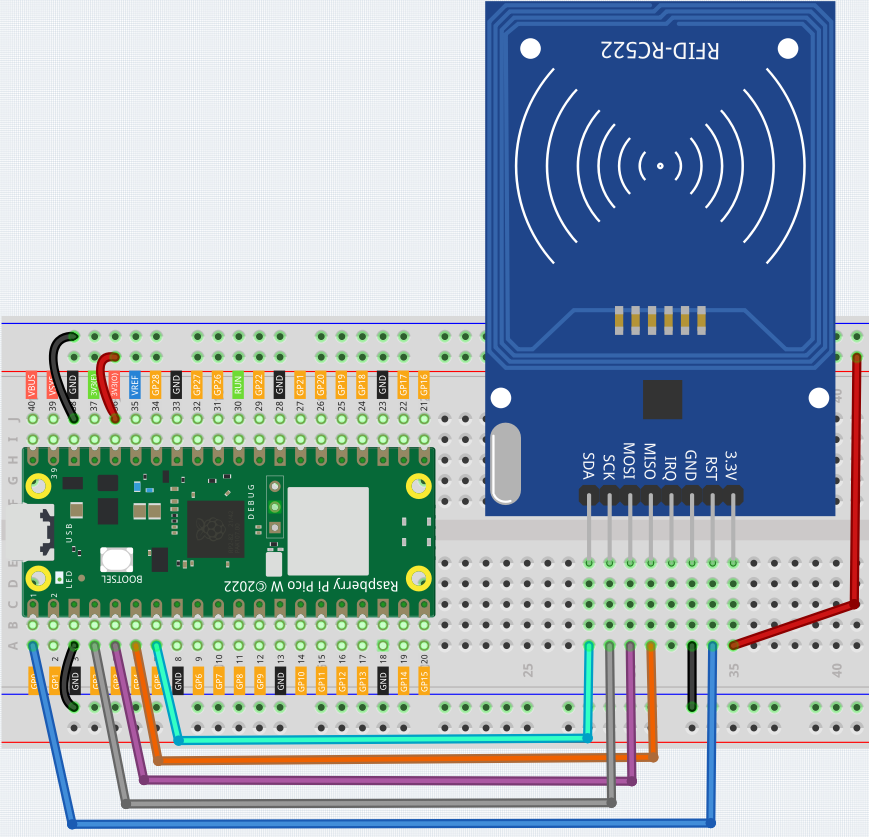
Wiring

Code
Here you need to use the libraries in mfrc522 folder, please check if it has been uploaded to Pico W, for a detailed tutorial refer to 1.4 Upload the Libraries to Pico.
The main function is divided into two:
6.5_rfid_write.py: Used to write information to the card (or key).6.5_rfid_read.py: used to read the information in the card (or key)
Open the 6.5_rfid_write.py file under the path of kepler-kit-main/micropython or copy this code into Thonny, then click “Run Current Script” or simply press F5 to run it.
After running you will be able to type message in the shell and then put the card (or key) close to the MFRC522 module to write the message in.
from mfrc522 import SimpleMFRC522

reader = SimpleMFRC522(spi_id=0,sck=2,miso=4,mosi=3,cs=5,rst=0)

def write():
    to_write = input("Please enter the message: ")
    print("Writing...Please place the card...")
    id, text = reader.write(to_write)
    print("ID: %s\nText: %s" % (id,text))

write()
Open the 6.5_rfid_read.py file under the path of kepler-kit-main/micropython or copy this code into Thonny, then click “Run Current Script” or simply press F5 to run it.
After running, you will be able to read the message stored in the card (or key).
from mfrc522 import SimpleMFRC522

reader = SimpleMFRC522(spi_id=0,sck=2,miso=4,mosi=3,cs=5,rst=0)

def read():
    print("Reading...Please place the card...")
    id, text = reader.read()
    print("ID: %s\nText: %s" % (id,text))

read()
How it works?
from mfrc522 import SimpleMFRC522

reader = SimpleMFRC522(spi_id=0,sck=2,miso=4,mosi=3,cs=5,rst=0)
Instantiate SimpleMFRC522() class.
id, text = reader.read()
This function is used to read card data. If the reading is successful, id and text will be returned.
id, text = reader.write("text")
This function is used to write information to the card, press Enter key to finish writing.
text is the information to be written to the card.