Note
Hello, welcome to the SunFounder Raspberry Pi & Arduino & ESP32 Enthusiasts Community on Facebook! Dive deeper into Raspberry Pi, Arduino, and ESP32 with fellow enthusiasts.
Why Join?
Expert Support: Solve post-sale issues and technical challenges with help from our community and team.
Learn & Share: Exchange tips and tutorials to enhance your skills.
Exclusive Previews: Get early access to new product announcements and sneak peeks.
Special Discounts: Enjoy exclusive discounts on our newest products.
Festive Promotions and Giveaways: Take part in giveaways and holiday promotions.
👉 Ready to explore and create with us? Click [here] and join today!
7.9 Fruit Piano
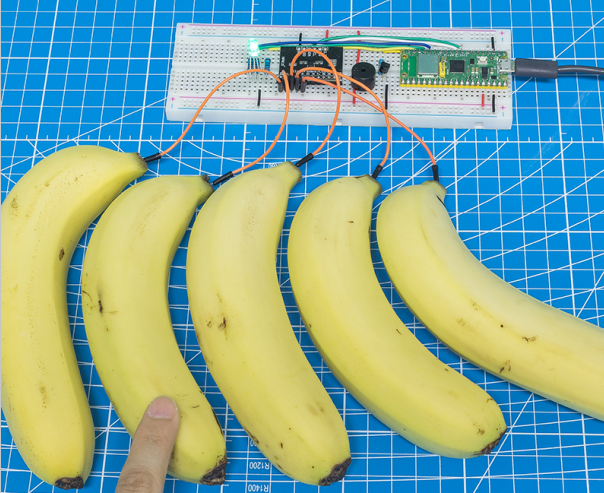
Electrical conductivity is found in many metal objects, as well as in the human body and fruits. This property can be used to create a fun little project: a fruit piano. In other words, we turn fruits into keyboards that can play music just by touching them.
Required Components
In this project, we need the following components.
It’s definitely convenient to buy a whole kit, here’s the link:
Name |
ITEMS IN THIS KIT |
LINK |
|---|---|---|
Kepler Kit |
450+ |
You can also buy them separately from the links below.
SN |
COMPONENT |
QUANTITY |
LINK |
|---|---|---|---|
1 |
1 |
||
2 |
Micro USB Cable |
1 |
|
3 |
1 |
||
4 |
Several |
||
5 |
1(S8050) |
||
6 |
4(1-1KΩ, 1-330Ω, 2-220Ω) |
||
7 |
Passive Buzzer |
1 |
|
8 |
1 |
||
9 |
1 |
Schematic
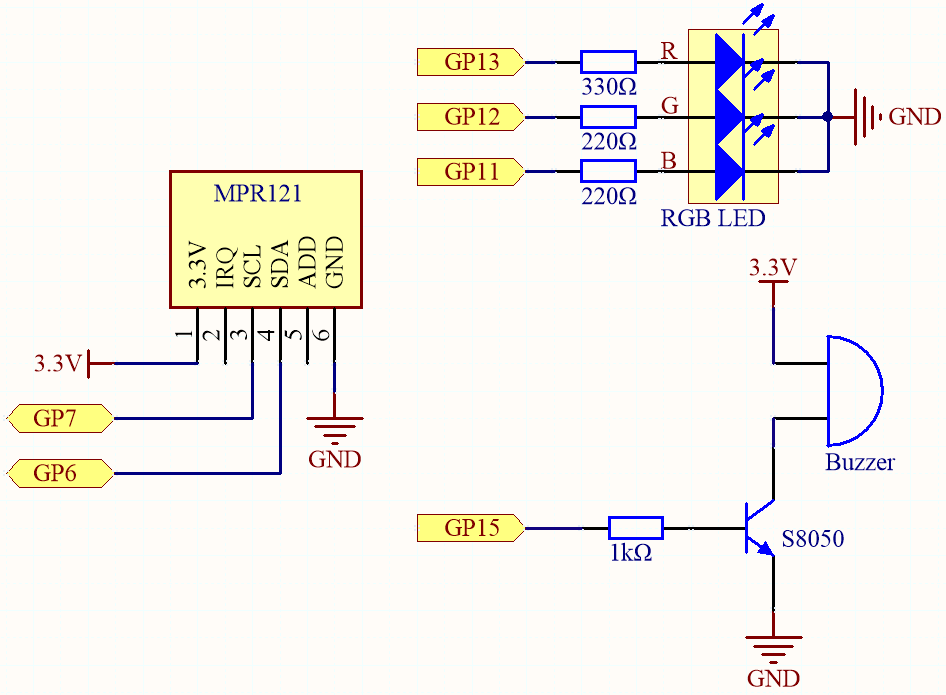
To turn the fruit into a piano key, you still need to connect the electrodes on the MPR121 to the fruit (e.g. into the banana handle).
In the beginning, MPR121 will initialize and each electrode will get a value based on the current charge; when a conductor (such as a human body) touches an electrode, the charge will shift and rebalance. As a result, the electrode’s value is different from its initial value, telling the main control board that it has been touched. During this process, ensure that the wiring of each electrode is stable so that its charge is balanced when initializing.
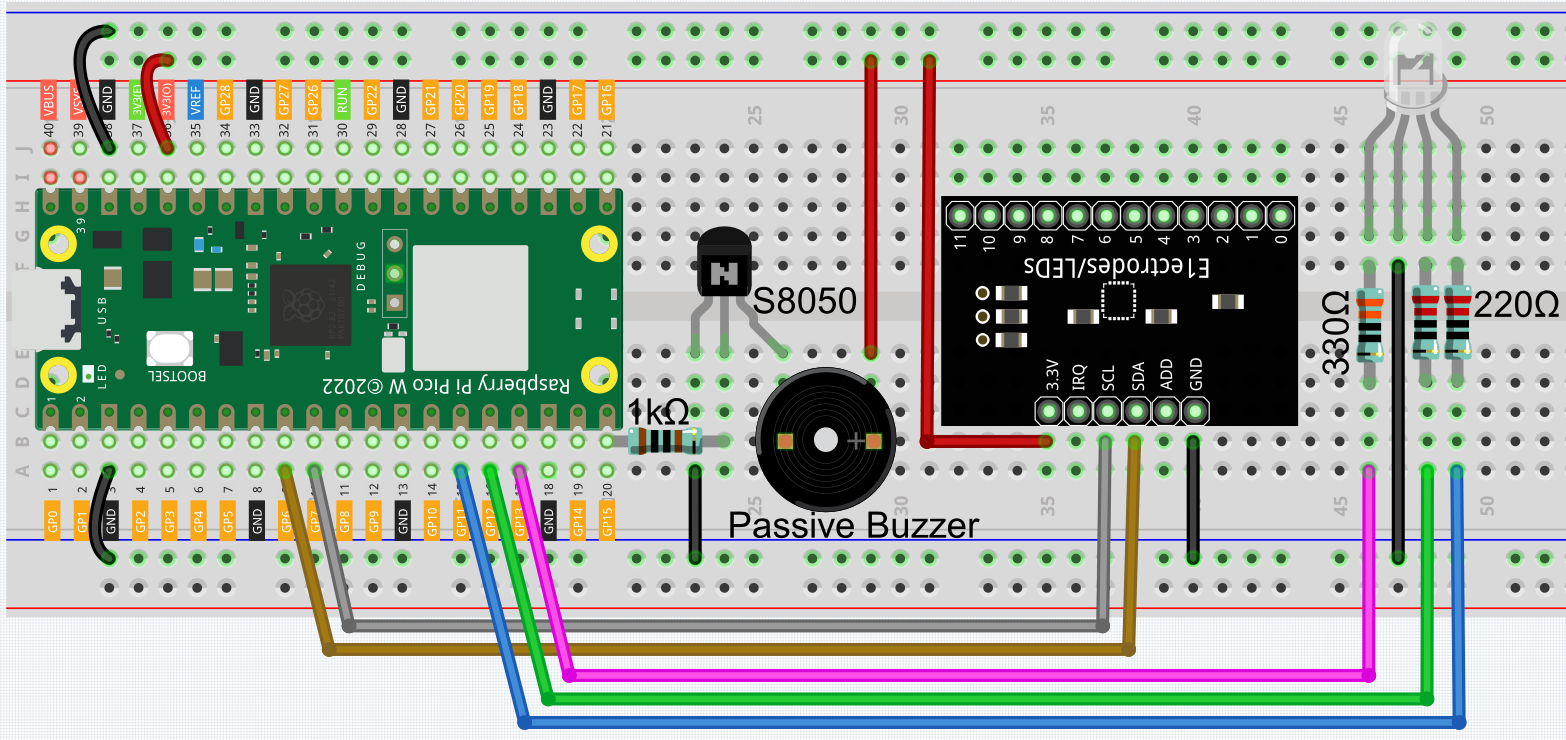
Wiring
Code
Note
Open the
7.9_fruit_piano.pyfile under the path ofkepler-kit-main/micropythonor copy this code into Thonny, then click “Run Current Script” or simply press F5 to run it.Don’t forget to click on the “MicroPython (Raspberry Pi Pico)” interpreter in the bottom right corner.
For detailed tutorials, please refer to Open and Run Code Directly.
Here you need to use the library called
mpr121.py, please check if it has been uploaded to Pico W, for a detailed tutorial refer to 1.4 Upload the Libraries to Pico.
from mpr121 import MPR121
from machine import Pin, I2C
import time
import urandom

# Initialize I2C connection for MPR121 capacitive touch sensor
i2c = I2C(1, sda=Pin(6), scl=Pin(7))  # Set up I2C bus with SDA on pin 6 and SCL on pin 7
mpr = MPR121(i2c)  # Create an instance of the MPR121 touch sensor

# Buzzer notes frequencies (in Hertz) for different musical notes
NOTE_A3 = 220
NOTE_B3 = 247
NOTE_C4 = 262
NOTE_D4 = 294
NOTE_E4 = 330
NOTE_F4 = 349
NOTE_G4 = 392
NOTE_A4 = 440
NOTE_B4 = 494
NOTE_C5 = 523
NOTE_D5 = 587
NOTE_E5 = 659

# Initialize PWM for buzzer on pin 15
buzzer = machine.PWM(machine.Pin(15))

# List of note frequencies to be played by the buzzer
note = [NOTE_A3, NOTE_B3, NOTE_C4, NOTE_D4, NOTE_E4, NOTE_F4, NOTE_G4, NOTE_A4, NOTE_B4, NOTE_C5, NOTE_D5, NOTE_E5]

# Function to play a tone on the buzzer at a specified frequency
def tone(pin, frequency):
    pin.freq(frequency)  # Set buzzer frequency
    pin.duty_u16(30000)  # Set duty cycle to 50% (approx)

# Function to stop playing the tone (mute the buzzer)
def noTone(pin):
    pin.duty_u16(0)  # Set duty cycle to 0% (mute)

# RGB LED initialization using PWM on pins 13, 12, and 11 (for red, green, blue)
red = machine.PWM(machine.Pin(13))
green = machine.PWM(machine.Pin(12))
blue = machine.PWM(machine.Pin(11))

# Set the PWM frequency for each color (1kHz)
red.freq(1000)
green.freq(1000)
blue.freq(1000)

# Function to map a value `x` from one range to another
def interval_mapping(x, in_min, in_max, out_min, out_max):
    return (x - in_min) * (out_max - out_min) / (in_max - in_min) + out_min

# Function to randomly light up the RGB LED with random color values
def lightup():
    red.duty_u16(int(urandom.uniform(0, 65535)))  # Set random intensity for red
    green.duty_u16(int(urandom.uniform(0, 65535)))  # Set random intensity for green
    blue.duty_u16(int(urandom.uniform(0, 65535)))  # Set random intensity for blue

# Function to turn off all RGB LED colors (set all to 0)
def dark():
    red.duty_u16(0)  # Turn off red LED
    green.duty_u16(0)  # Turn off green LED
    blue.duty_u16(0)  # Turn off blue LED

# Main project loop
lastState = mpr.get_all_states()  # Get initial state of all touch inputs
touchMills = time.ticks_ms()  # Record the time of the last touch event
beat = 500  # Set the duration of sound and light effect (500ms)

# Main loop to handle touch detection and effects
while True:
    currentState = mpr.get_all_states()  # Get current state of all touch inputs

    # Check if there's a change in the touch input state (touch started or ended)
    if currentState != lastState:
        for i in range(12):  # Iterate over 12 possible touch inputs
            # Check if a touch has started (touched in current state but not in the last state)
            if i in list(currentState) and not i in list(lastState):
                tone(buzzer, note[i])  # Play corresponding note for the touched input
                lightup()  # Light up the RGB LED with random colors
                touchMills = time.ticks_ms()  # Record the time of the touch event

    # Check if the beat duration has passed or if no touch inputs are active
    if time.ticks_diff(time.ticks_ms(), touchMills) >= beat or len(currentState) == 0:
        noTone(buzzer)  # Stop playing the buzzer
        dark()  # Turn off the RGB LED

    # Update the last state to the current state for the next iteration
    lastState = currentState
Please do not touch the fruit before the program runs to avoid getting a non-correct reference during initialization. After the program runs, touch the fruit gently, the buzzer will sound the corresponding tone and the RGB light will flash once randomly.