Distance Display 1.0
Note
🌟 Welcome to the SunFounder Facebook Community! Whether you’re into Raspberry Pi, Arduino, or ESP32, you’ll find inspiration, help ideas here.
✅ Be the first to get free learning resources.
✅ Stay updated on new products & exclusive giveaways.
✅ Share your creations and get real feedback.
Kit purchase
Looking for parts? Check out our all-in-one kits below — packed with components, beginner-friendly guides, and tons of fun.

Name |
Includes ESP32 board |
PURCHASE LINK |
|---|---|---|
ESP32 Ultimate Starter Kit |
ESP32 WROOM 32E + |
|
Universal Maker Sensor Kit |
Course Introduction
In this project, we use an ultrasonic sensor and three groups of LEDs (green, yellow, red) to simulate a radar-style proximity alert system with the ESP32 board.
The system measures the distance to an object and activates different LED groups based on how close the object is: green LEDs indicate a safe distance (≤15 cm), yellow LEDs warn that the object is getting closer (≤10 cm), and red LEDs signal a critical proximity alert (≤5 cm). The LEDs turn on from left to right and turn off from right to left to enhance the visual effect.
Note
If this is your first time working with an ESP32 project, we recommend downloading and reviewing the basic materials first.
Required Components
In this project, we need the following components:
SN |
COMPONENT INTRODUCTION |
QUANTITY |
PURCHASE LINK |
|---|---|---|---|
1 |
ESP-WROOM-32 ESP32 ESP-32S Development Board |
1 |
|
2 |
USB Type-C cable |
1 |
|
3 |
Breadboard |
1 |
|
4 |
Wires |
Several |
|
5 |
1kΩ resistor |
several |
|
6 |
Ultrasonic Sensor Module |
1 |
|
7 |
LED |
several |
Wiring
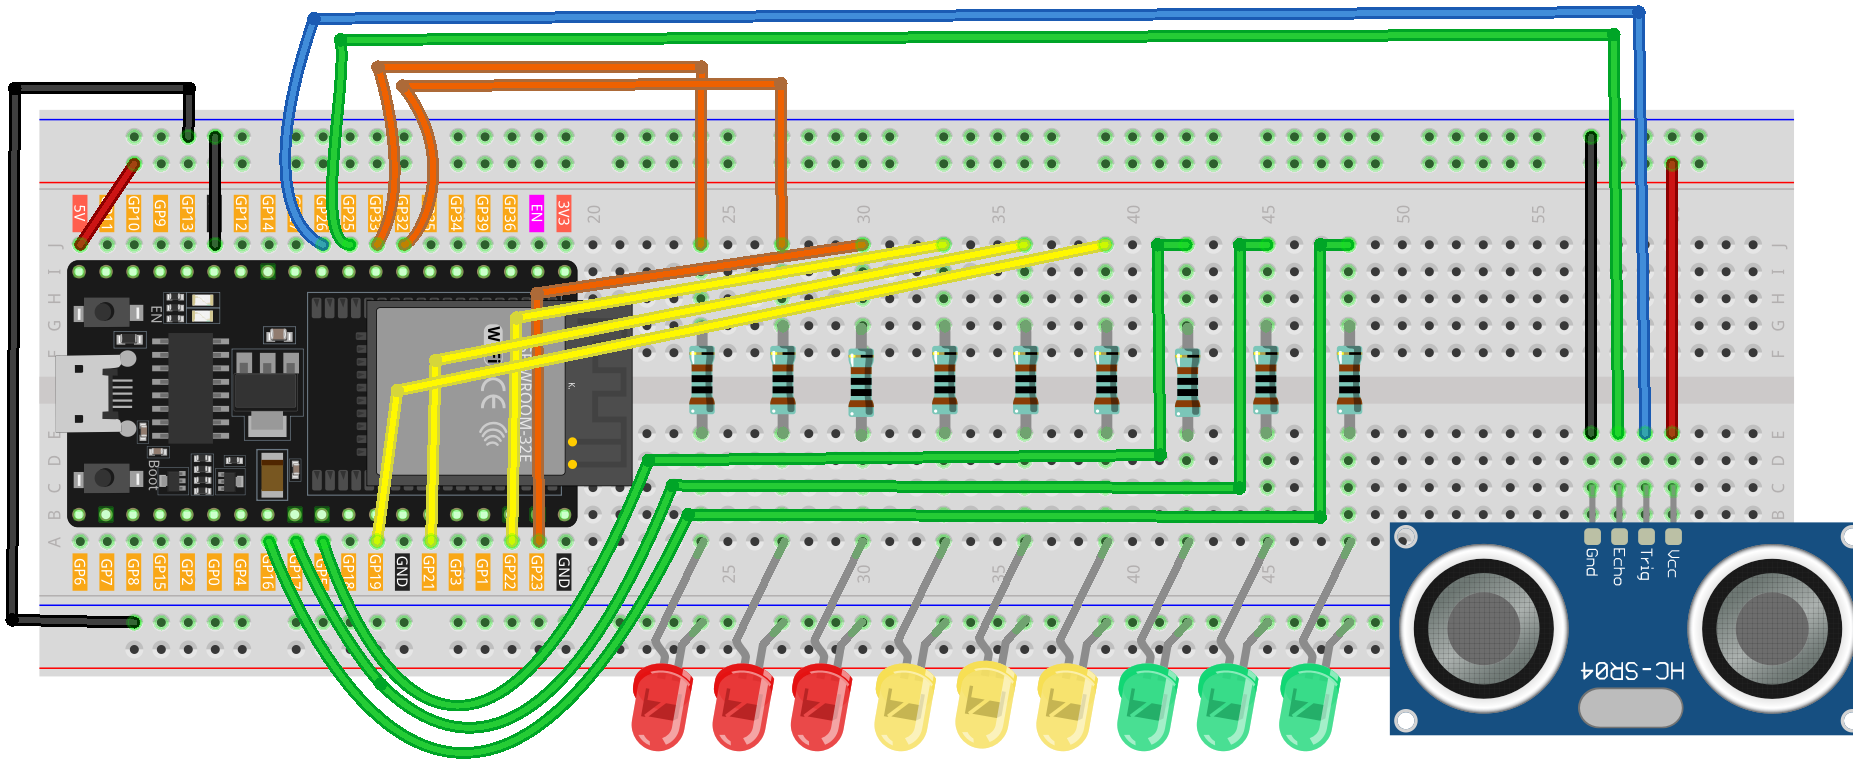
Common Connections:
LED
Connect the red LEDs cathode to the negative power bus on the breadboard, and the LEDs anode to a 1kΩ resistor then to GPIO33 , GPIO32 , GPIO23 on the ESP32.
Connect the yellow LEDs cathode to the negative power bus on the breadboard, and the LEDs anode to a 1kΩ resistor then to GPIO22 , GPIO21 , GPIO19 on the ESP32.
Connect the green LEDs cathode to the negative power bus on the breadboard, and the LEDs anode to a 1kΩ resistor then to GPIO16 , GPIO17 , GPIO18 on the ESP32.
Ultrasonic Sensor Module
Trig: Connect to GPIO26 on the ESP32.
Echo: Connect to GPIO25 on the ESP32.
GND: Connect to breadboard’s negative power bus.
VCC: Connect to breadboard’s red power bus.
Writing the Code
Note
You can copy this code into Arduino IDE.
Don’t forget to select the board(ESP32 Dev Module) and the correct port before clicking the Upload button.
// ESP32 version: Ultrasonic distance → 3 LED bars (green/yellow/red)

#include <Arduino.h>

// --- Ultrasonic sensor pins (ESP32) ---
const int trigPin = 26;   // TRIG (3.3V logic OK)
const int echoPin = 25;   // ECHO (MUST be level-shifted down to 3.3V)

// --- Three LED groups from left to right (ESP32 safe GPIOs) ---
// Use a series resistor (220–330 Ω) for each LED
const int greenLEDs[]  = {16, 17, 18};   // Green LEDs = safe distance
const int yellowLEDs[] = {19, 21, 22};   // Yellow LEDs = getting closer
const int redLEDs[]    = {23, 32, 33};   // Red LEDs = very close

// Flags to track if each LED group is on
bool greenOn  = false;
bool yellowOn = false;
bool redOn    = false;

void turnOnLEDs(const int ledArray[]);
void turnOffLEDsReverse(const int ledArray[]);
float readSensorData();

void setup() {
  Serial.begin(115200);

  pinMode(trigPin, OUTPUT);
  pinMode(echoPin, INPUT); // echo is 3.3V *after* level shifting (see wiring)

  // Set all LED pins as outputs and turn them off
  for (int i = 0; i < 3; i++) {
    pinMode(greenLEDs[i], OUTPUT);  digitalWrite(greenLEDs[i], LOW);
    pinMode(yellowLEDs[i], OUTPUT); digitalWrite(yellowLEDs[i], LOW);
    pinMode(redLEDs[i], OUTPUT);    digitalWrite(redLEDs[i], LOW);
  }

  Serial.println("Ultrasonic sensor (ESP32):");
}

void loop() {
  float distance = readSensorData();  // distance in cm
  Serial.print(distance, 1);
  Serial.println(" cm");

  if (distance <= 15) {
    // ≤15 cm: turn on green bar
    if (!greenOn) {
      turnOnLEDs(greenLEDs);
      greenOn = true;
    }

    if (distance <= 10) {
      // ≤10 cm: turn on yellow bar
      if (!yellowOn) {
        turnOnLEDs(yellowLEDs);
        yellowOn = true;
      }

      if (distance <= 5) {
        // ≤5 cm: turn on red bar
        if (!redOn) {
          turnOnLEDs(redLEDs);
          redOn = true;
        }
      } else {
        // >5 cm: turn off red bar (right-to-left)
        if (redOn) {
          turnOffLEDsReverse(redLEDs);
          redOn = false;
        }
      }

    } else {
      // >10 cm: turn off yellow bar
      if (yellowOn) {
        turnOffLEDsReverse(yellowLEDs);
        yellowOn = false;
      }
    }

  } else {
    // >15 cm: turn everything off (right-to-left for effect)
    if (redOn)    { turnOffLEDsReverse(redLEDs);    redOn = false; }
    if (yellowOn) { turnOffLEDsReverse(yellowLEDs); yellowOn = false; }
    if (greenOn)  { turnOffLEDsReverse(greenLEDs);  greenOn = false; }
  }

  delay(50);
}

// Measure distance using ultrasonic sensor (HC-SR04 style)
float readSensorData() {
  digitalWrite(trigPin, LOW);
  delayMicroseconds(2);

  digitalWrite(trigPin, HIGH);
  delayMicroseconds(10);

  digitalWrite(trigPin, LOW);

  // Timeout ~30ms to avoid blocking too long
  unsigned long duration = pulseIn(echoPin, HIGH, 30000UL);

  // If timed out, return a large value
  if (duration == 0) return 999.0;

  // Convert to centimeters
  return duration / 58.0f;
}

// Turn on LEDs from left to right
void turnOnLEDs(const int ledArray[]) {
  for (int i = 0; i < 3; i++) {
    if (digitalRead(ledArray[i]) == LOW) {
      digitalWrite(ledArray[i], HIGH);
      delay(60);
    }
  }
}

// Turn off LEDs from right to left
void turnOffLEDsReverse(const int ledArray[]) {
  for (int i = 2; i >= 0; i--) {
    if (digitalRead(ledArray[i]) == HIGH) {
      digitalWrite(ledArray[i], LOW);
      delay(60);
    }
  }
}