Note
Hello, welcome to the SunFounder Raspberry Pi & Arduino & ESP32 Enthusiasts Community on Facebook! Dive deeper into Raspberry Pi, Arduino, and ESP32 with fellow enthusiasts.
Why Join?
Expert Support: Solve post-sale issues and technical challenges with help from our community and team.
Learn & Share: Exchange tips and tutorials to enhance your skills.
Exclusive Previews: Get early access to new product announcements and sneak peeks.
Special Discounts: Enjoy exclusive discounts on our newest products.
Festive Promotions and Giveaways: Take part in giveaways and holiday promotions.
👉 Ready to explore and create with us? Click [here] and join today!
3.7 - Swinging Servo
In this kit, in addition to LED and passive buzzer, there is also a device controlled by PWM signal, Servo.
Servo is a position (angle) servo device, which is suitable for those control systems that require constant angle changes and can be maintained. It has been widely used in high-end remote control toys, such as airplanes, submarine models, and remote control robots.
Now, try to make the servo sway!
Required Components
In this project, we need the following components.
It’s definitely convenient to buy a whole kit, here’s the link:
Name |
ITEMS IN THIS KIT |
PURCHASE LINK |
|---|---|---|
Kepler Kit |
450+ |
You can also buy them separately from the links below.
SN |
COMPONENT INTRODUCTION |
QUANTITY |
PURCHASE LINK |
|---|---|---|---|
1 |
1 |
||
2 |
Micro USB Cable |
1 |
|
3 |
1 |
||
4 |
Several |
||
5 |
1 |
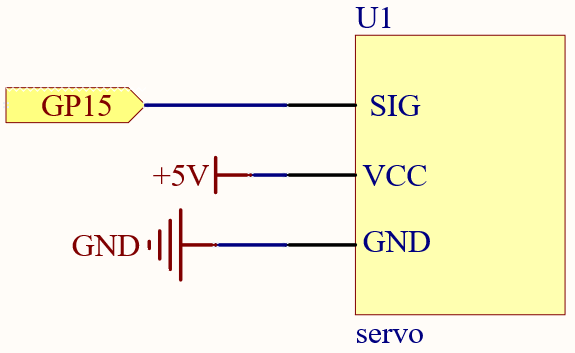
Schematic
Wiring
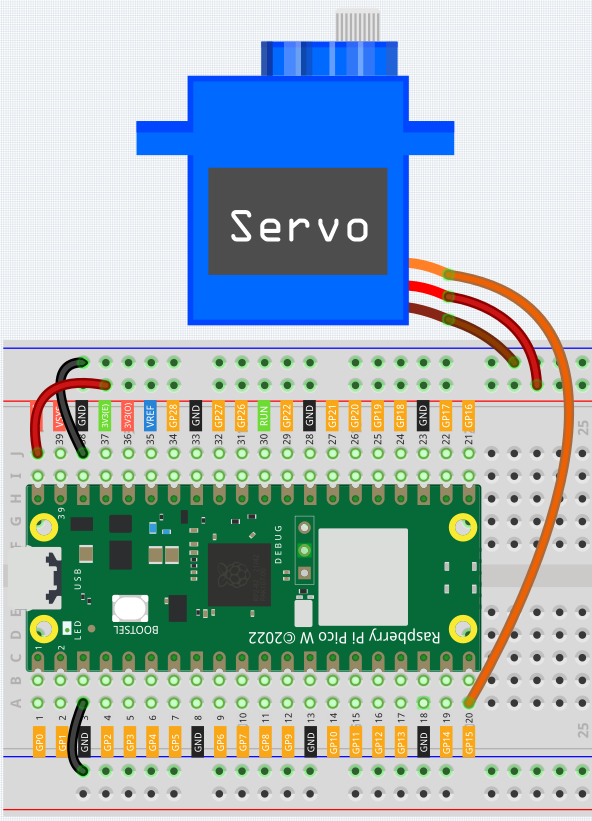
Orange wire is signal and connected to GP15.
Red wire is VCC and connected to VBUS(5V).
Brown wire is GND and connected to GND.
Code
Note
You can open the file
3.7_swinging_servo.inounder the path ofkepler-kit-main/arduino/3.7_swinging_servo.Or copy this code into Arduino IDE.
Don’t forget to select the board(Raspberry Pi Pico) and the correct port before clicking the Upload button.
When the program is running, we can see the Servo Arm swinging back and forth from 0° to 180°.
How it works?
By calling the library Servo.h, you can drive the servo easily.
#include <Servo.h>
Library Functions
Servo
Create Servo object to control a servo.
uint8_t attach(int pin);
Turn a pin into a servo driver. Calls pinMode. Returns 0 on failure.
void detach();
Release a pin from servo driving.
void write(int value);
Set the angle of the servo in degrees, 0 to 180.
int read();
Return that value set with the last write().
bool attached();
Return 1 if the servo is currently attached.