Note
Hello, welcome to the SunFounder Raspberry Pi & Arduino & ESP32 Enthusiasts Community on Facebook! Dive deeper into Raspberry Pi, Arduino, and ESP32 with fellow enthusiasts.
Why Join?
Expert Support: Solve post-sale issues and technical challenges with help from our community and team.
Learn & Share: Exchange tips and tutorials to enhance your skills.
Exclusive Previews: Get early access to new product announcements and sneak peeks.
Special Discounts: Enjoy exclusive discounts on our newest products.
Festive Promotions and Giveaways: Take part in giveaways and holiday promotions.
👉 Ready to explore and create with us? Click [here] and join today!
5.3 - Time Counter
4-Digit 7-segment display consists of four 7- segment displays working together.
The 4-digtal 7-segment display works independently. It uses the principle of human visual persistence to quickly display the characters of each 7-segment in a loop to form continuous strings.
For example, when “1234” is displayed on the display, “1” is displayed on the first 7-segment, and “234” is not displayed. After a period of time, the second 7-segment shows “2”, the 1st 3th 4th of 7-segment does not show, and so on, the four digital display show in turn. This process is very short (typically 5ms), and because of the optical afterglow effect and the principle of visual residue, we can see four characters at the same time.
Required Components
In this project, we need the following components.
It’s definitely convenient to buy a whole kit, here’s the link:
Name |
ITEMS IN THIS KIT |
PURCHASE LINK |
|---|---|---|
Kepler Kit |
450+ |
You can also buy them separately from the links below.
SN |
COMPONENT INTRODUCTION |
QUANTITY |
PURCHASE LINK |
|---|---|---|---|
1 |
1 |
||
2 |
Micro USB Cable |
1 |
|
3 |
1 |
||
4 |
Several |
||
5 |
4(220Ω) |
||
6 |
1 |
||
7 |
1 |
Schematic
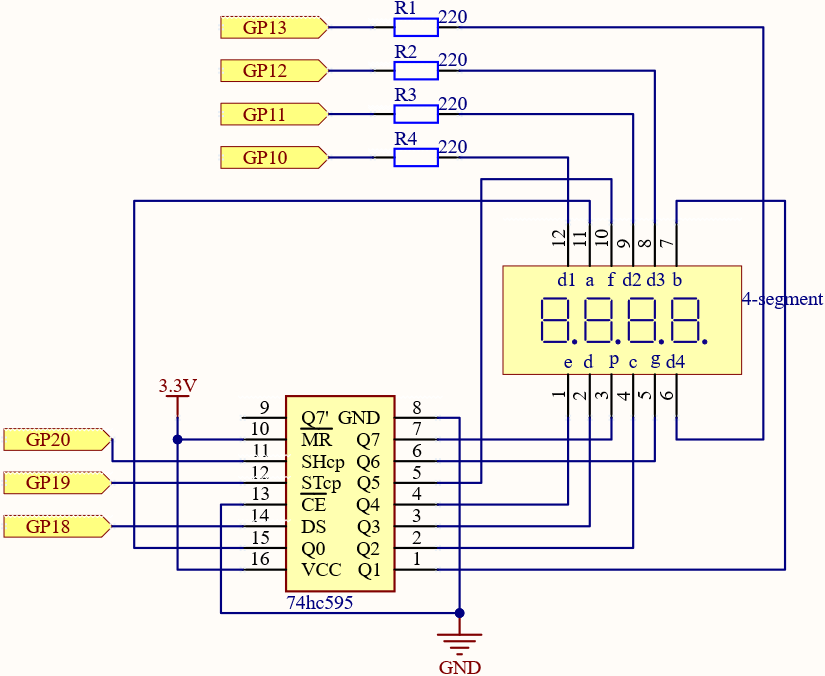
Here the wiring principle is basically the same as 5.1 - Microchip - 74HC595, the only difference is that Q0-Q7 are connected to the a ~ g pins of the 4-digit 7-segment display.
Then G10 ~ G13 will select which 7-segment display to work.
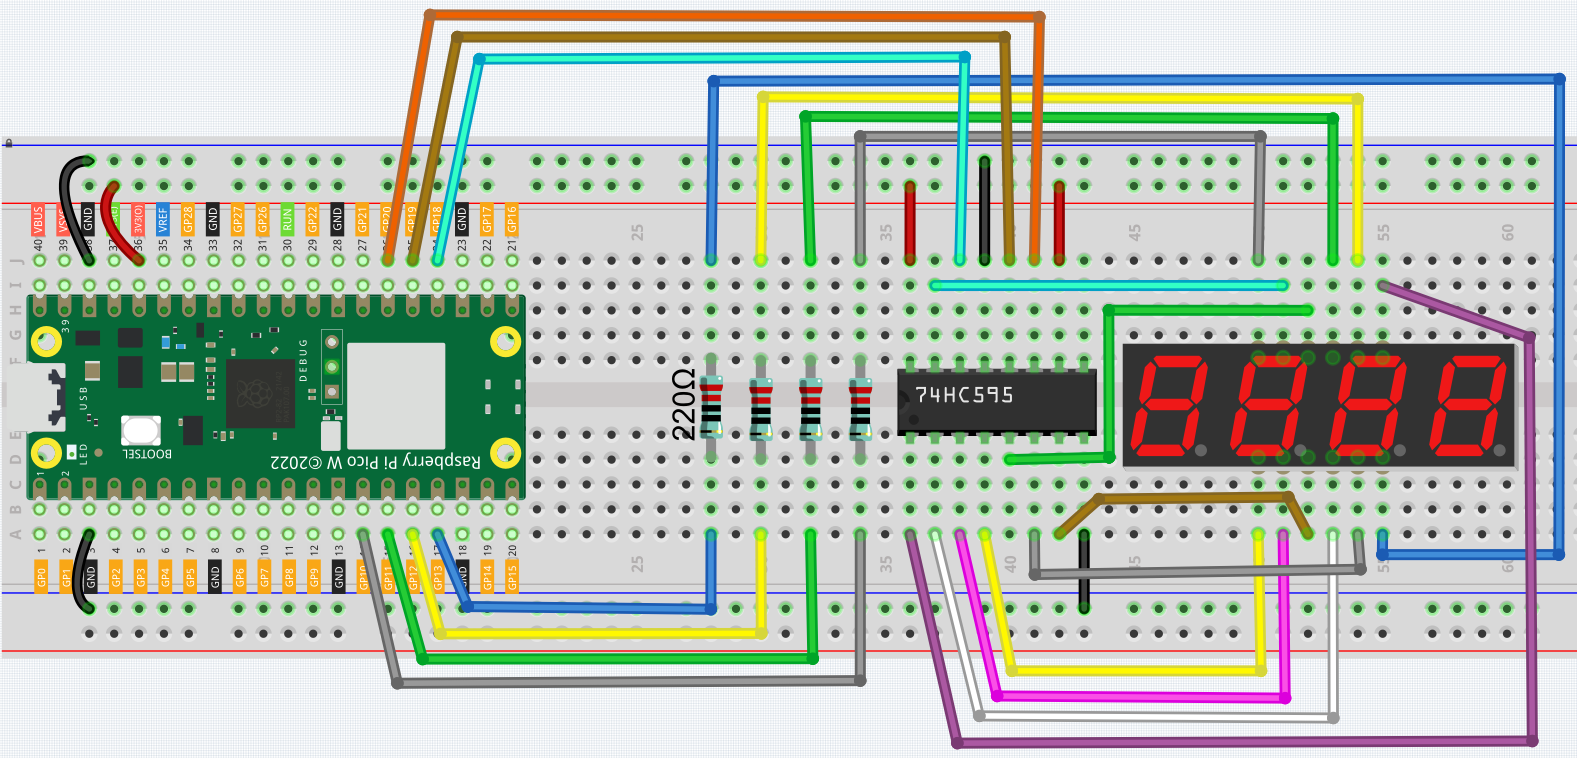
Wiring
Code
Note
You can open the file
5.3_time_counter.inounder the path ofkepler-kit-main/arduino/5.3_time_counter.Or copy this code into Arduino IDE.
Don’t forget to select the board(Raspberry Pi Pico) and the correct port before clicking the Upload button.
After the program is run, you will see the 4-digit 7-segment display become a counter and the number increases by 1 per second.
How it works?
Writing signals to each 7-segment display is done in the same way as 5.2 - Number Display, using the hc595_shift() function.
The core point of the 4-digit 7-segment display is to selectively activate each 7-segment display. The code associated with this is as follows.
const int placePin[4] = {13,12,11,10};

void setup ()
{
    for (int i = 0; i<4;i++){
        pinMode(placePin[i],OUTPUT);
    }
}

void loop()
{
    pickDigit(0);
    hc595_shift(count%10/1);

    pickDigit(1);
    hc595_shift(count%100/10);

    pickDigit(2);
    hc595_shift(count%1000/100);

    pickDigit(3);
    hc595_shift(count%10000/1000);
}

void pickDigit(int digit){
    for(int i = 0; i < 4; i++){
        digitalWrite(placePin[i],HIGH);
    }
    digitalWrite(placePin[digit],LOW);
}
Here, four pins (GP10, GP11, GP12, GP13) are used to control each bit of the 4-digit 7-segment display individually.
When the status of these pins is LOW, the corresponding 7-segment display is active; when the status is HIGH, the 7-segment display does not work.
Here the pickDigit(digit) function is used to unable all 7-segment displays and then enable a particular digit individually.
After that, hc595_shift() is used to write the corresponding 8 bits code for the 7-segment display.
The 4-digit 7-segment display needs to be continuously activated in turn so that we can see it display four digits, which means that the main program cannot easily add code that would affect the timing.
However, we need to add a timing function to this example, if we add a delay (1000), we will be able to detect the illusion of its four 7-segment displays working at the same time, exposing the fact that only one 7-segment display at a time to light.
Then, using the millis() function is an excellent way to do this.
void setup ()
{
    timerStart = millis();
}

void loop()
{
    unsigned int count = (millis()-timerStart)/1000;
}
The millis() function gets the number of milliseconds that have passed since the current program was started. We record the first time value as timerStart;
then when we need to get the time again, we call the millis() function again and subtract timerStart from the value to get how long the program has been running.
Finally, convert this time value and let the 4-digit 7-segment display to display it.