Note
Hello, welcome to the SunFounder Raspberry Pi & Arduino & ESP32 Enthusiasts Community on Facebook! Dive deeper into Raspberry Pi, Arduino, and ESP32 with fellow enthusiasts.
Why Join?
Expert Support: Solve post-sale issues and technical challenges with help from our community and team.
Learn & Share: Exchange tips and tutorials to enhance your skills.
Exclusive Previews: Get early access to new product announcements and sneak peeks.
Special Discounts: Enjoy exclusive discounts on our newest products.
Festive Promotions and Giveaways: Take part in giveaways and holiday promotions.
👉 Ready to explore and create with us? Click [here] and join today!
6.5 - Radio Frequency Identification
Radio Frequency Identification (RFID) refers to technologies that involve using wireless communication between an object (or tag) and an interrogating device (or reader) to automatically track and identify such objects. The tag transmission range is limited to several meters from the reader. A clear line of sight between the reader and tag is not necessarily required.
Most tags contain at least one integrated circuit (IC) and an antenna. The microchip stores information and is responsible for managing the radio frequency (RF) communication with the reader. Passive tags do not have an independent energy source and depend on an external electromagnetic signal, provided by the reader, to power their operations. Active tags contain an independent energy source, such as a battery. Thus, they may have increased processing, transmission capabilities and range.
Required Components
In this project, we need the following components.
It’s definitely convenient to buy a whole kit, here’s the link:
Name |
ITEMS IN THIS KIT |
PURCHASE LINK |
|---|---|---|
Kepler Kit |
450+ |
You can also buy them separately from the links below.
SN |
COMPONENT INTRODUCTION |
QUANTITY |
PURCHASE LINK |
|---|---|---|---|
1 |
1 |
||
2 |
Micro USB Cable |
1 |
|
3 |
1 |
||
4 |
Several |
||
5 |
1 |
Schematic
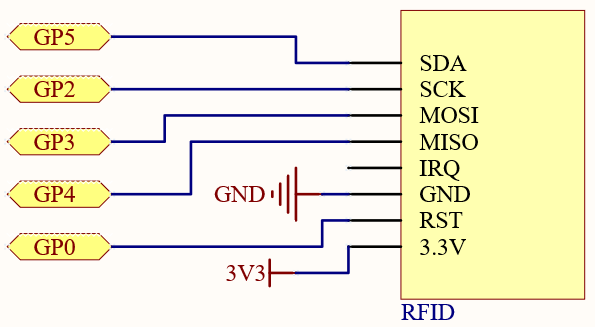
Wiring

Code
Note
The
MFRC522library is used here, you can install it from the Library Manager.
The main function is divided into two:
6.5_rfid_writeto write information to the card (or key).After running you will be able to enter message in the serial monitor, ending with
#, and then write the message to the card by placing the card (or key) close to the MFRC522 module.6.5_rfid_readto read the information from the card (or key).After running, you will be able to read the message stored in the card (or key).
How it works?
#include <MFRC522.h>

#define RST_PIN         9
#define SS_PIN          17

MFRC522 mfrc522(SS_PIN, RST_PIN);
First, instantiate MFRC522() class.
For simplicity of use, the MFRC522 library is further encapsulated with the following functions.
void simple_mfrc522_init(): Starts SPI communication and initializes the mfrc522 module.void simple_mfrc522_get_card(): Suspends the program until the card (or key) is detected, prints the card UID and PICC type.void simple_mfrc522_write(String text): Write a string for the card (or key).void simple_mfrc522_write(byte* buffer): Writes information for the card (or key), which usually comes from the serial port.void simple_mfrc522_write(byte section, String text): Writes a string for a specific sector.sectionis set to 0 to write sectors 1-2;sectionis set to 1 to write sectors 3-4.void simple_mfrc522_write(byte section, byte* buffer): Writes information for a specific sector, usually from the serial port.sectionset to 0, writes 1-2 sectors;sectionset to 1, writes 3-4 sectors.String simple_mfrc522_read(): Reads the information in the card (or key), returns a string.String simple_mfrc522_read(byte section): Reads the information in a specific sector, returns a string.sectionis set to 0, writes 1-2 sectors;sectionis set to 1, writes 3-4 sectors.
In the 6.5_rfid_write.ino example, the Serial.readBytesUntil() function is used, which is a common serial input method.