4.3 - Electrode Keyboard
The MPR121 is a good choice when you want to add a large number of touch switches to your project. It has electrodes that can be extended with conductors. If you connect the electrodes to a banana, you can turn the banana into a touch switch.
Required Components
In this project, we need the following components.
It’s definitely convenient to buy a whole kit, here’s the link:
Name |
ITEMS IN THIS KIT |
PURCHASE LINK |
|---|---|---|
Kepler Kit |
450+ |
You can also buy them separately from the links below.
SN |
COMPONENT INTRODUCTION |
QUANTITY |
PURCHASE LINK |
|---|---|---|---|
1 |
1 |
||
2 |
Micro USB Cable |
1 |
|
3 |
1 |
||
4 |
Several |
||
5 |
1 |
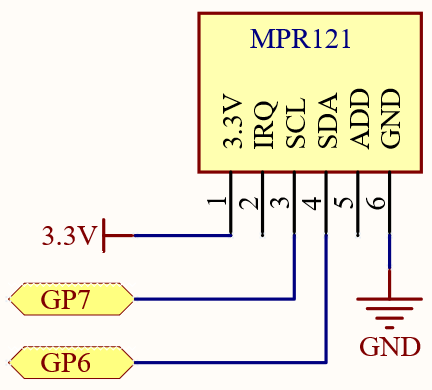
Schematic

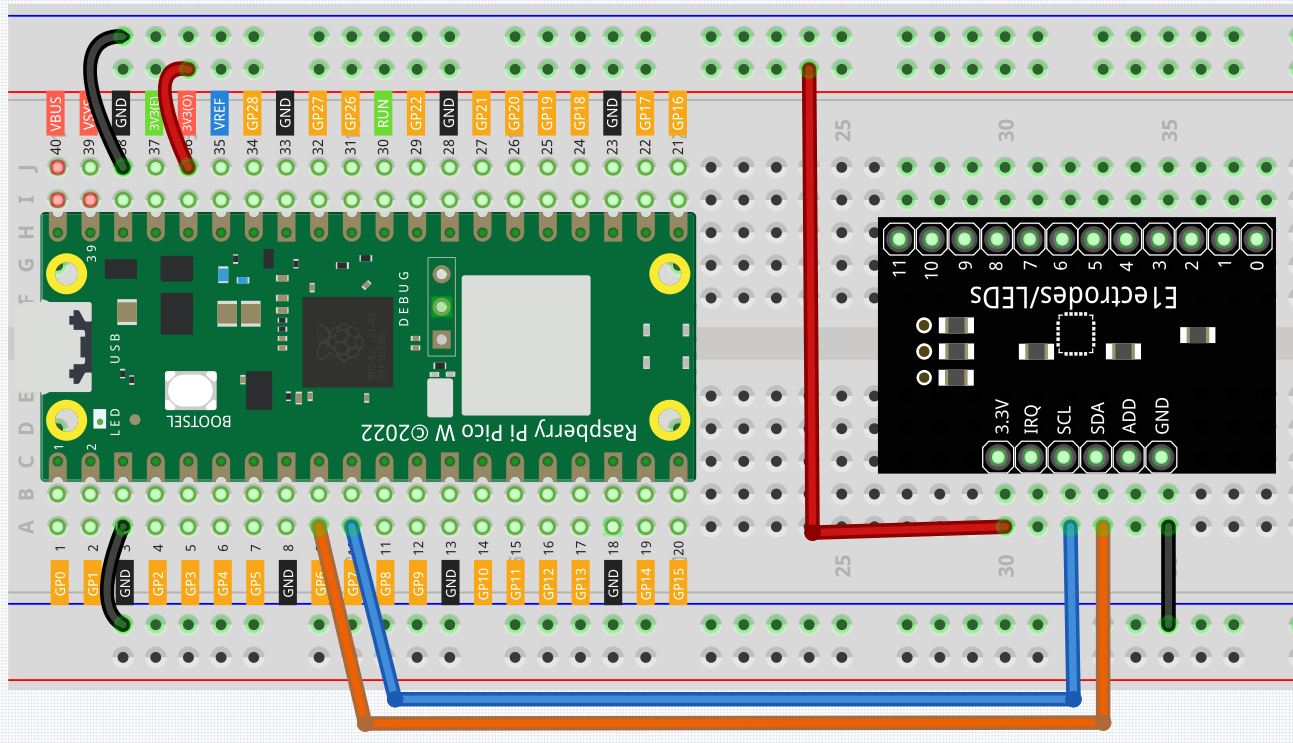
Wiring

Code
Note
You can open the file
4.3_electrode_keyboard.inounder the path ofkepler-kit-main/arduino/4.3_electrode_keyboard.Or copy this code into Arduino IDE.
Don’t forget to select the board(Raspberry Pi Pico) and the correct port before clicking the Upload button.
The two libraries
Adafruit_MPR121andAdafruit_BusIOare used here. Please refer to Add libraries for adding it to the Arduino IDE.
After the program runs, you can touch the twelve electrodes on the MPR121 module by hand and the touch status of these electrodes will be recorded in a 12-bit Boolean type array that will be printed on the serial monitor.
If the first and eleventh electrodes are touched, 100000000010 is printed.
You can extend the electrodes by connecting other conductors such as fruit, wire, foil, etc. This will give you more ways to trigger these electrodes.
How it works?
Initialize the MPR121 object. At this point the state of the module’s electrodes will be recorded as initial values.
If you extend the electrodes, you need to rerun the example to reset the initial values.
#include "Adafruit_MPR121.h"

Adafruit_MPR121 cap = Adafruit_MPR121();

void setup() {
    Serial.begin(9600);
    int check = cap.begin(0x5A);
    if (!check) {
        Serial.println("MPR121 not found, check wiring?");
        while (1);
    }
    Serial.println("MPR121 found!");
}
Gets the value of the current electrode, it will get a 12-bit binary value. If you touch the first and the eleventh electrode, it gets 100000000010.
// Get the currently touched pads
currtouched = cap.touched();
Determine if the electrode state has changed.
void loop() {
    currtouched = cap.touched();
    if (currtouched != lasttouched) {}

    // reset our state
    lasttouched = currtouched;
}
If a change in electrode state is detected, the values of currtouched are stored in the touchStates[12] array bit by bit. Finally, the array is printed.
if (currtouched != lasttouched) {
    for (int i = 0; i < 12; i++) {
        if (currtouched & (1 << i)) touchStates[i] = 1;
        else touchStates[i] = 0;
    }
    for (int i = 0; i < 12; i++){
        Serial.print(touchStates[i]);
    }
    Serial.println();
}