注釈
こんにちは、SunFounder Raspberry Pi & Arduino & ESP32 愛好者コミュニティ (Facebook) へようこそ! Raspberry Pi、Arduino、ESP32 を仲間と共にさらに深く学びましょう。
参加する理由
専門サポート: 購入後の問題や技術的課題をコミュニティとチームで解決
学びと共有: ヒントや学習資料を交換し、技術力を向上
限定プレビュー: 新製品情報や先行発表に早期アクセス
特別割引: 新製品を特別価格で購入可能
イベントと景品企画: 景品イベントや季節ごとのキャンペーンに参加
👉 一緒に探求し、ものづくりを楽しみましょう。[ここ] をクリックして参加!
4.1.7 スマート扇風機 (MCP3008)
注釈

キットのバージョンに応じて ADC0834 または MCP3008 が含まれています。 お手持ちのバージョンに対応する章をご参照ください。
概要
このプロジェクトでは、モーター、ボタン、サーミスタを使って、 手動+自動制御が可能で風速を調整できるスマート扇風機を作成します。
必要な部品
このプロジェクトで必要な部品は以下の通りです。
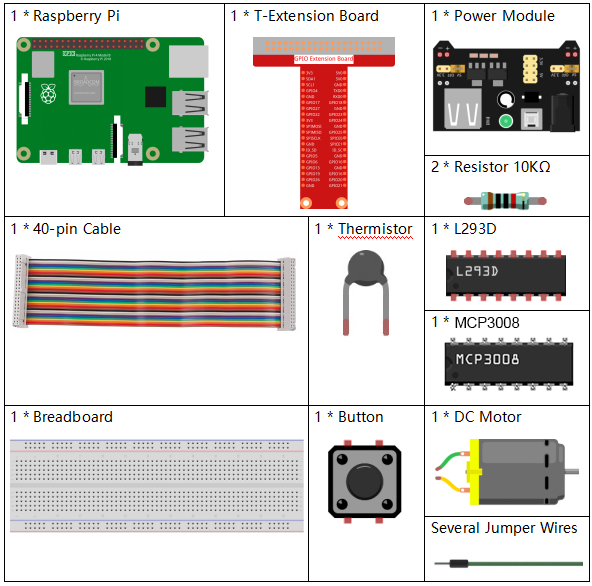
キット一式で購入すると便利です。リンクはこちら:
名称 |
キット内数量 |
リンク |
|---|---|---|
Raphael Kit |
337 |
個別に購入することもできます。以下のリンクをご参照ください。
部品紹介 |
購入リンク |
|---|---|
- |
|
- |
|
- |
|
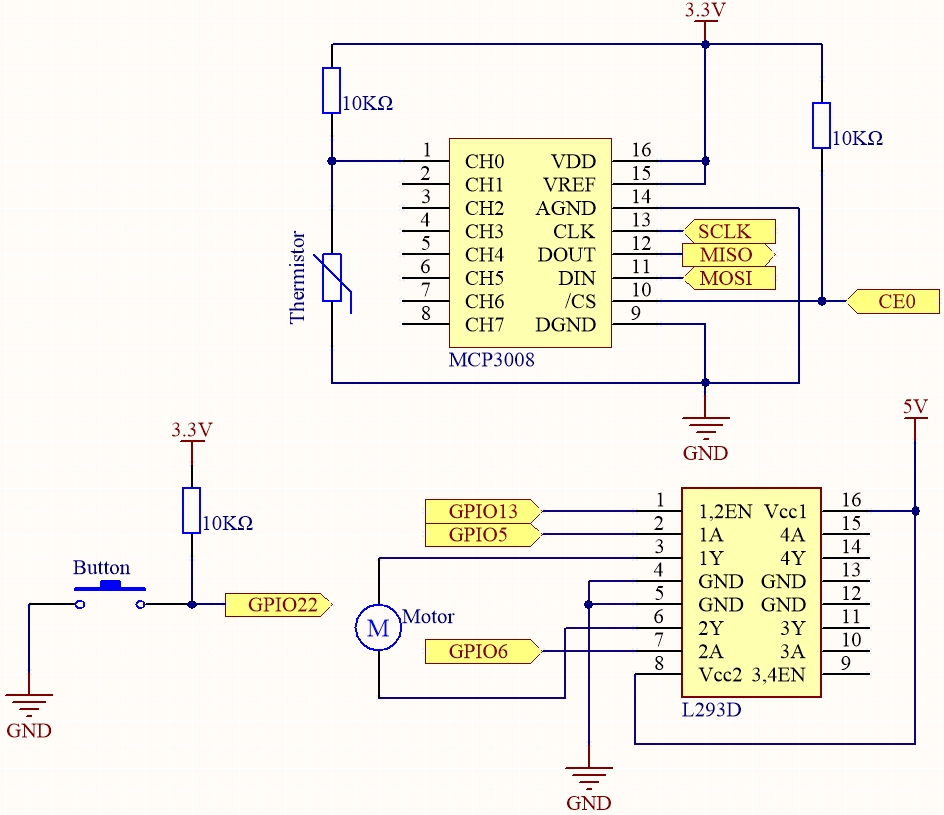
回路図
T-Board 名 |
physical |
wiringPi |
BCM |
SPICE0 |
Pin 24 |
10 |
8 |
SPIMOSI |
Pin 19 |
12 |
10 |
SPIMISO |
Pin 21 |
13 |
9 |
SPISCLK |
Pin 23 |
14 |
11 |
GPIO22 |
Pin 15 |
3 |
22 |
GPIO5 |
Pin 29 |
21 |
5 |
GPIO6 |
Pin 31 |
22 |
6 |
GPIO13 |
Pin 33 |
23 |
13 |
実験手順
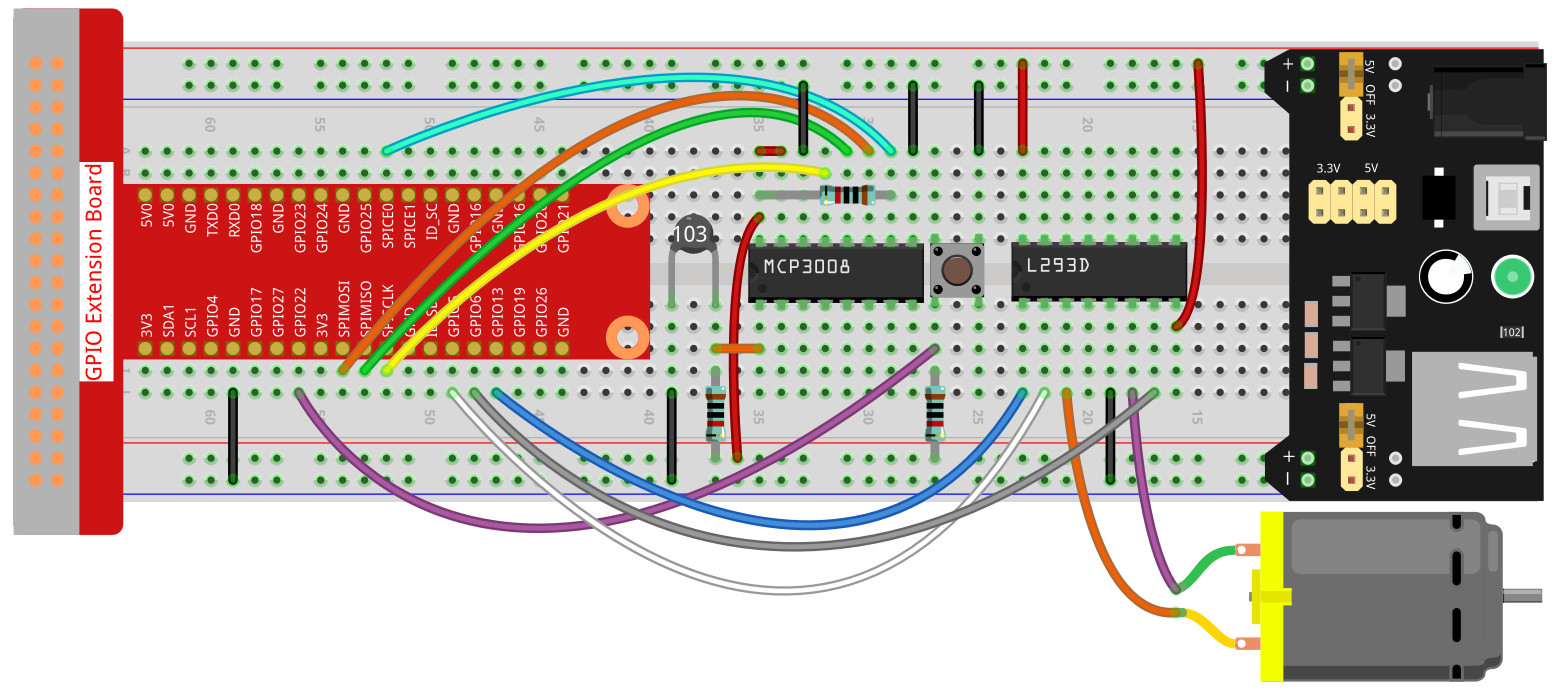
ステップ 1: 回路を組み立てます。
注釈
電源モジュールにはキット付属の9V電池を使用できます。

ステップ 2: SPIインターフェースを設定し、 spidev ライブラリをインストールします(詳細は SPI 設定 を参照)。
すでに設定済みの場合は省略可能です。
ステップ 3: コードがあるフォルダに移動します。
cd ~/raphael-kit/python-pi5
ステップ 4: 実行します。
sudo python3 4.1.10-2_SmartFan_zero.py
コードが実行されると、ボタンを押すことで扇風機が始動します。 ボタンを押すたびに風速が1段階ずつ切り替わり、0~4 の5段階があります。 4段階で再びボタンを押すと停止(風速0)に戻ります。
温度が2℃以上上下した場合、自動で1段階速くまたは遅くなります。
コード
注釈
以下のコードは 修正/リセット/コピー/実行/停止 が可能です。
その前に raphael-kit/python-pi5 のソースコードパスに移動してください。
変更後、直接実行して結果を確認できます。
#!/usr/bin/env python3

from gpiozero import Motor, Button
from time import sleep
import spidev
import math

# Initialize SPI for MCP3008
spi = spidev.SpiDev()
spi.open(0, 0)  # Bus 0, CE0 (GPIO8 / physical pin 24)
spi.max_speed_hz = 1000000  # 1 MHz

# Initialize GPIO pins for the button and motor control
BtnPin = Button(22)  # GPIO22 (physical pin 15)
motor = Motor(forward=5, backward=6, enable=13)  # GPIO5, GPIO6, GPIO13

# Initialize variables to track the motor speed level and temperatures
level = 0
currentTemp = 0
markTemp = 0

def read_adc(channel):
    """
    Reads analog value from MCP3008 channel (0–7).
    """
    if channel < 0 or channel > 7:
        return -1
    adc = spi.xfer2([1, (8 + channel) << 4, 0])
    value = ((adc[1] & 0x03) << 8) | adc[2]
    return value

def temperature():
    """
    Reads and calculates the current temperature from the sensor.
    Returns:
        float: The current temperature in Celsius.
    """
    analogVal = read_adc(0)  # Assuming thermistor connected to CH0
    Vr = 3.3 * analogVal / 1023.0  # For 3.3V system
    Rt = 10000.0 * Vr / (3.3 - Vr)
    temp = 1 / (((math.log(Rt / 10000.0)) / 3950.0) + (1 / (273.15 + 25.0)))
    Cel = temp - 273.15
    return Cel

def motor_run(level):
    """
    Adjusts the motor speed based on the specified level.
    Args:
        level (int): Desired motor speed level.
    Returns:
        int: Adjusted motor speed level.
    """
    if level == 0:
        motor.stop()
        return 0
    if level >= 4:
        level = 4
    motor.forward(speed=float(level / 4))
    return level

def changeLevel():
    """
    Changes the motor speed level when the button is pressed and updates the reference temperature.
    """
    global level, currentTemp, markTemp
    print("Button pressed")
    level = (level + 1) % 5
    markTemp = currentTemp

# Bind the button press event to changeLevel function
BtnPin.when_pressed = changeLevel

def main():
    """
    Main function to continuously monitor and respond to temperature changes.
    """
    global level, currentTemp, markTemp
    markTemp = temperature()
    while True:
        currentTemp = temperature()
        if level != 0:
            if currentTemp - markTemp <= -2:
                level -= 1
                markTemp = currentTemp
            elif currentTemp - markTemp >= 2:
                if level < 4:
                    level += 1
                markTemp = currentTemp
        level = motor_run(level)
        sleep(0.2)

# Run the main function and handle KeyboardInterrupt
try:
    main()
except KeyboardInterrupt:
    motor.stop()
    spi.close()
コード解説
モーターとボタン制御、MCP3008とのSPI通信、数学計算用ライブラリを読み込みます。
gpiozeroはGPIO制御、spidevはSPI通信、mathは抵抗値から温度計算に利用します。#!/usr/bin/env python3 from gpiozero import Motor, Button from time import sleep import spidev import math
SPI通信をバス0、デバイス0 (CE0) で初期化し、MCP3008と接続します。
# Initialize SPI for MCP3008
spi = spidev.SpiDev()
spi.open(0, 0)  # Bus 0, CE0 (GPIO8 / physical pin 24)
spi.max_speed_hz = 1000000  # 1 MHz
GPIO22をボタン入力に設定し、GPIO5(正転)、GPIO6(逆転)、GPIO13(有効化)でモーターを構成します。 また、風速レベルや温度計測用の変数を用意します。
# Initialize GPIO pins for the button and motor control
BtnPin = Button(22)  # GPIO22 (physical pin 15)
motor = Motor(forward=5, backward=6, enable=13)  # GPIO5, GPIO6, GPIO13

# Initialize variables to track the motor speed level and temperatures
level = 0
currentTemp = 0
markTemp = 0
read_adc()関数でMCP3008の指定チャンネル(0〜7)からアナログ値(10ビット: 0〜1023)を取得します。def read_adc(channel): """ Reads analog value from MCP3008 channel (0–7). """ if channel < 0 or channel > 7: return -1 adc = spi.xfer2([1, (8 + channel) << 4, 0]) value = ((adc[1] & 0x03) << 8) | adc[2] return value
temperature()関数でサーミスタの温度を読み取ります。 電圧→抵抗→温度(摂氏)に変換し、スティンハート・ハート式近似で計算します。def temperature(): """ Reads and calculates the current temperature from the sensor. Returns: float: The current temperature in Celsius. """ analogVal = read_adc(0) # Assuming thermistor connected to CH0 Vr = 3.3 * analogVal / 1023.0 # For 3.3V system Rt = 10000.0 * Vr / (3.3 - Vr) temp = 1 / (((math.log(Rt / 10000.0)) / 3950.0) + (1 / (273.15 + 25.0))) Cel = temp - 273.15 return Cel
motor_run()関数はモーター速度をレベル(0〜4)に応じて制御します。 レベル0では停止、それ以外はPWM速度を割合で設定します。def motor_run(level): """ Adjusts the motor speed based on the specified level. Args: level (int): Desired motor speed level. Returns: int: Adjusted motor speed level. """ if level == 0: motor.stop() return 0 if level >= 4: level = 4 motor.forward(speed=float(level / 4)) return level
changeLevel()関数はボタンが押された時に呼び出され、風速レベルを0〜4の範囲で循環的に変更し、基準温度を更新します。def changeLevel(): """ Changes the motor speed level when the button is pressed and updates the reference temperature. """ global level, currentTemp, markTemp print("Button pressed") level = (level + 1) % 5 markTemp = currentTemp # Bind the button press event to changeLevel function BtnPin.when_pressed = changeLevel
main()関数は常に温度を監視し、基準温度との差が±2℃の場合に速度レベルを1段階調整します。 モーター速度を更新し、短い待機を挟んで急な切り替えを防止します。def main(): """ Main function to continuously monitor and respond to temperature changes. """ global level, currentTemp, markTemp markTemp = temperature() while True: currentTemp = temperature() if level != 0: if currentTemp - markTemp <= -2: level -= 1 markTemp = currentTemp elif currentTemp - markTemp >= 2: if level < 4: level += 1 markTemp = currentTemp level = motor_run(level) sleep(0.2)
KeyboardInterrupt(Ctrl+C)で停止した場合、モーターを止め、SPI接続を安全に終了します。# Run the main function and handle KeyboardInterrupt try: main() except KeyboardInterrupt: motor.stop() spi.close()