注釈
こんにちは、SunFounderのRaspberry Pi & Arduino & ESP32愛好家コミュニティへようこそ!Facebook上でRaspberry Pi、Arduino、ESP32についてもっと深く掘り下げ、他の愛好家と交流しましょう。
参加する理由は?
エキスパートサポート:コミュニティやチームの助けを借りて、販売後の問題や技術的な課題を解決します。
学び&共有:ヒントやチュートリアルを交換してスキルを向上させましょう。
独占的なプレビュー:新製品の発表や先行プレビューに早期アクセスしましょう。
特別割引:最新製品の独占割引をお楽しみください。
祭りのプロモーションとギフト:ギフトや祝日のプロモーションに参加しましょう。
👉 私たちと一緒に探索し、創造する準備はできていますか?[ここ]をクリックして今すぐ参加しましょう!
4.1.4 カウンティングデバイス
はじめに
ここでは、PIRセンサーと4桁のセグメントディスプレイからなる、数値表示カウンターシステムを作成します。PIRが通行人を検出すると、4桁のセグメントディスプレイに表示される数値が1つ増えます。このカウンターを使用して、通路を通過する人数をカウントできます。
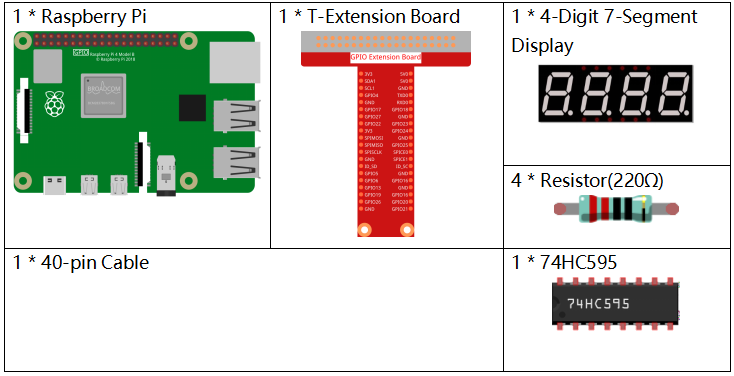
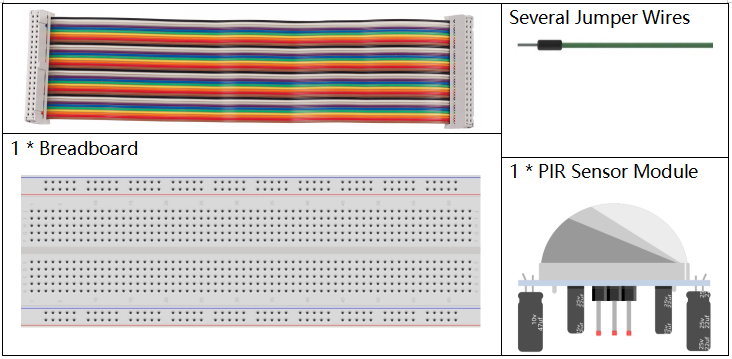
必要な部品
このプロジェクトには、次のコンポーネントが必要です。
一式を購入するのが便利です、こちらがリンクです:
名前 |
このキットのアイテム |
リンク |
|---|---|---|
Raphael Kit |
337 |
以下のリンクから別々に購入することもできます。
コンポーネントの紹介 |
購入リンク |
|---|---|
- |
|
- |
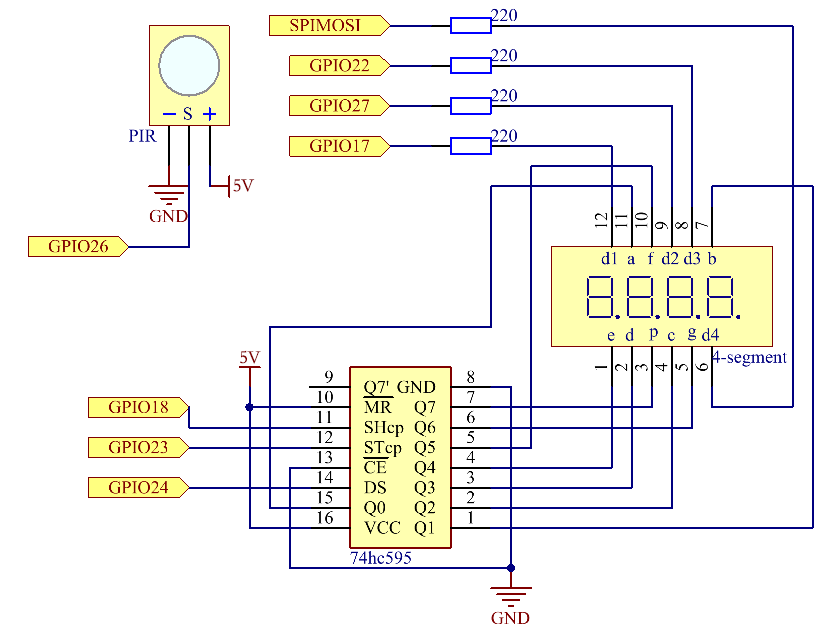
回路図
T-Board Name |
physical |
wiringPi |
BCM |
GPIO17 |
Pin 11 |
0 |
17 |
GPIO27 |
Pin 13 |
2 |
27 |
GPIO22 |
Pin 15 |
3 |
22 |
SPIMOSI |
Pin 19 |
12 |
10 |
GPIO18 |
Pin 12 |
1 |
18 |
GPIO23 |
Pin 16 |
4 |
23 |
GPIO24 |
Pin 18 |
5 |
24 |
GPIO26 |
Pin 37 |
25 |
26 |
実験手順
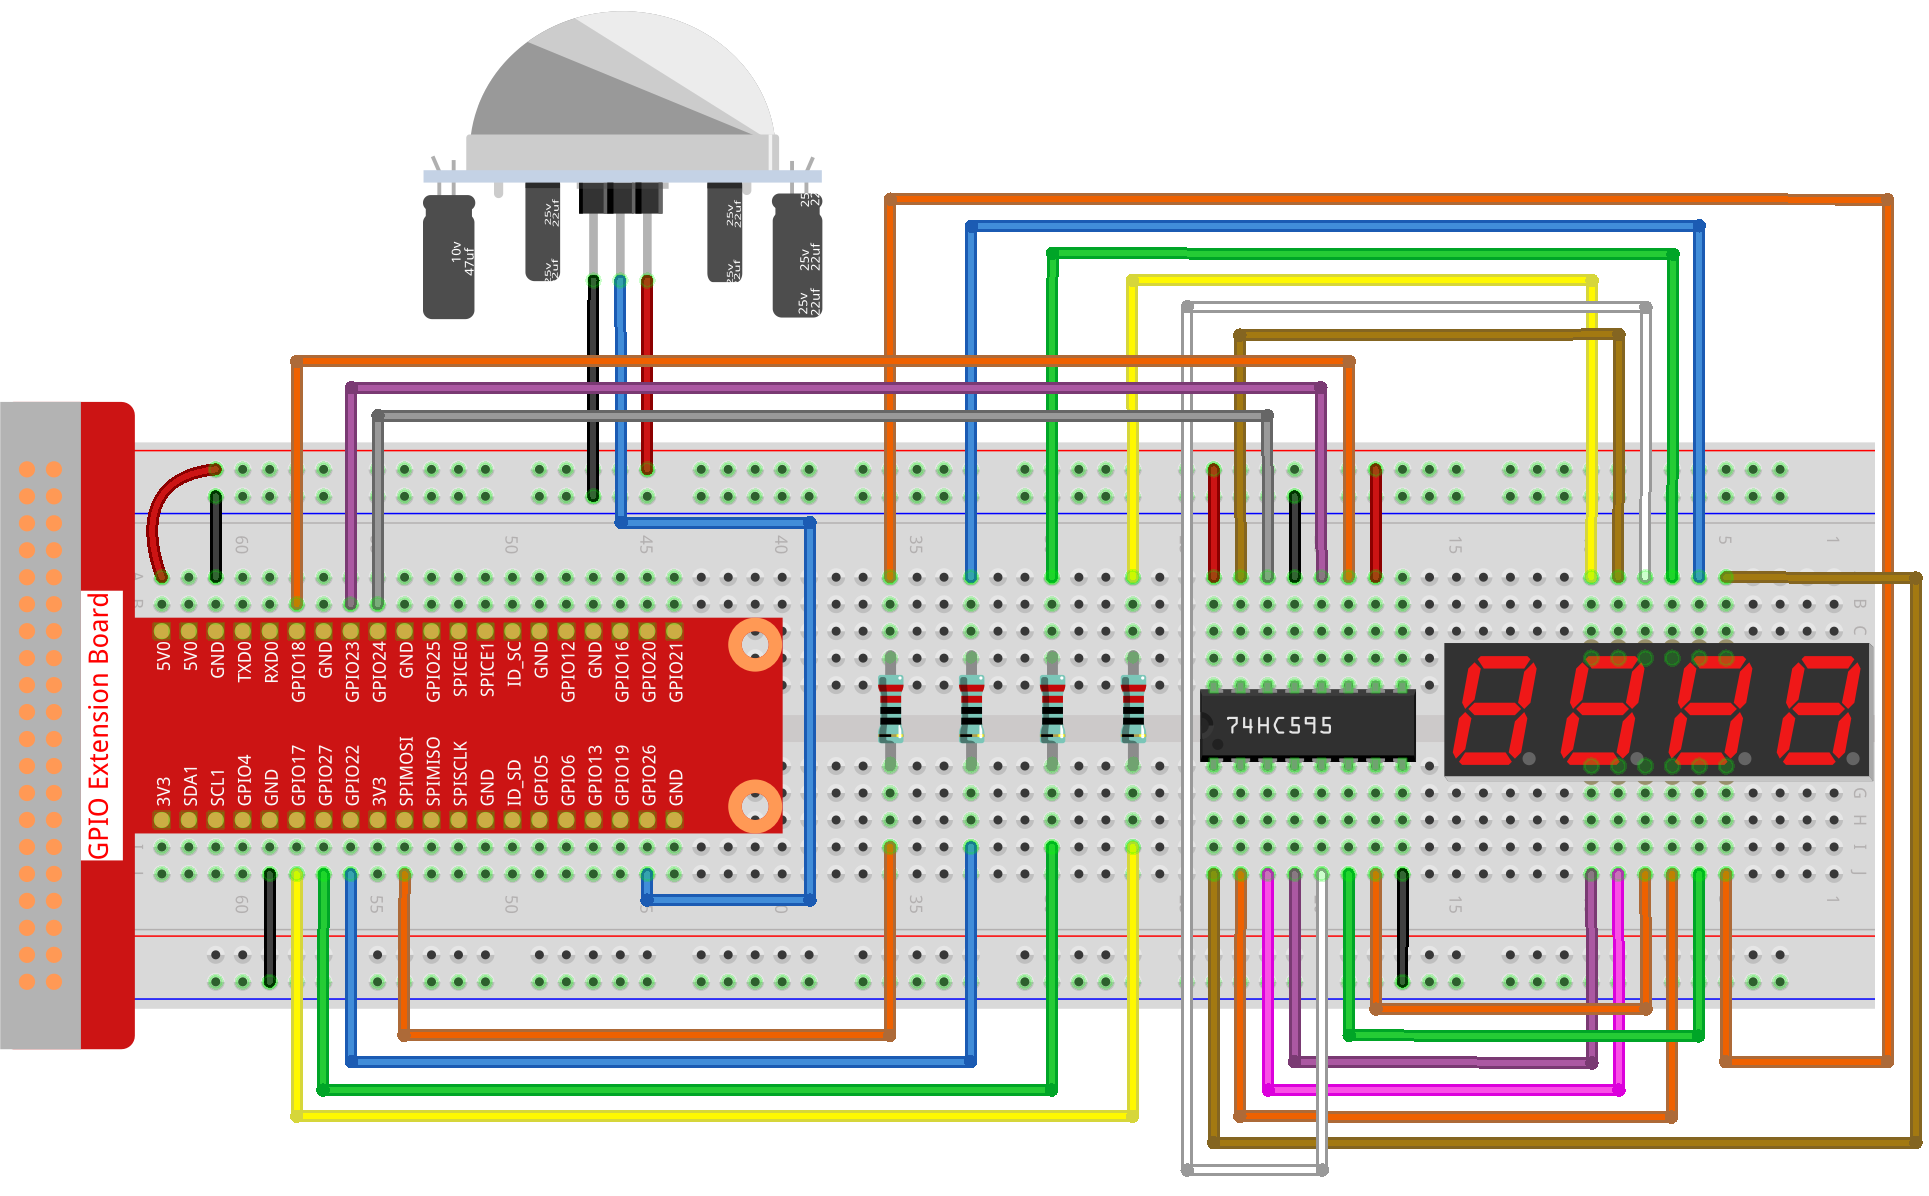
ステップ 1: 回路を組み立てます。
ステップ 2: コードのフォルダに移動します。
cd ~/raphael-kit/python-pi5
ステップ 3: 実行可能ファイルを実行します。
sudo python3 3.1.1_CountingDevice_zero.py
コードを実行すると、PIRが通行人を検出すると、4桁のセグメントディスプレイに表示される数値が1つ増えます。
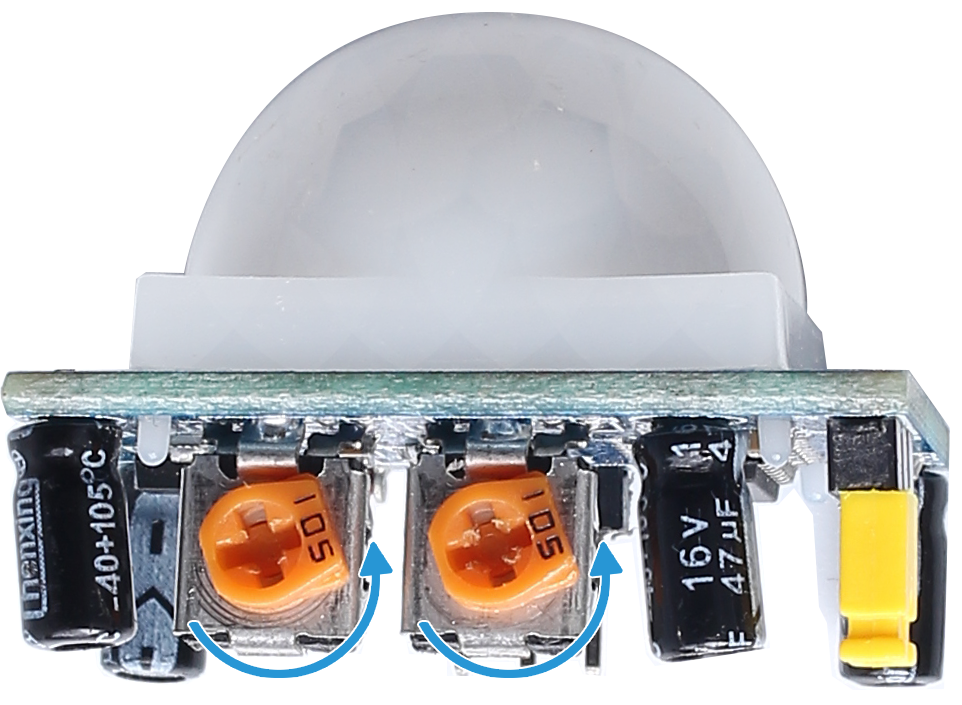
PIRモジュールには2つのポテンショメータがあります。1つは感度を調整するためのもので、もう1つは検出距離を調整するためのものです。PIRモジュールをより良く動作させるには、これらのポテンショメータを両方とも反時計回りにまわす必要があります。
警告
エラー メッセージ RuntimeError: Cannot determine SOC peripheral base address が表示された場合は、 「gpiozero」が動作しない場合。 を参照してください。
コード
注釈
以下のコードを 変更/リセット/コピー/実行/停止 することができます。ただし、その前に raphael-kit/python-pi5 のソースコードパスに移動する必要があります。コードを変更した後、効果を確認するために直接実行できます。
#!/usr/bin/env python3
from gpiozero import OutputDevice, MotionSensor

# Initialize PIR motion sensor on GPIO 26
pir = MotionSensor(26)

# Initialize shift register pins
SDI = OutputDevice(24)    # Serial Data Input
RCLK = OutputDevice(23)   # Register Clock Input
SRCLK = OutputDevice(18)  # Shift Register Clock Input

# Initialize 7-segment display pins
placePin = [OutputDevice(pin) for pin in (10, 22, 27, 17)]

# Define digit codes for 7-segment display
number = (0xc0, 0xf9, 0xa4, 0xb0, 0x99, 0x92, 0x82, 0xf8, 0x80, 0x90)

# Counter for the displayed number
counter = 0

def clearDisplay():
    # Clears the display by setting all segments off
    for _ in range(8):
        SDI.on()
        SRCLK.on()
        SRCLK.off()
    RCLK.on()
    RCLK.off()

def hc595_shift(data):
    # Shifts data into the 74HC595 shift register
    for i in range(8):
        SDI.value = 0x80 & (data << i)
        SRCLK.on()
        SRCLK.off()
    RCLK.on()
    RCLK.off()

def pickDigit(digit):
    # Activates a specific digit of the 7-segment display
    for pin in placePin:
        pin.off()
    placePin[digit].on()

def display():
    # Updates the display with the current counter value
    global counter
    clearDisplay()
    pickDigit(0)
    hc595_shift(number[counter % 10])

    clearDisplay()
    pickDigit(1)
    hc595_shift(number[counter % 100//10])

    clearDisplay()
    pickDigit(2)
    hc595_shift(number[counter % 1000//100])

    clearDisplay()
    pickDigit(3)
    hc595_shift(number[counter % 10000//1000])

def loop():
    # Main loop to update display and check for motion
    global counter
    currentState = 0
    lastState = 0
    while True:
        display()
        currentState = 1 if pir.motion_detected else 0
        if currentState == 1 and lastState == 0:
            counter += 1
        lastState = currentState

try:
    loop()
except KeyboardInterrupt:
    # Turn off all pins when the script is interrupted
    SDI.off()
    SRCLK.off()
    RCLK.off()
    pass
コードの説明
この行では、
gpiozeroライブラリからOutputDeviceとMotionSensorクラスをインポートします。OutputDeviceはLED、モーター、または出力として制御したい任意のデバイスを指します。MotionSensorは通常、動きを検出するために使用されるPIR(受動赤外線)センサーです。#!/usr/bin/env python3 from gpiozero import OutputDevice, MotionSensor
GPIOピン26に接続されたPIRモーションセンサーを初期化します。
# Initialize PIR motion sensor on GPIO 26
pir = MotionSensor(26)
シフトレジスタのシリアルデータ入力(SDI)、レジスタクロック入力(RCLK)、シフトレジスタクロック入力(SRCLK)に接続されたGPIOピンを初期化します。
# Initialize shift register pins
SDI = OutputDevice(24)    # Serial Data Input
RCLK = OutputDevice(23)   # Register Clock Input
SRCLK = OutputDevice(18)  # Shift Register Clock Input
7セグメント表示の各桁用のピンを初期化し、0-9の数字を表示するためのバイナリコードを定義します。
# Initialize 7-segment display pins
placePin = [OutputDevice(pin) for pin in (10, 22, 27, 17)]

# Define digit codes for 7-segment display
number = (0xc0, 0xf9, 0xa4, 0xb0, 0x99, 0x92, 0x82, 0xf8, 0x80, 0x90)
次の数字を表示する前にすべてのセグメントをオフに設定して、7セグメント表示をクリアします。
def clearDisplay():
    # Clears the display by setting all segments off
    for _ in range(8):
        SDI.on()
        SRCLK.on()
        SRCLK.off()
    RCLK.on()
    RCLK.off()
74HC595シフトレジスタに1バイトのデータをシフトし、表示セグメントを制御します。
def hc595_shift(data):
    # Shifts data into the 74HC595 shift register
    for i in range(8):
        SDI.value = 0x80 & (data << i)
        SRCLK.on()
        SRCLK.off()
    RCLK.on()
    RCLK.off()
7セグメント表示のどの桁をアクティブにするかを選択します。各桁は別々のGPIOピンによって制御されます。
def pickDigit(digit):
    # Activates a specific digit of the 7-segment display
    for pin in placePin:
        pin.off()
    placePin[digit].on()
最初に単位の桁の表示を開始し、次に十の桁の表示をアクティブにします。その後、百と千の桁の表示を順に行います。この高速なアクティベーションの連続は、連続した4桁の表示の錯覚を作り出します。
def display():
    # Updates the display with the current counter value
    global counter
    clearDisplay()
    pickDigit(0)
    hc595_shift(number[counter % 10])

    clearDisplay()
    pickDigit(1)
    hc595_shift(number[counter % 100//10])

    clearDisplay()
    pickDigit(2)
    hc595_shift(number[counter % 1000//100])

    clearDisplay()
    pickDigit(3)
    hc595_shift(number[counter % 10000//1000])
メインループを定義し、表示を継続的に更新し、PIRセンサーの状態をチェックします。動きが検出されると、カウンターが増加します。
def loop():
    # Main loop to update display and check for motion
    global counter
    currentState = 0
    lastState = 0
    while True:
        display()
        currentState = 1 if pir.motion_detected else 0
        if currentState == 1 and lastState == 0:
            counter += 1
        lastState = currentState
メインループを実行し、キーボードコマンド(Ctrl+C)で中断できるようにします。クリーンな終了のためにすべてのピンをオフにします。
try:
    loop()
except KeyboardInterrupt:
    # Turn off all pins when the script is interrupted
    SDI.off()
    SRCLK.off()
    RCLK.off()
    pass