注釈
こんにちは、SunFounderのRaspberry Pi & Arduino & ESP32愛好家コミュニティへようこそ!Facebook上でRaspberry Pi、Arduino、ESP32についてもっと深く掘り下げ、他の愛好家と交流しましょう。
参加する理由は?
エキスパートサポート:コミュニティやチームの助けを借りて、販売後の問題や技術的な課題を解決します。
学び&共有:ヒントやチュートリアルを交換してスキルを向上させましょう。
独占的なプレビュー:新製品の発表や先行プレビューに早期アクセスしましょう。
特別割引:最新製品の独占割引をお楽しみください。
祭りのプロモーションとギフト:ギフトや祝日のプロモーションに参加しましょう。
👉 私たちと一緒に探索し、創造する準備はできていますか?[ここ]をクリックして今すぐ参加しましょう!
4.1.6 リバースアラーム
はじめに
このプロジェクトでは、LCD、ブザー、超音波センサーを使用して、リバースアシストシステムを作成します。これをリモートコントロール車に取り付けて、車をガレージにバックさせる実際のプロセスをシミュレートできます。
必要な部品
このプロジェクトには、次のコンポーネントが必要です。
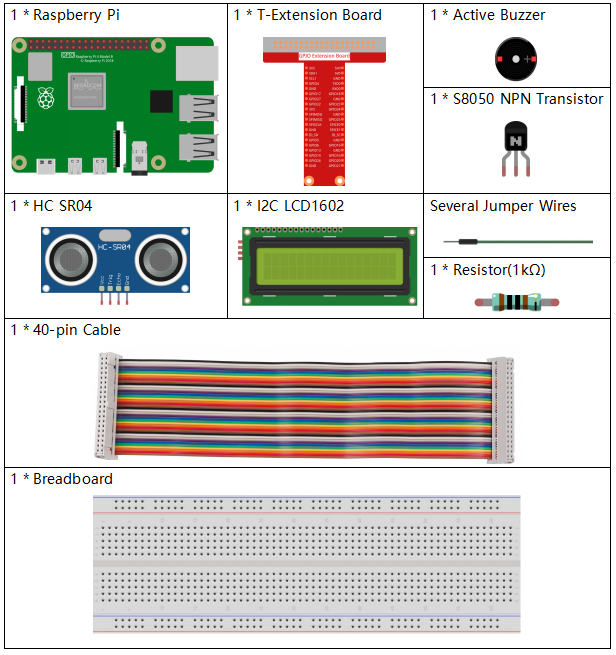
一式を購入するのが便利です、こちらがリンクです:
名前 |
このキットのアイテム |
リンク |
|---|---|---|
Raphael Kit |
337 |
以下のリンクから別々に購入することもできます。
コンポーネントの紹介 |
購入リンク |
|---|---|
- |
|
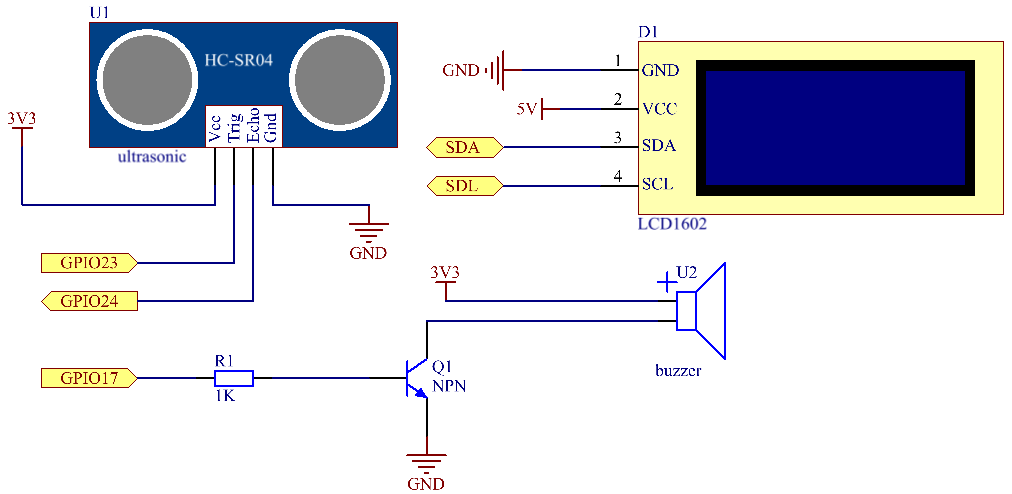
回路図
超音波センサーは、障害物との距離をコードの形でLCDに表示します。同時に、超音波センサーは異なる距離値に応じてブザーから警告音を出力します。
T-Board Name |
physical |
wiringPi |
BCM |
GPIO23 |
Pin 16 |
4 |
23 |
GPIO24 |
Pin 18 |
5 |
24 |
GPIO17 |
Pin 11 |
0 |
17 |
SDA1 |
Pin 3 |
||
SCL1 |
Pin 5 |
実験手順
ステップ1: 回路を組み立てます。

ステップ2: ディレクトリを変更します。
cd ~/raphael-kit/python-pi5
ステップ3: 実行します。
sudo python3 3.1.3_ReversingAlarm_zero.py
このコードを実行すると、超音波センサーモジュールが障害物までの距離を検出し、その距離情報をLCD1602に表示し、同時にブザーから距離に応じて周波数が変化する警告音が鳴ります。
注釈
FileNotFoundError: [Errno 2] No such file or directory: '/dev/i2c-1'エラーが発生した場合は、I2Cを有効にするために I²C 設定 を参照してください。ModuleNotFoundError: No module named 'smbus2'エラーが表示された場合は、sudo apt install python3-smbus2を実行してください。エラー
OSError: [Errno 121] Remote I/O errorが表示された場合、モジュールの接続が誤っているか、モジュールが壊れていることを意味します。コードと配線は正常ですが、LCDにコンテンツが表示されない場合は、バックのポテンショメーターを回してコントラストを増加させることができます。
警告
エラー メッセージ RuntimeError: Cannot determine SOC peripheral base address が表示された場合は、 「gpiozero」が動作しない場合。 を参照してください。
コード
注釈
以下のコードを 変更/リセット/コピー/実行/停止 することができます。ただし、変更する前に raphael-kit/python-pi5 のようなソースコードのパスに移動する必要があります。コードを変更した後、効果を確認するために直接実行できます。
#!/usr/bin/env python3
import LCD1602
import time
from gpiozero import DistanceSensor, Buzzer

# Initialize the ultrasonic sensor with GPIO pins
sensor = DistanceSensor(echo=24, trigger=23)  # Echo pin is GPIO 24, Trigger pin is GPIO 23

# Initialize the buzzer connected to GPIO pin 17
buzzer = Buzzer(17)

def lcdsetup():
    # Initialize the LCD with I2C address and enable backlight
    LCD1602.init(0x27, 1)  # 0x27 is the I2C address of the LCD
    LCD1602.clear()  # Clear the LCD display
    # Display startup messages on LCD
    LCD1602.write(0, 0, 'Ultrasonic Starting')
    LCD1602.write(1, 1, 'By SunFounder')
    time.sleep(2)  # Wait for 2 seconds

def distance():
    # Calculate and return the distance measured by the sensor
    dis = sensor.distance * 100  # Convert distance to centimeters
    print('Distance: {:.2f} cm'.format(dis))  # Print distance with two decimal places
    time.sleep(0.3)  # Wait for 0.3 seconds before next measurement
    return dis

def loop():
    # Continuously measure distance and update LCD and buzzer
    while True:
        dis = distance()  # Get the current distance
        # Display distance and handle alerts based on distance
        if dis > 400:  # Check if distance is out of range
            LCD1602.clear()
            LCD1602.write(0, 0, 'Error')
            LCD1602.write(3, 1, 'Out of range')
            time.sleep(0.5)
        else:
            # Display current distance on LCD
            LCD1602.clear()
            LCD1602.write(0, 0, 'Distance is')
            LCD1602.write(5, 1, str(round(dis, 2)) + ' cm')
            # Adjust buzzer frequency based on distance
            if dis >= 50:
                time.sleep(0.5)
            elif 20 < dis < 50:
                # Medium distance: medium buzzer frequency
                for _ in range(2):
                    buzzer.on()
                    time.sleep(0.05)
                    buzzer.off()
                    time.sleep(0.2)
            elif dis <= 20:
                # Close distance: high buzzer frequency
                for _ in range(5):
                    buzzer.on()
                    time.sleep(0.05)
                    buzzer.off()
                    time.sleep(0.05)

try:
    lcdsetup()  # Setup the LCD display
    loop()      # Start the measurement loop
except KeyboardInterrupt:
    # Turn off buzzer and clear LCD on user interrupt (e.g., Ctrl+C)
    buzzer.off()
LCD1602.clear()
コードの説明
このスクリプトでは、さまざまなライブラリを機能に活用しています。
LCD1602ライブラリはLCDディスプレイを管理し、timeは時間に関連する機能を提供します。gpiozeroライブラリは、Raspberry PiのGPIOピン操作に必要であり、特にDistanceSensorとBuzzerの操作に使用されます。#!/usr/bin/env python3 import LCD1602 import time from gpiozero import DistanceSensor, Buzzer
超音波センサーは、エコーとトリガーピンがそれぞれGPIOピン24と23に接続されてセットアップされています。さらに、ブザーはGPIOピン17に接続されています。
# Initialize the ultrasonic sensor with GPIO pins
sensor = DistanceSensor(echo=24, trigger=23)  # Echo pin is GPIO 24, Trigger pin is GPIO 23

# Initialize the buzzer connected to GPIO pin 17
buzzer = Buzzer(17)
LCDディスプレイの初期化では、クリアしてから起動メッセージを表示する手順が含まれています。
def lcdsetup():
    # Initialize the LCD with I2C address and enable backlight
    LCD1602.init(0x27, 1)  # 0x27 is the I2C address of the LCD
    LCD1602.clear()  # Clear the LCD display
    # Display startup messages on LCD
    LCD1602.write(0, 0, 'Ultrasonic Starting')
    LCD1602.write(1, 1, 'By SunFounder')
    time.sleep(2)  # Wait for 2 seconds
distance関数は超音波センサーによって測定された距離を計算し、センチメートル単位で値を返します。def distance(): # Calculate and return the distance measured by the sensor dis = sensor.distance * 100 # Convert distance to centimeters print('Distance: {:.2f} cm'.format(dis)) # Print distance with two decimal places time.sleep(0.3) # Wait for 0.3 seconds before next measurement return dis
メインループは距離を連続的に測定し、LCDとブザーの両方を更新します。測定された距離に基づいて異なる距離範囲を処理し、エラーメッセージを表示したり、測定された距離に基づいてブザーの周波数を変更したりします。
def loop():
    # Continuously measure distance and update LCD and buzzer
    while True:
        dis = distance()  # Get the current distance
        # Display distance and handle alerts based on distance
        if dis > 400:  # Check if distance is out of range
            LCD1602.clear()
            LCD1602.write(0, 0, 'Error')
            LCD1602.write(3, 1, 'Out of range')
            time.sleep(0.5)
        else:
            # Display current distance on LCD
            LCD1602.clear()
            LCD1602.write(0, 0, 'Distance is')
            LCD1602.write(5, 1, str(round(dis, 2)) + ' cm')
            # Adjust buzzer frequency based on distance
            if dis >= 50:
                time.sleep(0.5)
            elif 20 < dis < 50:
                # Medium distance: medium buzzer frequency
                for _ in range(2):
                    buzzer.on()
                    time.sleep(0.05)
                    buzzer.off()
                    time.sleep(0.2)
            elif dis <= 20:
                # Close distance: high buzzer frequency
                for _ in range(5):
                    buzzer.on()
                    time.sleep(0.05)
                    buzzer.off()
                    time.sleep(0.05)
実行時、スクリプトはLCDをセットアップし、メインループに入ります。キーボードコマンド(Ctrl+C)で割り込みが発生すると、ブザーがオフになり、LCDがクリアされます。
try:
    lcdsetup()  # Setup the LCD display
    loop()      # Start the measurement loop
except KeyboardInterrupt:
    # Turn off buzzer and clear LCD on user interrupt (e.g., Ctrl+C)
    buzzer.off()
    LCD1602.clear()