注釈
こんにちは、SunFounderのRaspberry Pi & Arduino & ESP32愛好家コミュニティへようこそ!Facebook上でRaspberry Pi、Arduino、ESP32についてもっと深く掘り下げ、他の愛好家と交流しましょう。
参加する理由は?
エキスパートサポート:コミュニティやチームの助けを借りて、販売後の問題や技術的な課題を解決します。
学び&共有:ヒントやチュートリアルを交換してスキルを向上させましょう。
独占的なプレビュー:新製品の発表や先行プレビューに早期アクセスしましょう。
特別割引:最新製品の独占割引をお楽しみください。
祭りのプロモーションとギフト:ギフトや祝日のプロモーションに参加しましょう。
👉 私たちと一緒に探索し、創造する準備はできていますか?[ここ]をクリックして今すぐ参加しましょう!
4.1.2 自動撮影カメラ
はじめに
外出中に、小さなリスたちがあなたの窓辺を訪れるかもしれません。これらの小さなかわいい生き物たちの写真を残すための自動撮影カメラを作ってみましょう!
必要な部品
このプロジェクトには、次のコンポーネントが必要です。
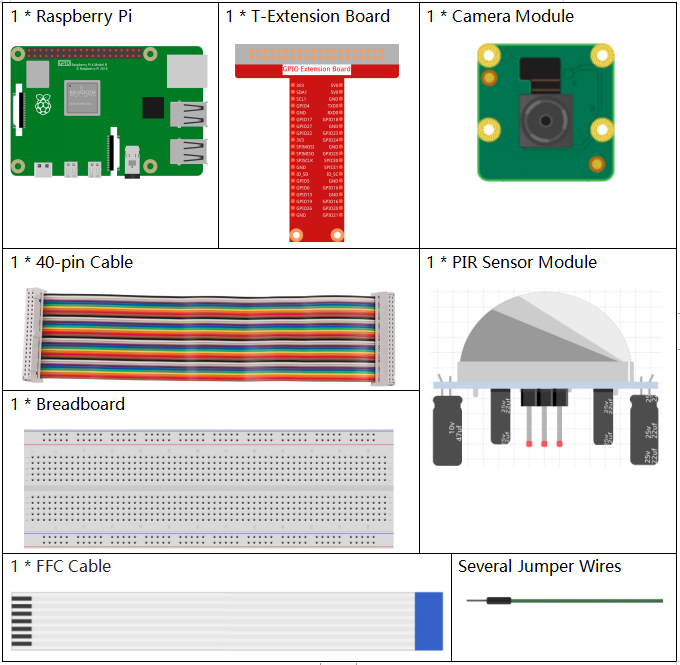
一式を購入するのが便利です、こちらがリンクです:
名前 |
このキットのアイテム |
リンク |
|---|---|---|
Raphael Kit |
337 |
以下のリンクから別々に購入することもできます。
コンポーネントの紹介 |
購入リンク |
|---|---|
- |
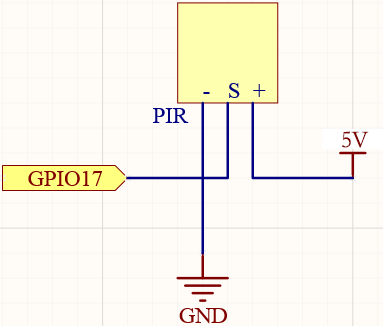
回路図
T-Board Name |
physical |
wiringPi |
BCM |
GPIO17 |
Pin 11 |
0 |
17 |
実験手順
このプロジェクトを始める前に、 3.1.1 写真モジュール を完了しておく必要があります。
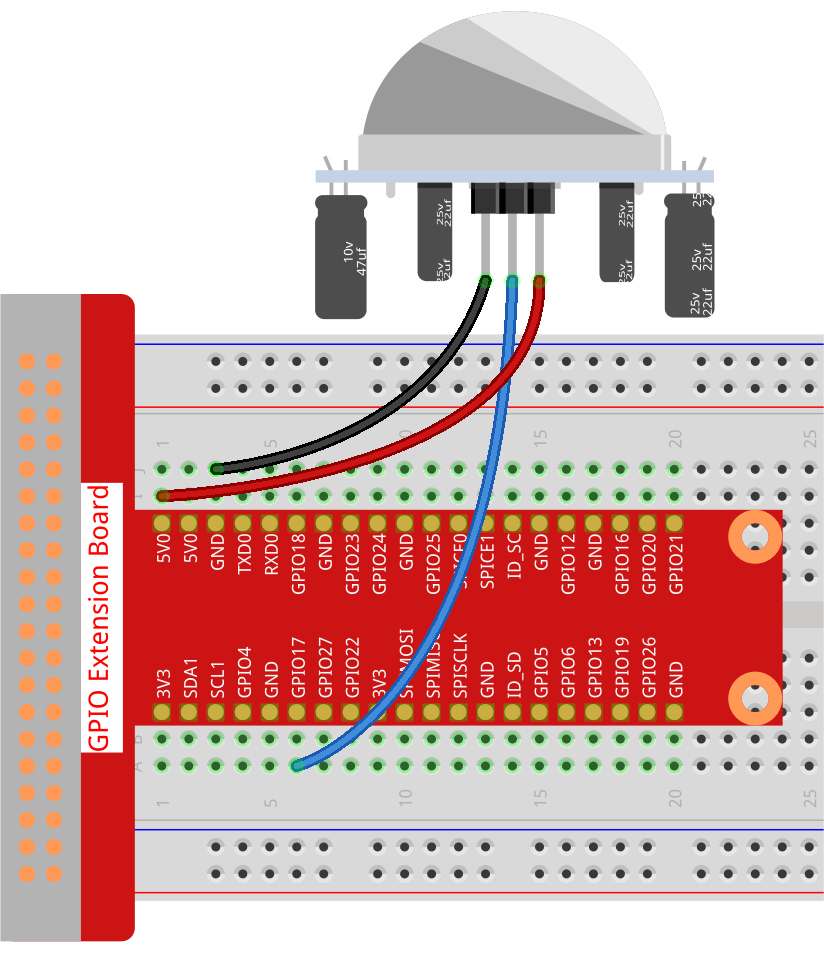
ステップ 1: 回路を組み立てます。
ステップ 2: Raspberry Piデスクトップに入ります。より良い体験のために画面が必要な場合は、 Connect your Raspberry Pi を参照してください。または、リモートでRaspberry Piデスクトップにアクセスするには、 リモートデスクトップ の詳細なチュートリアルを参照してください。
ステップ 3: ターミナルを開き、コードのフォルダに入ります。
cd ~/raphael-kit/python-pi5
ステップ 4: 実行します。
sudo python3 4.1.4_AutomaticCaptureCamera_zero.py
コードを実行した後、PIRは周囲の環境を検知し、リスなどが通りかかると、カメラが写真を撮ります。 写真の間隔は3秒で、撮影された写真の総数はプリントウィンドウを通じて表示されます。
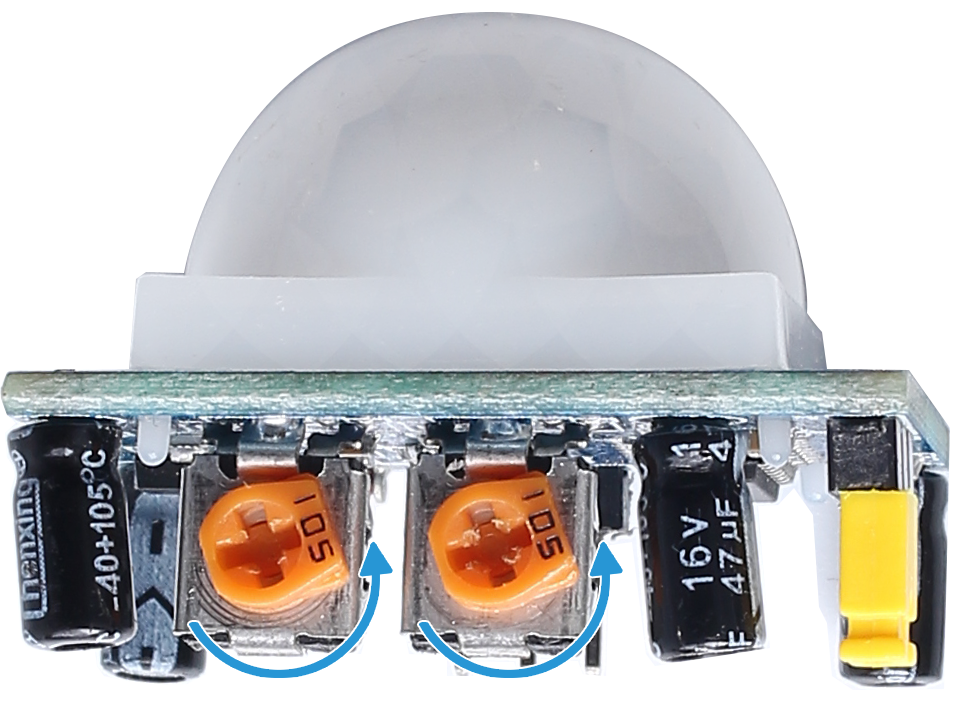
PIRモジュールには2つのポテンショメータがあります:1つは感度を、もう1つは検出距離を調整するためのものです。PIRモジュールをより良く機能させるために、それらを両方とも反時計回りに最後まで回してください。
注釈
~/raphael-kit/python-pi5/ パスの 4.1.4_AutomaticCaptureCamera_zero.py をPython IDEで開き、実行ボタンをクリックしてコードを実行し、停止ボタンでコードを停止することもできます。
警告
エラー メッセージ RuntimeError: Cannot determine SOC peripheral base address が表示された場合は、 「gpiozero」が動作しない場合。 を参照してください。
コード
注釈
下記のコードを 変更/リセット/コピー/実行/停止 することができます。しかし、その前に raphael-kit/python-pi5 のようなソースコードのパスに移動する必要があります。コードを変更した後、直接実行して効果を見ることができます。
#!/usr/bin/env python3
from picamera2 import Picamera2, Preview
from gpiozero import MotionSensor
import time
import os

# Retrieve the current user's login name and home directory
user = os.getlogin()
user_home = os.path.expanduser(f'~{user}')

# Initialize the camera
camera = Picamera2()
camera.start()

# Initialize the motion sensor on GPIO pin 17
pir = MotionSensor(17)

try:
    i = 1  # Initialize the image count
    while True:
        if pir.motion_detected:
            # Capture an image when motion is detected and save it with a unique number
            camera.capture_file(f'{user_home}/capture%s.jpg' % i)
            print('The number is %s' % i)  # Print the image count
            time.sleep(3)  # Wait for 3 seconds before next detection
            i += 1  # Increment the image count
        else:
            print('waiting')  # Print 'waiting' when no motion is detected
            time.sleep(0.5)  # Check for motion every 0.5 seconds

except KeyboardInterrupt:
    # Stop the camera and turn off the LED if a KeyboardInterrupt occurs


    camera.stop_preview()
    pass
コード説明
カメラ制御用の
Picamera2とPreviewクラス、動き検出用のMotionSensorクラス、標準ライブラリのtimeとosをインポートします。#!/usr/bin/env python3 from picamera2 import Picamera2, Preview from gpiozero import MotionSensor import time import os
撮影された画像を保存するために、現在のユーザーのログイン名とホームディレクトリを取得します。
# Retrieve the current user's login name and home directory
user = os.getlogin()
user_home = os.path.expanduser(f'~{user}')
カメラを初期化し、開始します。
# Initialize the camera
camera = Picamera2()
camera.start()
GPIOピン17に接続されたPIR動作センサーを初期化します。
# Initialize the motion sensor on GPIO pin 17
pir = MotionSensor(17)
カウンター
iを初期化して、撮影された画像の数を追跡します。無限ループ内で、動きが検出されるかどうかをチェックします。動きが検出された場合、カウンターiに基づいて一意の名前で画像をキャプチャし、画像番号を印刷し、次の動き検出前に3秒間待ち、カウンターiをインクリメントします。try: i = 1 # Initialize the image count while True: if pir.motion_detected: # Capture an image when motion is detected and save it with a unique number camera.capture_file(f'{user_home}/capture%s.jpg' % i) print('The number is %s' % i) # Print the image count time.sleep(3) # Wait for 3 seconds before next detection i += 1 # Increment the image count
動きが検出されない場合は、「待機中」と表示し、0.5秒ごとに動きをチェックします。
try:
    ...

    while True:
        ...

        else:
            print('waiting')  # Print 'waiting' when no motion is detected
            time.sleep(0.5)  # Check for motion every 0.5 seconds
Ctrl+CのようなKeyboardInterruptをキャッチして、カメラのプレビューを停止し、スクリプトを優雅に終了させます。
except KeyboardInterrupt:
    # Stop the camera and turn off the LED if a KeyboardInterrupt occurs
    camera.stop_preview()
    pass