注釈
こんにちは、SunFounderのRaspberry Pi & Arduino & ESP32愛好家コミュニティへようこそ!Facebook上でRaspberry Pi、Arduino、ESP32についてもっと深く掘り下げ、他の愛好家と交流しましょう。
参加する理由は?
エキスパートサポート:コミュニティやチームの助けを借りて、販売後の問題や技術的な課題を解決します。
学び&共有:ヒントやチュートリアルを交換してスキルを向上させましょう。
独占的なプレビュー:新製品の発表や先行プレビューに早期アクセスしましょう。
特別割引:最新製品の独占割引をお楽しみください。
祭りのプロモーションとギフト:ギフトや祝日のプロモーションに参加しましょう。
👉 私たちと一緒に探索し、創造する準備はできていますか?[ここ]をクリックして今すぐ参加しましょう!
4.1.1 カメラ
はじめに
このセクションでは、シャッターボタンを押すとLEDが点滅しながらカメラが撮影するカメラを作成します。
必要な部品
このプロジェクトには、次のコンポーネントが必要です。
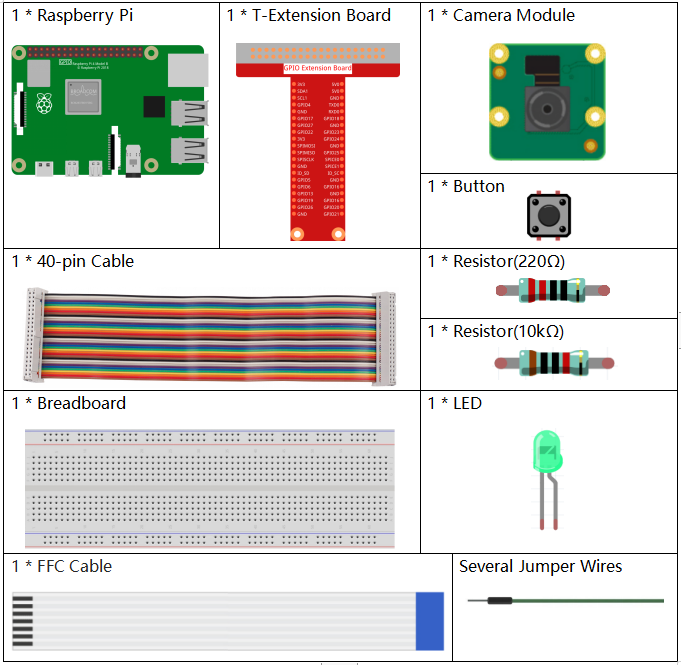
一式を購入するのが便利です、こちらがリンクです:
名前 |
このキットのアイテム |
リンク |
|---|---|---|
Raphael Kit |
337 |
以下のリンクから別々に購入することもできます。
コンポーネントの紹介 |
購入リンク |
|---|---|
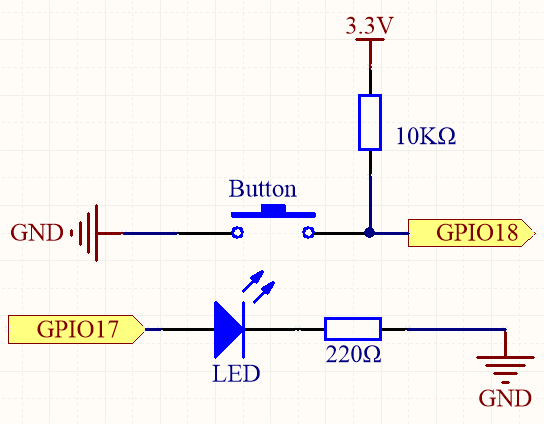
回路図
T-Board Name |
physical |
wiringPi |
BCM |
GPIO17 |
Pin 11 |
0 |
17 |
GPIO18 |
Pin 12 |
1 |
18 |
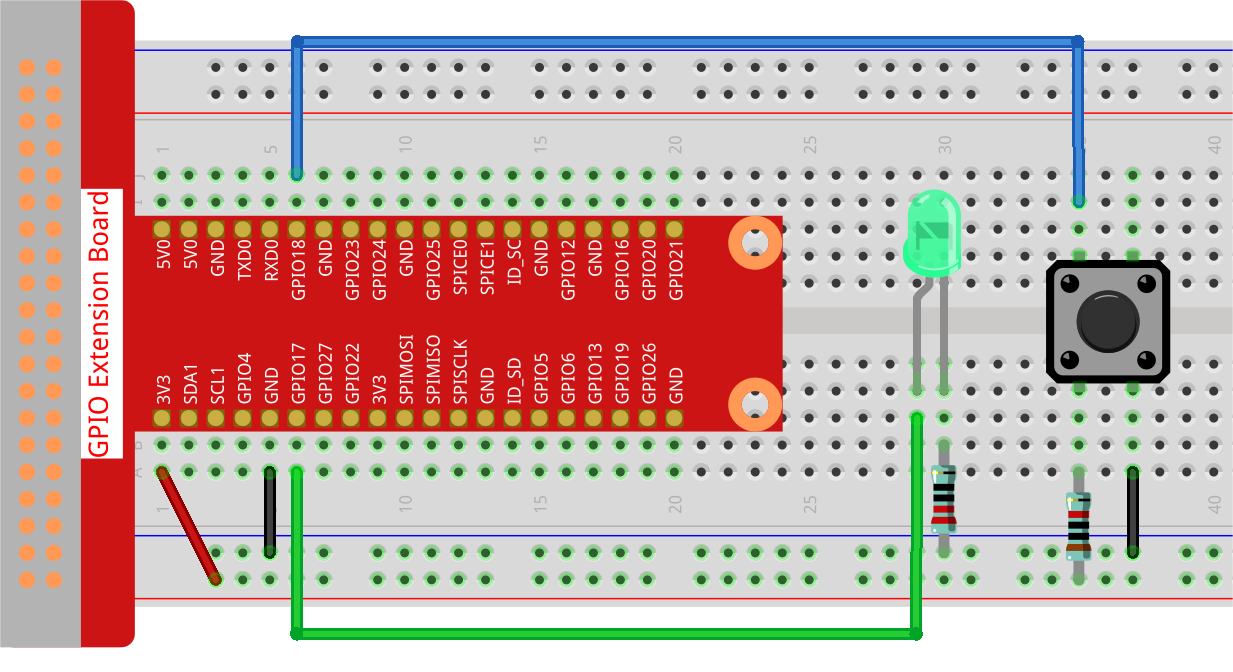
実験手順
ステップ 1: 回路を組み立てます。
ステップ 2: Raspberry Piデスクトップに入ります。より良い体験のために画面が必要な場合は、 Connect your Raspberry Pi を参照してください。または、リモートでRaspberry Piデスクトップにアクセスするには、 リモートデスクトップ の詳細なチュートリアルを参照してください。
ステップ 3: ターミナルを開き、コードのフォルダに入ります。
cd ~/raphael-kit/python-pi5
ステップ 4: 実行します。
sudo python3 4.1.1_Camera_zero.py
コードを実行した後、ボタンを押すと、Raspberry PiはLEDを点滅させながら写真を撮ります。写真は my_photo.jpg という名前で ~/ ディレクトリに保存されます。
注釈
~/raphael-kit/python-pi5 パスの 4.1.1_Camera_zero.py をPython IDEで開き、実行ボタンをクリックしてコードを実行し、停止ボタンでコードを停止することもできます。
写真をPCにダウンロードしたい場合は、 FileZilla ソフトウェア を参照してください。
警告
エラー メッセージ RuntimeError: Cannot determine SOC peripheral base address が表示された場合は、 「gpiozero」が動作しない場合。 を参照してください。
コード
#!/usr/bin/env python3
from picamera2 import Picamera2, Preview
from gpiozero import LED, Button
import time
import os

# Get the current user's login name and home directory
user = os.getlogin()
user_home = os.path.expanduser(f'~{user}')

# Initialize the camera
camera = Picamera2()
camera.start()

# Initialize a variable to track the camera's status
global status
status = False

# Set up LED and button with their GPIO pin numbers
led = LED(17)
button = Button(18)

def takePhotos(pin):
    """Function to set the camera's status to True when the button is pressed."""
    global status
    status = True

try:
    # Assign the function to be called when the button is pressed
    button.when_pressed = takePhotos

    # Main loop
    while True:
        # Check if the button has been pressed
        if status:
            # Blink the LED five times
            for i in range(5):
                led.on()
                time.sleep(0.1)
                led.off()
                time.sleep(0.1)
            # Capture and save a photo
            camera.capture_file(f'{user_home}/my_photo.jpg')
            print('Take a photo!')
            # Reset the status
            status = False
        else:
            # Turn off the LED if not capturing
            led.off()

        # Wait for a short period before checking the button status again
        time.sleep(1)

except KeyboardInterrupt:
    # Stop the camera and turn off the LED if a KeyboardInterrupt occurs
    camera.stop_preview()
    led.off()
    pass
コード説明
時間処理、カメラ制御、GPIOコンポーネント制御のための必要なライブラリをインポートします。
#!/usr/bin/env python3
from picamera2 import Picamera2, Preview
from gpiozero import LED, Button
import time
import os
写真の保存先として、現在のユーザーのログイン名とホームディレクトリを取得します。
# Get the current user's login name and home directory
user = os.getlogin()
user_home = os.path.expanduser(f'~{user}')
カメラを初期化し、開始します。
# Initialize the camera
camera = Picamera2()
camera.start()
statusをグローバル変数として宣言し、Falseに初期化します。# Initialize a variable to track the camera's status global status status = False
GPIOピン17に接続されたLEDと、GPIOピン18に接続されたボタンを初期化します。
# Set up LED and button with their GPIO pin numbers
led = LED(17)
button = Button(18)
ボタンが押されたときにグローバル変数
statusをTrueに設定する関数takePhotosを定義します。def takePhotos(pin): """Function to set the camera's status to True when the button is pressed.""" global status status = True
takePhotos関数がボタンが押されたときに呼び出されるように割り当てます。try: # Assign the function to be called when the button is pressed button.when_pressed = takePhotos ...
statusがTrueであるかどうかを継続的にチェックします。そうであれば、LEDを5回点滅させ、写真を撮影し、statusをリセットします。そうでなければ、LEDは消灯したままです。ループの各イテレーションの間に1秒の遅延があります。try: ... # Main loop while True: # Check if the button has been pressed if status: # Blink the LED five times for i in range(5): led.on() time.sleep(0.1) led.off() time.sleep(0.1) # Capture and save a photo camera.capture_file(f'{user_home}/my_photo.jpg') print('Take a photo!') # Reset the status status = False else: # Turn off the LED if not capturing led.off() # Wait for a short period before checking the button status again time.sleep(1)
Ctrl+CのようなKeyboardInterruptを捕捉し、カメラのプレビューを停止し、LEDを消灯してから終了します。
except KeyboardInterrupt:
    # Stop the camera and turn off the LED if a KeyboardInterrupt occurs
    camera.stop_preview()
    led.off()
    pass