Note
Hello, welcome to the SunFounder Raspberry Pi & Arduino & ESP32 Enthusiasts Community on Facebook! Dive deeper into Raspberry Pi, Arduino, and ESP32 with fellow enthusiasts.
Why Join?
Expert Support: Solve post-sale issues and technical challenges with help from our community and team.
Learn & Share: Exchange tips and tutorials to enhance your skills.
Exclusive Previews: Get early access to new product announcements and sneak peeks.
Special Discounts: Enjoy exclusive discounts on our newest products.
Festive Promotions and Giveaways: Take part in giveaways and holiday promotions.
👉 Ready to explore and create with us? Click [here] and join today!
4.1.5 Intelligent Visual Doorbell
Introduction
In this project, let’s make a DIY intelligent visual doorbell.
Required Components
In this project, we need the following components.
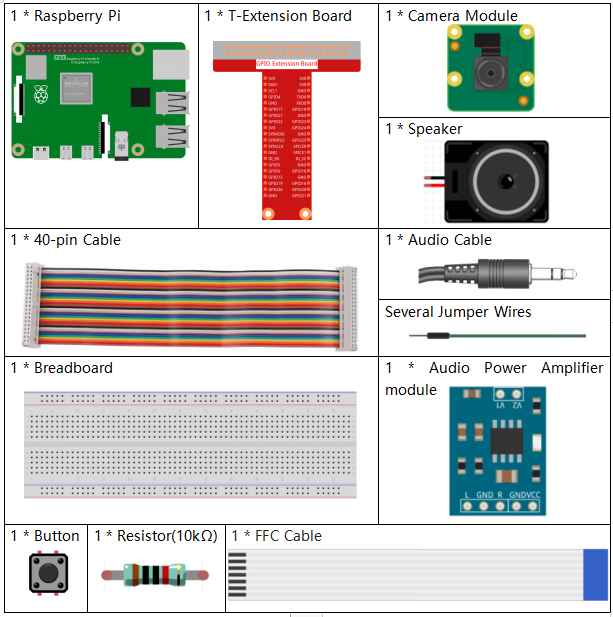
It’s definitely convenient to buy a whole kit, here’s the link:
Name |
ITEMS IN THIS KIT |
LINK |
|---|---|---|
Raphael Kit |
337 |
You can also buy them separately from the links below.
COMPONENT INTRODUCTION |
PURCHASE LINK |
|---|---|
- |
|
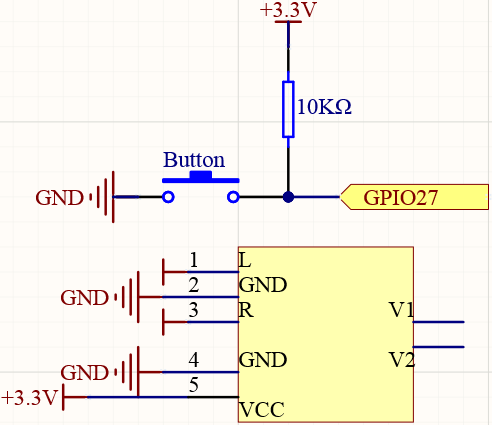
Schematic Diagram
T-Board Name |
physical |
wiringPi |
BCM |
GPIO27 |
Pin 13 |
2 |
27 |
Experimental Procedures
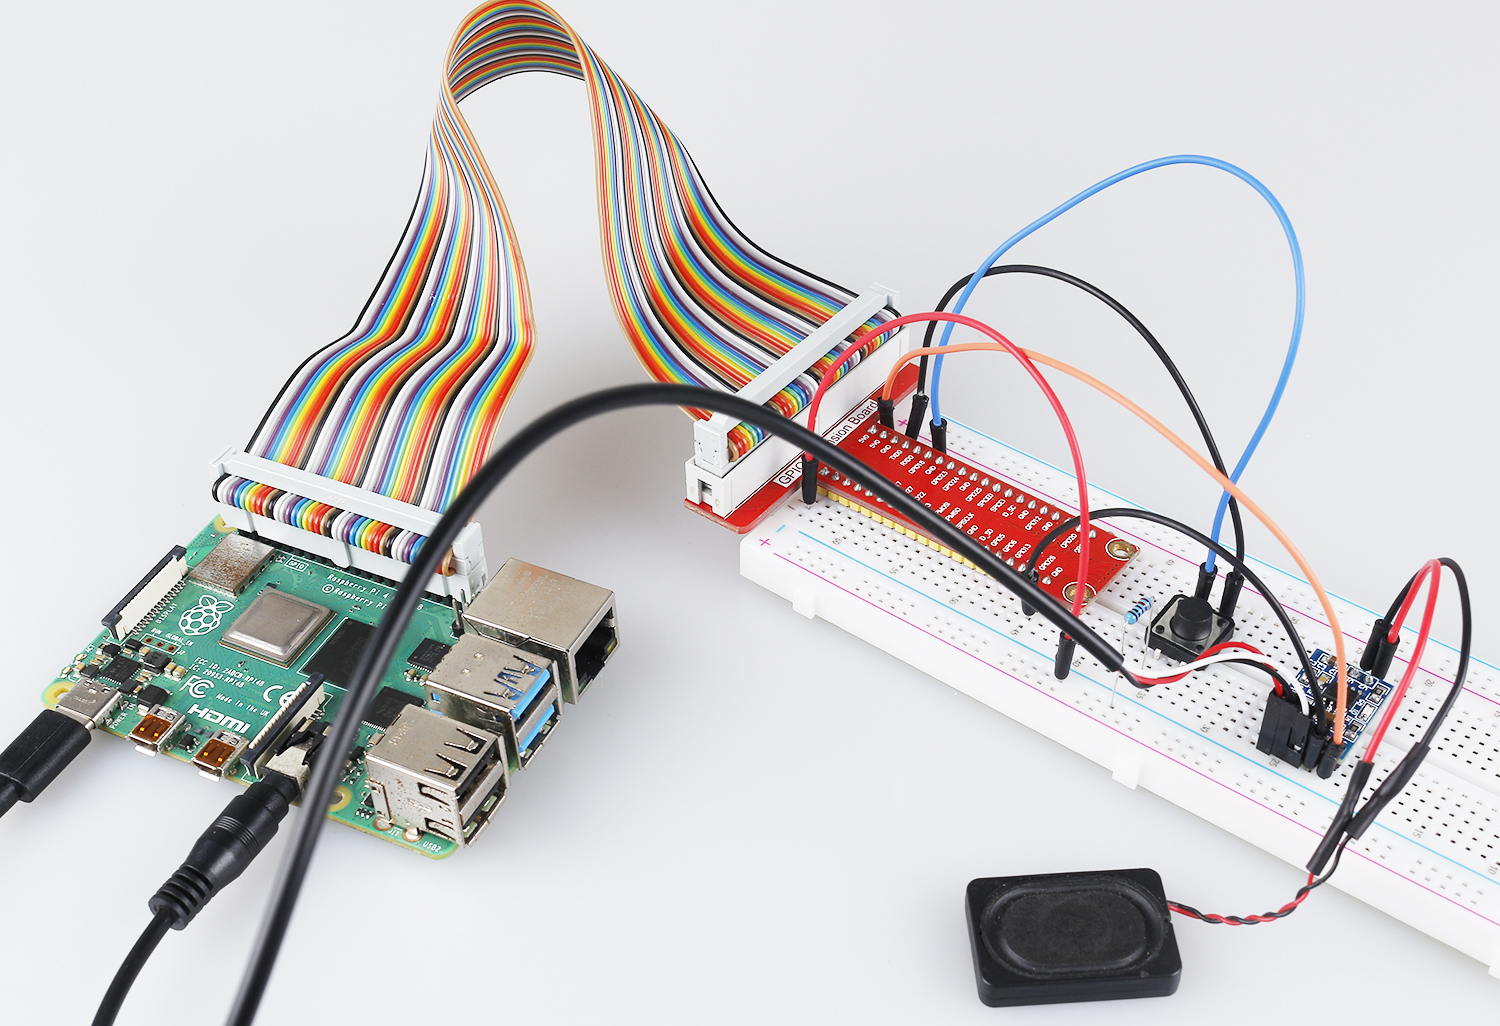
Step 1: Build the circuit.
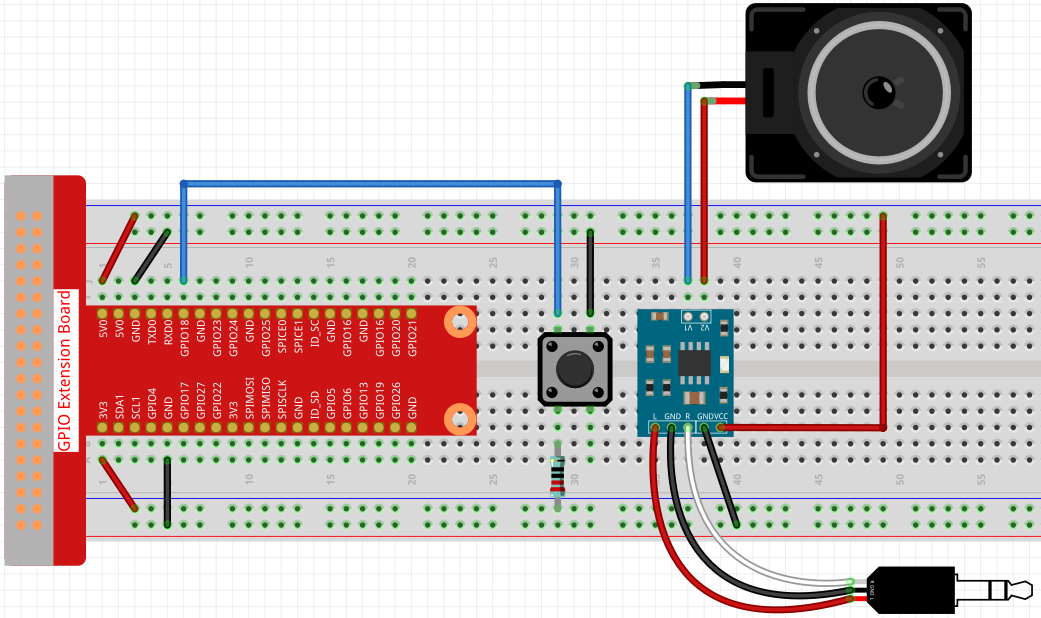
Before this project, you need to make sure you complete 3.1.3 Audio Module & 3.1.2 Video Module.
Step 2: Get into the folder of the code.
cd ~/raphael-kit/python/
Step 3: Run.
python3 4.1.5_DoorBell.py
After the code runs:
The program waits for the doorbell button to be pressed.
When pressed, a doorbell sound plays and a 5-second video is recorded.
The video is saved as
visitor.mp4in the user’s home directory.The system then returns to standby until the next button press.
Press
Ctrl+Cto exit and clean up resources.
Code
Note
You can Modify/Reset/Copy/Run/Stop the code below. But before that, you need to go to source code path like raphael-kit/python. After modifying the code, you can run it directly to see the effect.
#!/usr/bin/env python3
import time
import os
import RPi.GPIO as GPIO
from pygame import mixer
from picamera2 import Picamera2, Preview
from picamera2.encoders import H264Encoder
from picamera2.outputs import FfmpegOutput

# --------------------------------------------------
# USER DIRECTORY
# --------------------------------------------------
user = os.getlogin()
user_home = os.path.expanduser(f"~{user}")

# --------------------------------------------------
# CAMERA SETUP (Picamera2)
# --------------------------------------------------
camera = Picamera2()

# Create a video configuration WITHOUT the deprecated "video=" argument
video_config = camera.create_video_configuration(
    main={"size": (1280, 720), "format": "XBGR8888"}
)
camera.configure(video_config)

# Create H264 encoder (10 Mbps is good quality for doorbell)
encoder = H264Encoder(bitrate=10_000_000)

# --------------------------------------------------
# GPIO SETUP
# --------------------------------------------------
BtnPin = 18
status = False

def setup():
    GPIO.setmode(GPIO.BCM)
    GPIO.setup(BtnPin, GPIO.IN, pull_up_down=GPIO.PUD_UP)
    mixer.init()

def button_pressed(pin):
    """Button callback"""
    global status
    status = True

# --------------------------------------------------
# MAIN LOOP
# --------------------------------------------------
def main():
    global status
    GPIO.add_event_detect(BtnPin, GPIO.FALLING,
                        callback=button_pressed, bouncetime=250)

    print("Doorbell system running... Press the button to record.")

    while True:
        if status:
            print("Visitor detected!")

            # Play doorbell sound
            mixer.music.load(f"{user_home}/raphael-kit/music/doorbell.wav")
            mixer.music.set_volume(0.7)
            mixer.music.play()

            # Use QTGL preview
            camera.start_preview(Preview.QTGL)

            # Output file
            output_path = f"{user_home}/visitor.mp4"
            output = FfmpegOutput(output_path)

            # Start recording
            camera.start_recording(encoder, output)
            print(f"Recording video to {output_path}")

            time.sleep(5)  # Record for 5 seconds

            # Stop everything
            mixer.music.stop()
            camera.stop_recording()
            camera.stop_preview()

            print("Recording finished.\n")

            status = False

        time.sleep(0.05)

# --------------------------------------------------
# CLEAN EXIT
# --------------------------------------------------
def destroy():
    print("\nExiting...")

    mixer.quit()
    GPIO.cleanup()
    camera.close()

    print("Program exited cleanly.")

if __name__ == "__main__":
    setup()
    try:
        main()
    except KeyboardInterrupt:
        destroy()
Code Explanation
Retrieves the current user’s home directory to store the recorded video.
user = os.getlogin()
user_home = os.path.expanduser(f"~{user}")
Creates a Picamera2 instance and configures it for video recording.
camera = Picamera2()
video_config = camera.create_video_configuration(
    main={"size": (1280, 720), "format": "XBGR8888"}
)
camera.configure(video_config)
Sets up the GPIO button on
GPIO18as an input with a pull-up resistor.GPIO.setmode(GPIO.BCM) GPIO.setup(BtnPin, GPIO.IN, pull_up_down=GPIO.PUD_UP)
Loads and initializes the audio mixer used to play the doorbell sound.
mixer.init()
Registers a callback that sets
statustoTruewhen the button is pressed.GPIO.add_event_detect(BtnPin, GPIO.FALLING, callback=button_pressed, bouncetime=250)
Plays the doorbell sound, starts the preview window, and begins video recording.
mixer.music.load(f"{user_home}/raphael-kit/music/doorbell.wav")
mixer.music.play()
camera.start_preview(Preview.QTGL)
camera.start_recording(encoder, output)
Records a 5-second video and saves it as
visitor.mp4.time.sleep(5) camera.stop_recording() camera.stop_preview()
Cleans up all resources when the program is stopped with
Ctrl+C.mixer.quit() GPIO.cleanup() camera.close()
Phenomenon Picture