Note
Hello, welcome to the SunFounder Raspberry Pi & Arduino & ESP32 Enthusiasts Community on Facebook! Dive deeper into Raspberry Pi, Arduino, and ESP32 with fellow enthusiasts.
Why Join?
Expert Support: Solve post-sale issues and technical challenges with help from our community and team.
Learn & Share: Exchange tips and tutorials to enhance your skills.
Exclusive Previews: Get early access to new product announcements and sneak peeks.
Special Discounts: Enjoy exclusive discounts on our newest products.
Festive Promotions and Giveaways: Take part in giveaways and holiday promotions.
👉 Ready to explore and create with us? Click [here] and join today!
4.1.15 Alarm Bell
Introduction
In this project, we will make a manual alarm device. You can replace the toggle switch with a thermistor or a photosensitive sensor to make a temperature alarm or a light alarm.
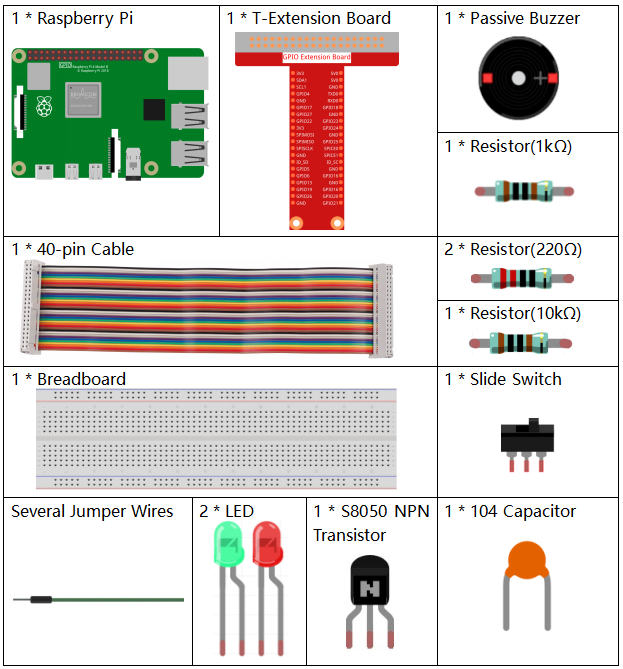
Required Components
In this project, we need the following components.
It’s definitely convenient to buy a whole kit, here’s the link:
Name |
ITEMS IN THIS KIT |
LINK |
|---|---|---|
Raphael Kit |
337 |
You can also buy them separately from the links below.
COMPONENT INTRODUCTION |
PURCHASE LINK |
|---|---|
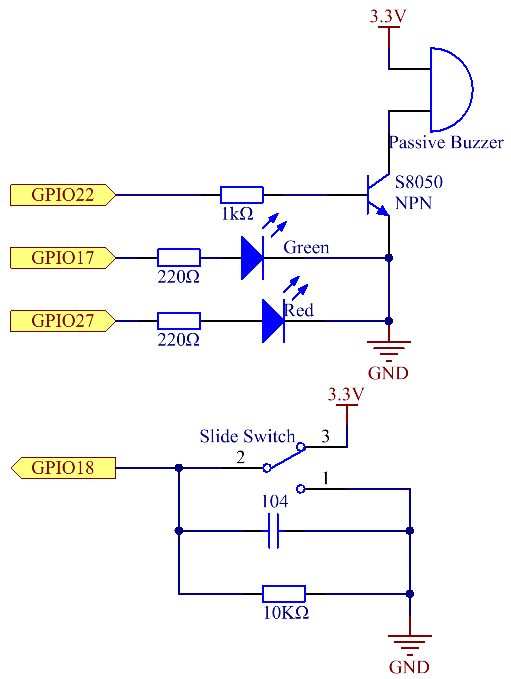
Schematic Diagram
T-Board Name |
physical |
wiringPi |
BCM |
GPIO17 |
Pin 11 |
0 |
17 |
GPIO18 |
Pin 12 |
1 |
18 |
GPIO27 |
Pin 13 |
2 |
27 |
GPIO22 |
Pin 15 |
3 |
22 |
Experimental Procedures
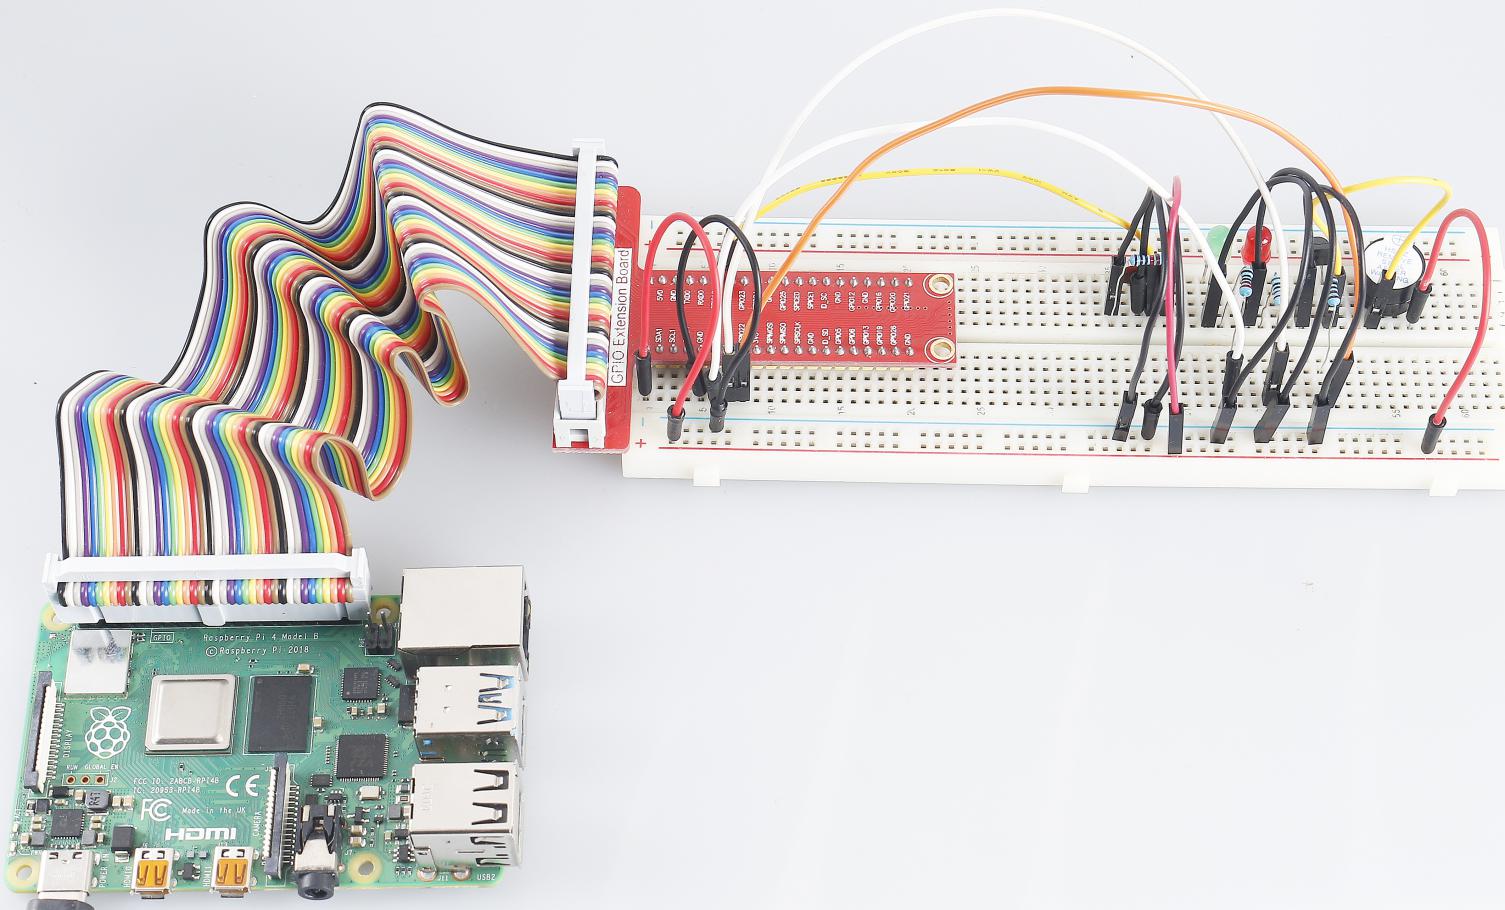
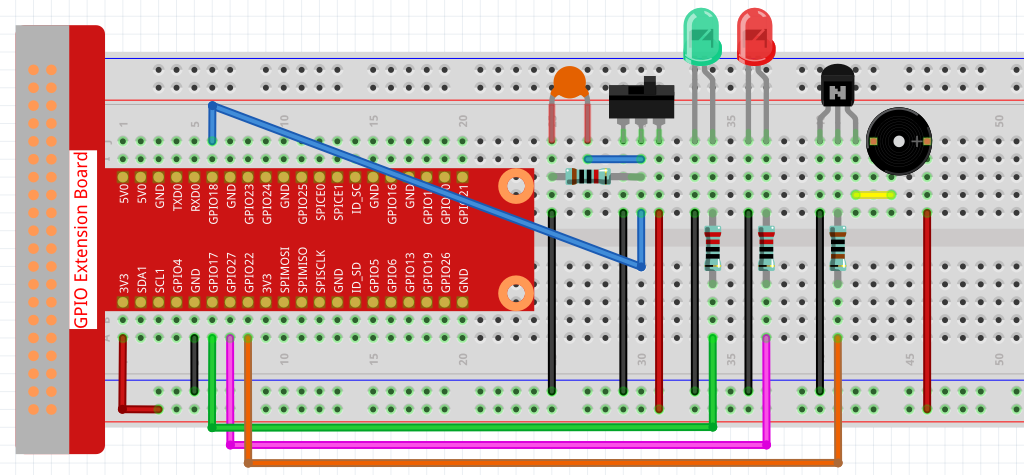
Step 1: Build the circuit.
Step 2: Change directory.
cd ~/raphael-kit/python/
Step 3: Run.
sudo python3 4.1.15_AlarmBell.py
After the program starts, the toggle switch will be toggled to the right, and the buzzer will give out alarm sounds. At the same time, the red and green LEDs will flash at a certain frequency.
Code
Note
You can Modify/Reset/Copy/Run/Stop the code below. But before that, you need to go to source code path like raphael-kit/python.
#!/usr/bin/env python3

import RPi.GPIO as GPIO
import time
import threading

BeepPin=22
ALedPin=17
BLedPin=27
switchPin=18

Buzz=0
flag =0
note=150
pitch=20

def setup():
    GPIO.setmode(GPIO.BCM)
    GPIO.setup(BeepPin, GPIO.OUT)
    GPIO.setup(ALedPin,GPIO.OUT,initial=GPIO.LOW)
    GPIO.setup(BLedPin,GPIO.OUT,initial=GPIO.LOW)
    GPIO.setup(switchPin,GPIO.IN)
    global Buzz
    Buzz=GPIO.PWM(BeepPin,note)

def ledWork():
    while flag:
        GPIO.output(ALedPin,GPIO.HIGH)
        time.sleep(0.5)
        GPIO.output(ALedPin,GPIO.LOW)
        GPIO.output(BLedPin,GPIO.HIGH)
        time.sleep(0.5)
        GPIO.output(BLedPin,GPIO.LOW)

def buzzerWork():
    global pitch
    global note
    while flag:
        if note >= 800 or note <=130:
            pitch = -pitch
        note = note + pitch
        Buzz.ChangeFrequency(note)
        time.sleep(0.01)

def on():
    global flag
    flag = 1
    Buzz.start(50)
    tBuzz = threading.Thread(target=buzzerWork)
    tBuzz.start()
    tLed = threading.Thread(target=ledWork)
    tLed.start()

def off():
    global flag
    flag = 0
    Buzz.stop()
    GPIO.output(ALedPin,GPIO.LOW)
    GPIO.output(BLedPin,GPIO.LOW)

def main():
    lastState=0
    while True:
        currentState =GPIO.input(switchPin)
        if currentState == 1 and lastState == 0:
            on()
        elif currentState == 0 and lastState == 1:
            off()
        lastState=currentState

def destroy():
    off()
    GPIO.cleanup()

if __name__ == '__main__':
    setup()
    try:
        main()
    except KeyboardInterrupt:
        destroy()
Code Explanation
import threading
Here, we import the Threading module and it allows you to do
multiple things at once, while normal programs can only execute code
from top to bottom. With Threading modules, the LED and the buzzer
can work separately.
def ledWork():
    while flag:
        GPIO.output(ALedPin,GPIO.HIGH)
        time.sleep(0.5)
        GPIO.output(ALedPin,GPIO.LOW)
        GPIO.output(BLedPin,GPIO.HIGH)
        time.sleep(0.5)
        GPIO.output(BLedPin,GPIO.LOW)
The function ledWork() helps to set the working state of these 2 LEDs:
it keeps the green LED lighting up for 0.5s and then turns off;
similarly, keeps the red LED lighting up for 0.5s and then turns off.
def buzzerWork():
    global pitch
    global note
    while flag:
        if note >= 800 or note <=130:
            pitch = -pitch
        note = note + pitch
        Buzz.ChangeFrequency(note)
        time.sleep(0.01)
The function buzzWork() is used to set the working state of the buzzer.
Here we set the frequency as between 130 and 800, to accumulate or decay
at an interval of 20.
def on():
    global flag
    flag = 1
    Buzz.start(50)
    tBuzz = threading.Thread(target=buzzerWork)
    tBuzz.start()
    tLed = threading.Thread(target=ledWork)
    tLed.start()
In the function on() :
Define the mark “flag=1”, indicating the ending of the control thread.
Start the Buzz, and set the duty cycle to 50%.
Create 2 separate threads so that the LED and the buzzer can work at the same time.
threading.Thread() function is used to create the thread and its prototype is as follows:
class threading.Thread(group=None, target=None, name=None, args=(), kwargs={}, *, daemon=None)
Among the construction methods, the principal parameter is target,
we need to assign a callable object (here are the functions ledWork
and BuzzWork) to target.
Next start() is called to start the thread object, ex., tBuzz.start() is used to start the newly installed tBuzz thread.
def off():
    global flag
    flag = 0
    Buzz.stop()
    GPIO.output(ALedPin,GPIO.LOW)
    GPIO.output(BLedPin,GPIO.LOW)
The function Off() defines “flag=0” so as to exit the threads
ledWork and BuzzWork and then turn off the buzzer and the LED.
def main():
    lastState=0
    while True:
        currentState =GPIO.input(switchPin)
        if currentState == 1 and lastState == 0:
            on()
        elif currentState == 0 and lastState == 1:
            off()
        lastState=currentState
Main() contains the whole process of the program: firstly read the value
of the slide switch; if the toggle switch is toggled to the right (the
reading is 1), the function on() is called, the buzzer is driven to emit
sounds and the the red and the green LEDs blink. Otherwise, the buzzer
and the LED don’t work.
Phenomenon Picture