Note
Hello, welcome to the SunFounder Raspberry Pi & Arduino & ESP32 Enthusiasts Community on Facebook! Dive deeper into Raspberry Pi, Arduino, and ESP32 with fellow enthusiasts.
Why Join?
Expert Support: Solve post-sale issues and technical challenges with help from our community and team.
Learn & Share: Exchange tips and tutorials to enhance your skills.
Exclusive Previews: Get early access to new product announcements and sneak peeks.
Special Discounts: Enjoy exclusive discounts on our newest products.
Festive Promotions and Giveaways: Take part in giveaways and holiday promotions.
👉 Ready to explore and create with us? Click [here] and join today!
4.1.10 Smart Fan
Note

Depending on your kit version, please identify whether you have ADC0834 or MCP3008 and proceed with the matching section.
Introduction
In this project, we will use motors, buttons and thermistors to make a manual + automatic smart fan whose wind speed is adjustable.
Required Components
In this project, we need the following components.
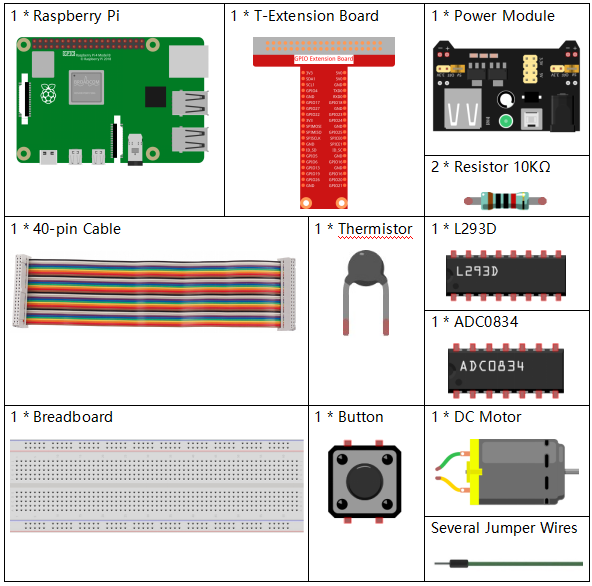
It’s definitely convenient to buy a whole kit, here’s the link:
Name |
ITEMS IN THIS KIT |
LINK |
|---|---|---|
Raphael Kit |
337 |
You can also buy them separately from the links below.
COMPONENT INTRODUCTION |
PURCHASE LINK |
|---|---|
- |
|
- |
|
- |
|
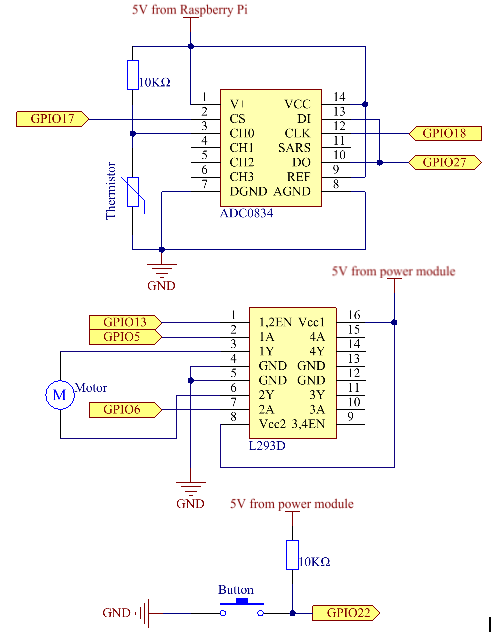
Schematic Diagram
T-Board Name |
physical |
wiringPi |
BCM |
GPIO17 |
Pin 11 |
0 |
17 |
GPIO18 |
Pin 12 |
1 |
18 |
GPIO27 |
Pin 13 |
2 |
27 |
GPIO22 |
Pin 15 |
3 |
22 |
GPIO5 |
Pin 29 |
21 |
5 |
GPIO6 |
Pin 31 |
22 |
6 |
GPIO13 |
Pin 33 |
23 |
13 |
Experimental Procedures
Step 1: Build the circuit.
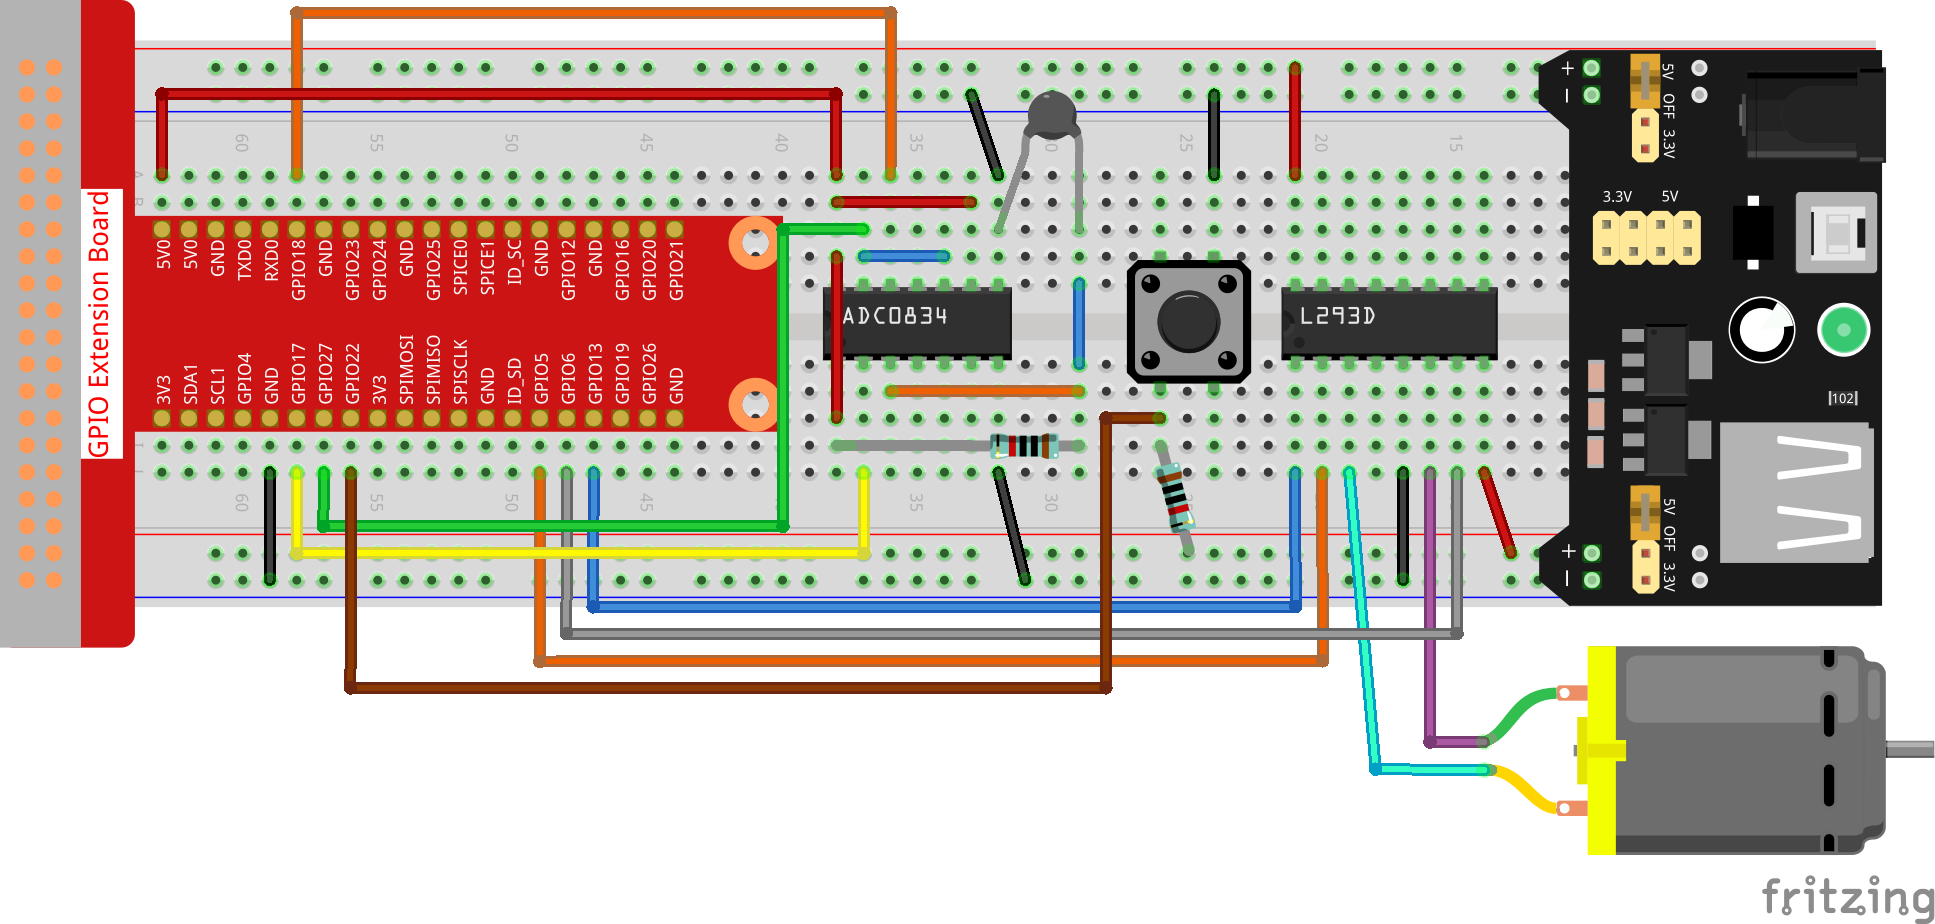
Note
The power module can apply a 9V battery with the 9V Battery Buckle in the kit. Insert the jumper cap of the power module into the 5V bus strips of the breadboard.
Step 2: Get into the folder of the code.
cd ~/raphael-kit/python
Step 3: Run.
sudo python3 4.1.10_SmartFan.py
As the code runs, start the fan by pressing the button. Every time you press, 1 speed grade is adjusted up or down. There are 5 kinds of speed grades: 0~4. When set to the 4th speed grade and you press the button, the fan stops working with a 0 wind speed.
Once the temperature goes up or down for more than 2℃, the speed automatically gets 1-grade faster or slower.
Code
Note
You can Modify/Reset/Copy/Run/Stop the code below. But before that, you need to go to source code path like raphael-kit/python. After modifying the code, you can run it directly to see the effect.
import RPi.GPIO as GPIO
import time
import ADC0834
import math

# Set up pins
MotorPin1   = 5
MotorPin2   = 6
MotorEnable = 13
BtnPin  = 22


def setup():
    global p_M1,p_M2
    ADC0834.setup()
    GPIO.setmode(GPIO.BCM)
    GPIO.setup(MotorPin1, GPIO.OUT)
    GPIO.setup(MotorPin2, GPIO.OUT)
    p_M1=GPIO.PWM(MotorPin1,2000)
    p_M2=GPIO.PWM(MotorPin2,2000)
    p_M1.start(0)
    p_M2.start(0)
    GPIO.setup(MotorEnable, GPIO.OUT, initial=GPIO.LOW)
    GPIO.setup(BtnPin, GPIO.IN)

def temperature():
    analogVal = ADC0834.getResult()
    Vr = 5 * float(analogVal) / 255
    Rt = 10000 * Vr / (5 - Vr)
    temp = 1/(((math.log(Rt / 10000)) / 3950) + (1 / (273.15+25)))
    Cel = temp - 273.15
    Fah = Cel * 1.8 + 32
    return Cel

def motor(level):
    if level == 0:
        GPIO.output(MotorEnable, GPIO.LOW)
        return 0
    if level>=4:
        level = 4
    GPIO.output(MotorEnable, GPIO.HIGH)
    p_M1.ChangeDutyCycle(level*25)
    return level


def main():
    lastState=0
    level=0
    markTemp = temperature()
    while True:
        currentState =GPIO.input(BtnPin)
        currentTemp=temperature()
        if currentState == 1 and lastState == 0:
            level=(level+1)%5
            markTemp = currentTemp
            time.sleep(0.5)
        lastState=currentState
        if level!=0:
            if currentTemp-markTemp <= -2:
                level = level -1
                markTemp=currentTemp
            if currentTemp-markTemp >= 2:
                level = level +1
                markTemp=currentTemp
        level = motor(level)


def destroy():
    GPIO.output(MotorEnable, GPIO.LOW)
    p_M1.stop()
    p_M2.stop()
    GPIO.cleanup()

if __name__ == '__main__':
    setup()
    try:
        main()
    except KeyboardInterrupt:
        destroy()
Code Explanation
def temperature():
    analogVal = ADC0834.getResult()
    Vr = 5 * float(analogVal) / 255
    Rt = 10000 * Vr / (5 - Vr)
    temp = 1/(((math.log(Rt / 10000)) / 3950) + (1 / (273.15+25)))
    Cel = temp - 273.15
    Fah = Cel * 1.8 + 32
    return Cel
temperture() works by converting thermistor values read by ADC0834
into temperature values. Refer to 2.2.2 Thermistor for more details.
def motor(level):
    if level == 0:
        GPIO.output(MotorEnable, GPIO.LOW)
        return 0
    if level>=4:
        level = 4
    GPIO.output(MotorEnable, GPIO.HIGH)
    p_M1.ChangeDutyCycle(level*25)
    return level
This function controls the rotating speed of the motor. The range of the Lever: 0-4 (level 0 stops the working motor). One level adjustment stands for a 25% change of the wind speed.
def main():
    lastState=0
    level=0
    markTemp = temperature()
    while True:
        currentState =GPIO.input(BtnPin)
        currentTemp=temperature()
        if currentState == 1 and lastState == 0:
            level=(level+1)%5
            markTemp = currentTemp
            time.sleep(0.5)
        lastState=currentState
        if level!=0:
            if currentTemp-markTemp <= -2:
                level = level -1
                markTemp=currentTemp
            if currentTemp-markTemp >= 2:
                level = level +1
                markTemp=currentTemp
        level = motor(level)
The function main() contains the whole program process as shown:
Constantly read the button state and the current temperature.
Every press makes level+1 and at the same time, the temperature is updated. The Level ranges 1~4.
As the fan works ( the level is not 0), the temperature is under detection. A 2℃+ change causes the up and down of the level.
The motor changes the rotating speed with the Level.
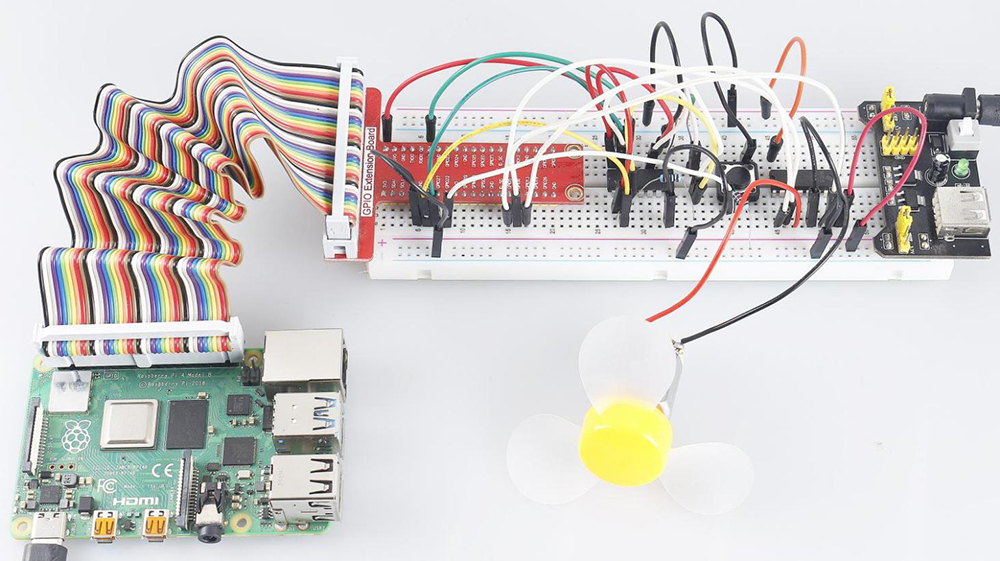
Phenomenon Picture