Note
Hello, welcome to the SunFounder Raspberry Pi & Arduino & ESP32 Enthusiasts Community on Facebook! Dive deeper into Raspberry Pi, Arduino, and ESP32 with fellow enthusiasts.
Why Join?
Expert Support: Solve post-sale issues and technical challenges with help from our community and team.
Learn & Share: Exchange tips and tutorials to enhance your skills.
Exclusive Previews: Get early access to new product announcements and sneak peeks.
Special Discounts: Enjoy exclusive discounts on our newest products.
Festive Promotions and Giveaways: Take part in giveaways and holiday promotions.
👉 Ready to explore and create with us? Click [here] and join today!
4.1.4 Automatic Capture Camera
Introduction
When you are out, the little squirrels in the woods might visit your windowsill. Let’s make a automatic capture camera to leave pictures of these little cuties!
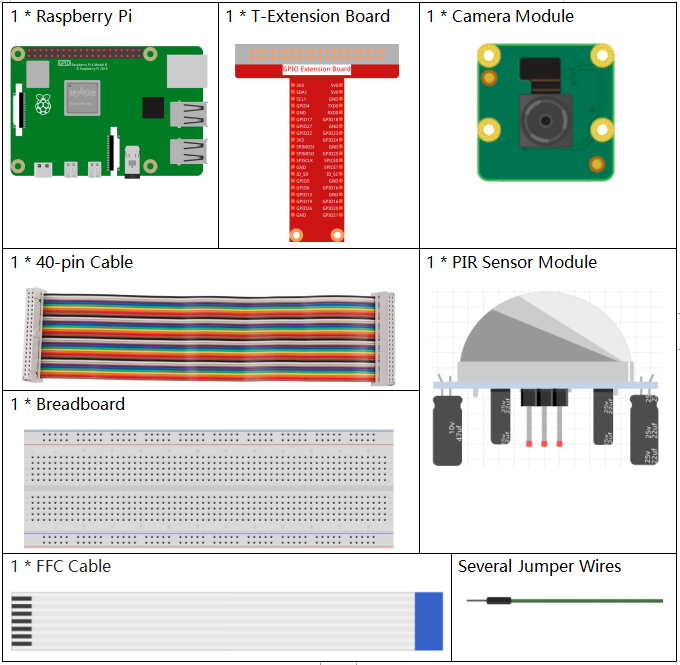
Required Components
In this project, we need the following components.
It’s definitely convenient to buy a whole kit, here’s the link:
Name |
ITEMS IN THIS KIT |
LINK |
|---|---|---|
Raphael Kit |
337 |
You can also buy them separately from the links below.
COMPONENT INTRODUCTION |
PURCHASE LINK |
|---|---|
- |
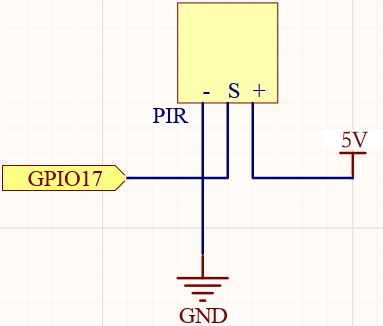
Schematic Diagram
T-Board Name |
physical |
wiringPi |
BCM |
GPIO17 |
Pin 11 |
0 |
17 |
Experimental Procedures
Before this project, you need to make sure you complete 3.1.1 Photograph Module .
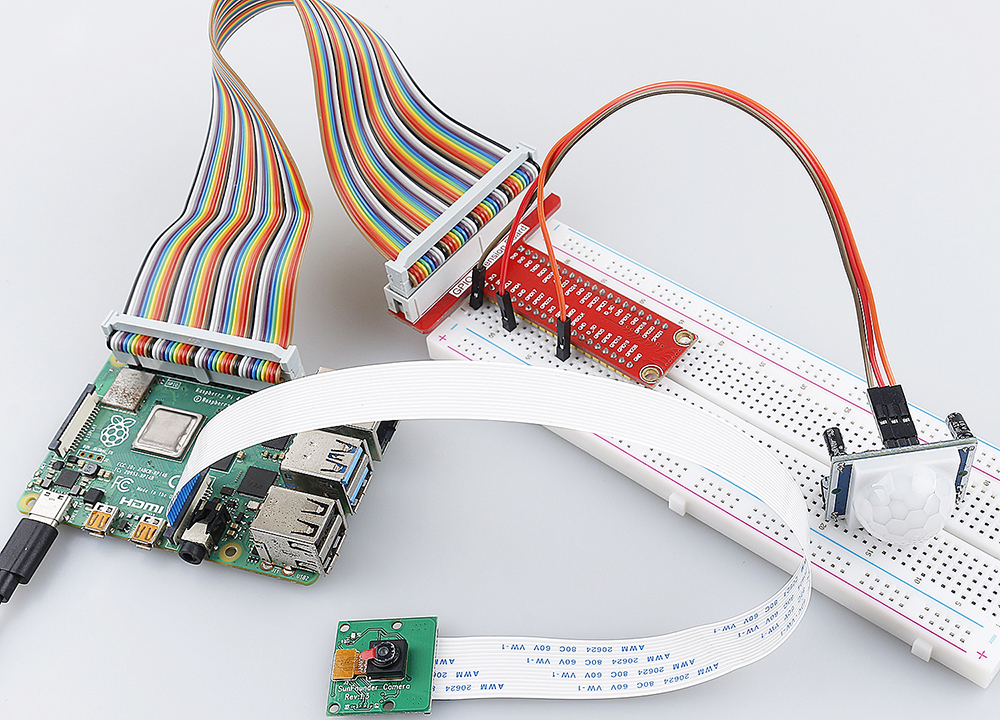
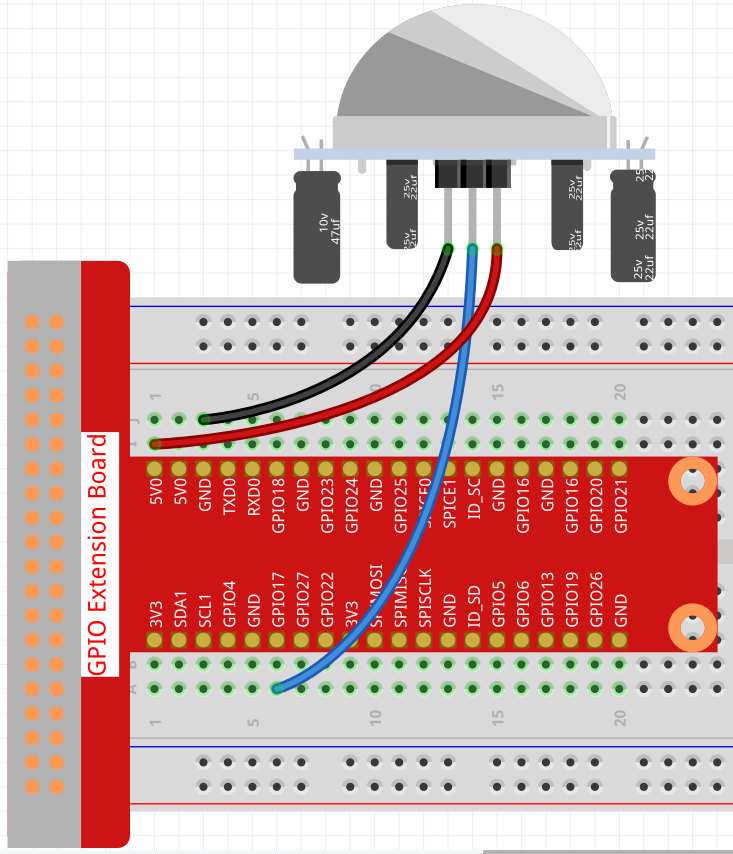
Step 1: Build the circuit.
Step 2: To connect the camera module and complete the configuration, please refer to: Camera Module.
Step 3: Go into the Raspberry Pi Desktop. You may need a screen for a better experience, refer to: Connect your Raspberry Pi. Or access the Raspberry Pi desktop remotely, for a detailed tutorial please refer to Remote Desktop.
Step 4: Open a Terminal and get into the folder of the code.
cd ~/raphael-kit/python/
Step 5: Run.
sudo python3 4.1.4_AutomaticCaptureCamera.py
After the code runs, PIR will detect the surrounding environment, and if it senses the little squirrel passing by, the camera will take a photo. The photo interval is 3 seconds, and the total number of photos taken will be displayed through the print window.
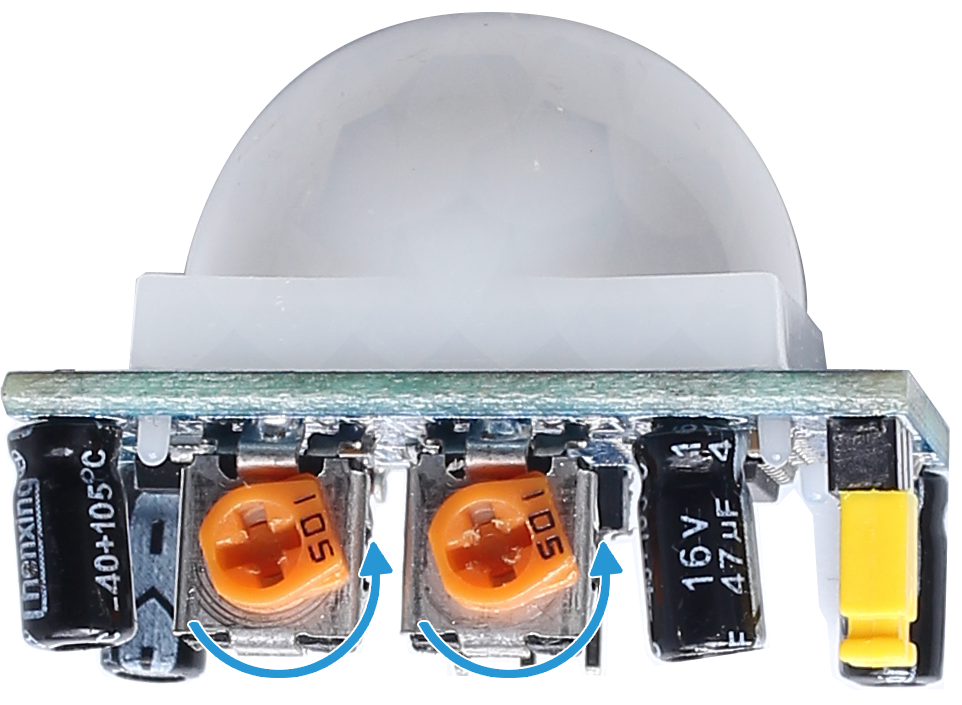
There are two potentiometers on the PIR module: one is to adjust sensitivity and the other is to adjust the detection distance. To make the PIR module work better, you You need to turn both of them counterclockwise to the end.
Note
You can also open 4.1.4_AutomaticCaptureCamera.py in the ~/raphael-kit/python/ path with a Python IDE, click Run button to run, and stop the code with Stop button.
Code
Note
You can Modify/Reset/Copy/Run/Stop the code below. But before that, you need to go to source code path like raphael-kit/python. After modifying the code, you can run it directly to see the effect.
#!/usr/bin/env python3
import time
import os
import RPi.GPIO as GPIO
from picamera2 import Picamera2

# ----------------------------
# USER DIRECTORY
# ----------------------------
user = os.getlogin()
user_home = os.path.expanduser(f'~{user}')

# ----------------------------
# GPIO SETUP
# ----------------------------
PIR_PIN = 17  # PIR motion sensor connected to GPIO17

GPIO.setmode(GPIO.BCM)
GPIO.setup(PIR_PIN, GPIO.IN, pull_up_down=GPIO.PUD_DOWN)

# ----------------------------
# CAMERA SETUP
# ----------------------------
camera = Picamera2()
camera.start()

print("Motion detection started. Press Ctrl+C to exit.")

# ----------------------------
# MAIN LOOP
# ----------------------------
try:
    i = 1
    while True:
        if GPIO.input(PIR_PIN) == GPIO.HIGH:
            filename = f"{user_home}/capture{i}.jpg"
            camera.capture_file(filename)
            print(f"Motion detected. Saved image #{i}: {filename}")
            time.sleep(3)
            i += 1
        else:
            print("waiting")
            time.sleep(0.5)

# ----------------------------
# KEYBOARD INTERRUPT
# ----------------------------
except KeyboardInterrupt:
    print("\nKeyboard interrupt received. Exiting program...")

# ----------------------------
# CLEANUP
# ----------------------------
finally:
    try:
        camera.close()
    except:
        pass

    GPIO.cleanup()
    print("Program exited cleanly.")
Code Explanation
Reads the current user’s home directory for saving captured images.
user = os.getlogin()
user_home = os.path.expanduser(f'~{user}')
This obtains the active user’s name and builds a full path to the home directory.
Sets up GPIO and configures the PIR motion sensor on
GPIO17as an input.PIR_PIN = 17 GPIO.setmode(GPIO.BCM) GPIO.setup(PIR_PIN, GPIO.IN, pull_up_down=GPIO.PUD_DOWN)
Using a pull-down resistor ensures that the pin reads
LOWwhen no motion is detected.Initializes the Picamera2 instance and starts the camera.
camera = Picamera2()
camera.start()
The camera is activated so it can capture images immediately when motion is detected.
Detects motion by reading the PIR sensor input state.
if GPIO.input(PIR_PIN) == GPIO.HIGH:
When the PIR senses movement, it outputs a
HIGHsignal, triggering the capture process.Captures an image and saves it using a sequential file number.
filename = f"{user_home}/capture{i}.jpg"
camera.capture_file(filename)
Each detection saves a new image as
capture1.jpg,capture2.jpg, and so on.Delays for three seconds after a motion-triggered capture.
time.sleep(3)
This prevents multiple images from being taken too quickly after a single motion event.
Prints “waiting” when no motion is detected and checks again after a short delay.
else:
    print("waiting")
    time.sleep(0.5)
This ensures constant monitoring while reducing unnecessary CPU usage.
Handles keyboard interruption (Ctrl+C) to exit the program safely.
except KeyboardInterrupt:
    print("\nKeyboard interrupt received. Exiting program...")
A clean exit message is printed when the user stops the program manually.
Releases camera and GPIO resources before exiting.
finally:
    camera.close()
    GPIO.cleanup()
This ensures the camera shuts down properly and all GPIO pins return to a safe state.
Phenomenon Picture