Note
Hello, welcome to the SunFounder Raspberry Pi & Arduino & ESP32 Enthusiasts Community on Facebook! Dive deeper into Raspberry Pi, Arduino, and ESP32 with fellow enthusiasts.
Why Join?
Expert Support: Solve post-sale issues and technical challenges with help from our community and team.
Learn & Share: Exchange tips and tutorials to enhance your skills.
Exclusive Previews: Get early access to new product announcements and sneak peeks.
Special Discounts: Enjoy exclusive discounts on our newest products.
Festive Promotions and Giveaways: Take part in giveaways and holiday promotions.
👉 Ready to explore and create with us? Click [here] and join today!
4.1.1 Camera
Introduction
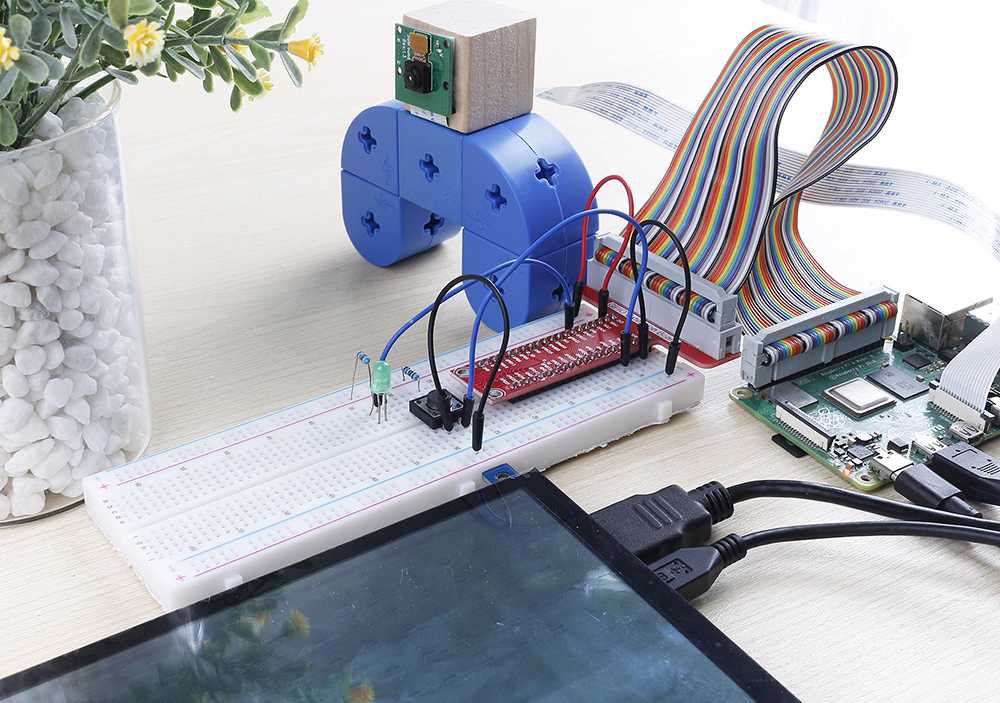
Here we will make a camera with a shutter, when you press the button, the camera shoots while the LED flashes.
Required Components
In this project, we need the following components.
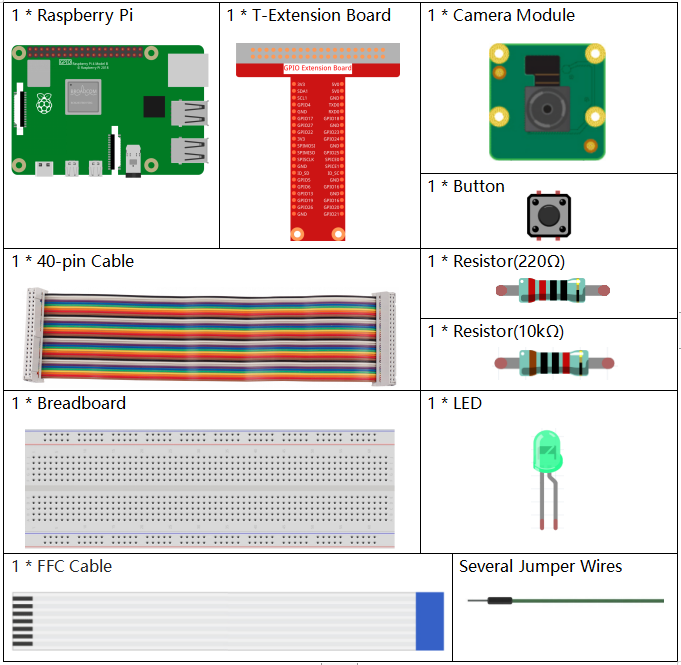
It’s definitely convenient to buy a whole kit, here’s the link:
Name |
ITEMS IN THIS KIT |
LINK |
|---|---|---|
Raphael Kit |
337 |
You can also buy them separately from the links below.
COMPONENT INTRODUCTION |
PURCHASE LINK |
|---|---|
Schematic Diagram
T-Board Name |
physical |
wiringPi |
BCM |
GPIO17 |
Pin 11 |
0 |
17 |
GPIO18 |
Pin 12 |
1 |
18 |

Experimental Procedures
Step 1: Build the circuit.

Step 2: To connect the camera module and complete the configuration, please refer to: Camera Module.
Step 3: Go into the Raspberry Pi Desktop. You may need a screen for a better experience, refer to: Connect your Raspberry Pi. Or access the Raspberry Pi desktop remotely, for a detailed tutorial please refer to Remote Desktop.
Step 4: Open a Terminal and get into the folder of the code.
cd ~/raphael-kit/python/
Step 5: Run.
sudo python3 4.1.1_Camera.py
After the code runs:
A live camera preview window opens.
The program waits for a button press.
When the button is pressed:
The LED flashes three times.
The camera captures a photo.
The LED stays on for 0.5 seconds as confirmation.
The image is saved with a timestamped filename in
/home/<username>/.
Press
Ctrl+Cat any time to stop the preview, release GPIO resources, and exit the program cleanly.
Note
You can also open 4.1.1_Camera.py in the ~/raphael-kit/python/ path with a Python IDE, click Run button to run, and stop the code with Stop button.
If you want to download the photo to your PC, please refer to FileZilla Software.
Code
#!/usr/bin/env python3
import time
import os
import RPi.GPIO as GPIO
from picamera2 import Picamera2, Preview

# ----------------------------
# GPIO SETUP
# ----------------------------

BUTTON_PIN = 18  # The push button is connected to GPIO18
LED_PIN = 17     # The LED is connected to GPIO17

GPIO.setmode(GPIO.BCM)  # Use BCM GPIO numbering

# The button uses a 10K pull-up resistor externally.
# When released → HIGH, when pressed → LOW.
GPIO.setup(BUTTON_PIN, GPIO.IN, pull_up_down=GPIO.PUD_UP)

# LED is an output (HIGH → ON, LOW → OFF)
GPIO.setup(LED_PIN, GPIO.OUT)
GPIO.output(LED_PIN, GPIO.LOW)  # Ensure LED is OFF at startup

# ----------------------------
# USER DIRECTORY SETUP
# ----------------------------

# Get the current logged-in username
user = os.getlogin()

# Build the path to the user's home directory (ex: /home/pi)
user_home = os.path.expanduser(f"~{user}")

# ----------------------------
# CAMERA SETUP
# ----------------------------

# Create a Picamera2 object
camera = Picamera2()

# Create a preview configuration:
# main → the main camera stream
# size → resolution 800x600
# format → display format used by the preview window
preview_config = camera.create_preview_configuration(
    main={"size": (800, 600), "format": "XRGB8888"}
)

# Apply the configuration to the camera
camera.configure(preview_config)

# Start the preview window using QTGL (GPU-accelerated)
camera.start_preview(Preview.QTGL)

# Start the camera hardware
camera.start()

print("Ready! Press the button to take a photo...")

# ----------------------------
# MAIN LOOP
# ----------------------------
try:
    while True:
        # Check if button is pressed (LOW means pressed)
        if GPIO.input(BUTTON_PIN) == GPIO.LOW:
            print("Button pressed! Taking photo...")

            # Flash LED 3 times to warn before taking the photo
            for _ in range(3):
                GPIO.output(LED_PIN, GPIO.HIGH)
                time.sleep(0.1)
                GPIO.output(LED_PIN, GPIO.LOW)
                time.sleep(0.1)

            # Build a unique filename using current date and time
            # Example: /home/pi/my_photo_20251201_143522.jpg
            timestamp = time.strftime("%Y%m%d_%H%M%S")
            filename = os.path.join(user_home, f"my_photo_{timestamp}.jpg")

            # Capture the image
            camera.capture_file(filename)

            print(f"Photo saved to: {filename}")

            # Turn LED ON briefly to confirm capture
            GPIO.output(LED_PIN, GPIO.HIGH)
            time.sleep(0.5)
            GPIO.output(LED_PIN, GPIO.LOW)

            # Debounce delay to prevent repeated triggers
            time.sleep(0.3)

        # Small delay to reduce CPU usage
        time.sleep(0.01)

# ----------------------------
# CLEAN EXIT WHEN CTRL+C IS PRESSED
# ----------------------------
except KeyboardInterrupt:
    print("\nCtrl+C received, exiting...")

# ----------------------------
# CLEANUP SECTION
# ----------------------------
finally:
    # Safely try to stop the camera preview
    try:
        camera.stop_preview()
    except:
        pass  # Ignore errors if preview wasn't running

    # Safely close the camera device
    try:
        camera.close()
    except:
        pass

    # Reset GPIO pins to a safe state
    GPIO.cleanup()

    print("Program exited cleanly.")
Code Explanation
Checks if the button connected to
BUTTON_PINis pressed.if GPIO.input(BUTTON_PIN) == GPIO.LOW:
Since the button uses a pull-up resistor, its default state is
HIGH. When the button is pressed, the signal becomesLOWand triggers the photo capture process.Flashes the LED three times as visual feedback before taking a photo.
for _ in range(3):
    GPIO.output(LED_PIN, GPIO.HIGH)
    time.sleep(0.1)
    GPIO.output(LED_PIN, GPIO.LOW)
    time.sleep(0.1)
This indicates that the Raspberry Pi is preparing to capture an image.
Generates a unique filename using a timestamp and captures a photo.
timestamp = time.strftime("%Y%m%d_%H%M%S")
filename = os.path.join(user_home, f"my_photo_{timestamp}.jpg")
camera.capture_file(filename)
The timestamp ensures that each captured photo has a different filename. The image is then saved to the user’s home directory.
Turns the LED on for 0.5 seconds to confirm that a photo was taken.
GPIO.output(LED_PIN, GPIO.HIGH)
time.sleep(0.5)
GPIO.output(LED_PIN, GPIO.LOW)
This brief illumination signals that the capture was successful.
Adds a short delay to prevent multiple triggers from a single button press.
time.sleep(0.3)
This debounce delay ensures reliable button operation.
Phenomenon Picture