Nota
Ciao, benvenuto nella community di SunFounder per gli appassionati di Raspberry Pi, Arduino e ESP32 su Facebook! Approfondisci le tue conoscenze su Raspberry Pi, Arduino ed ESP32 insieme ad altri appassionati.
Perché unirti a noi?
Supporto Esperto: Risolvi problemi post-vendita e affronta sfide tecniche con l’aiuto della nostra community e del nostro team.
Impara e Condividi: Scambia consigli e tutorial per migliorare le tue competenze.
Anteprime Esclusive: Ottieni accesso anticipato agli annunci di nuovi prodotti e alle anteprime esclusive.
Sconti Speciali: Approfitta di sconti esclusivi sui nostri ultimi prodotti.
Promozioni Festive e Giveaway: Partecipa a giveaway e promozioni durante le festività.
👉 Sei pronto a esplorare e creare con noi? Clicca [Qui] e unisciti oggi stesso!
4.1.11 Blocco con Password
Introduzione
In questo progetto, utilizzeremo una tastiera e un display LCD per creare una serratura a combinazione. L’LCD visualizzerà un messaggio corrispondente che ti inviterà a digitare la tua password sulla tastiera. Se la password viene inserita correttamente, verrà visualizzato «Correct».
Basandoci su questo progetto, possiamo aggiungere ulteriori componenti elettronici, come un cicalino, LED e così via, per aggiungere diversi fenomeni sperimentali all’inserimento della password.
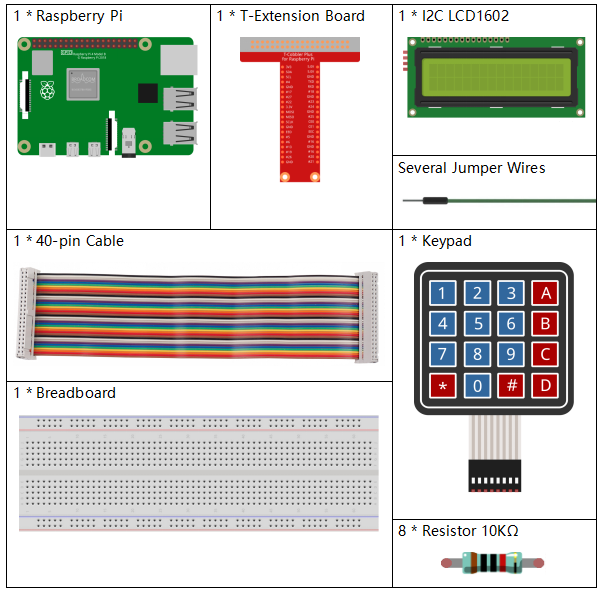
Componenti Necessari
In questo progetto, ci servono i seguenti componenti.
È sicuramente conveniente acquistare un kit completo, ecco il link:
Nome |
ELEMENTI NEL KIT |
LINK |
|---|---|---|
Kit Raphael |
337 |
Puoi anche acquistare i componenti separatamente dai link qui sotto.
INTRODUZIONE AI COMPONENTI |
LINK D’ACQUISTO |
|---|---|
- |
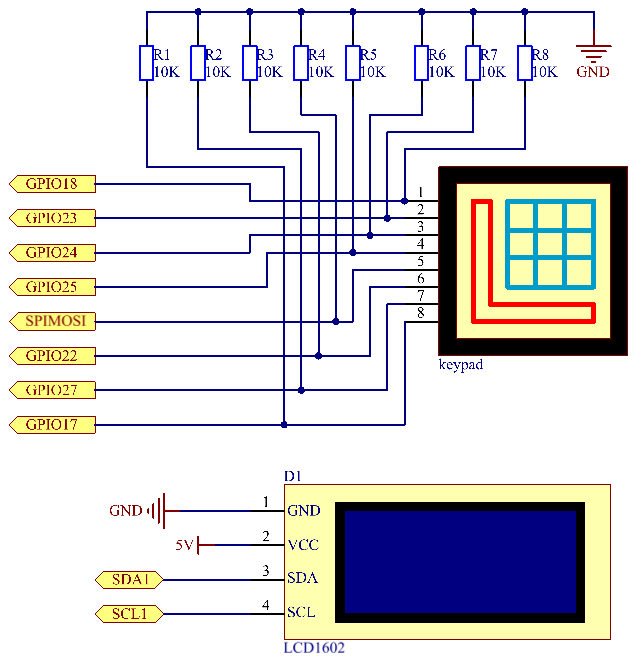
Schema Elettrico
T-Board Name |
physical |
wiringPi |
BCM |
GPIO18 |
Pin 12 |
1 |
18 |
GPIO23 |
Pin 16 |
4 |
23 |
GPIO24 |
Pin 18 |
5 |
24 |
GPIO25 |
Pin 22 |
6 |
25 |
GPIO17 |
Pin 11 |
0 |
17 |
GPIO27 |
Pin 13 |
2 |
27 |
GPIO22 |
Pin 15 |
3 |
22 |
SPIMOSI |
Pin 19 |
12 |
10 |
SDA1 |
Pin 3 |
||
SCL1 |
Pin 5 |
Procedure Sperimentali
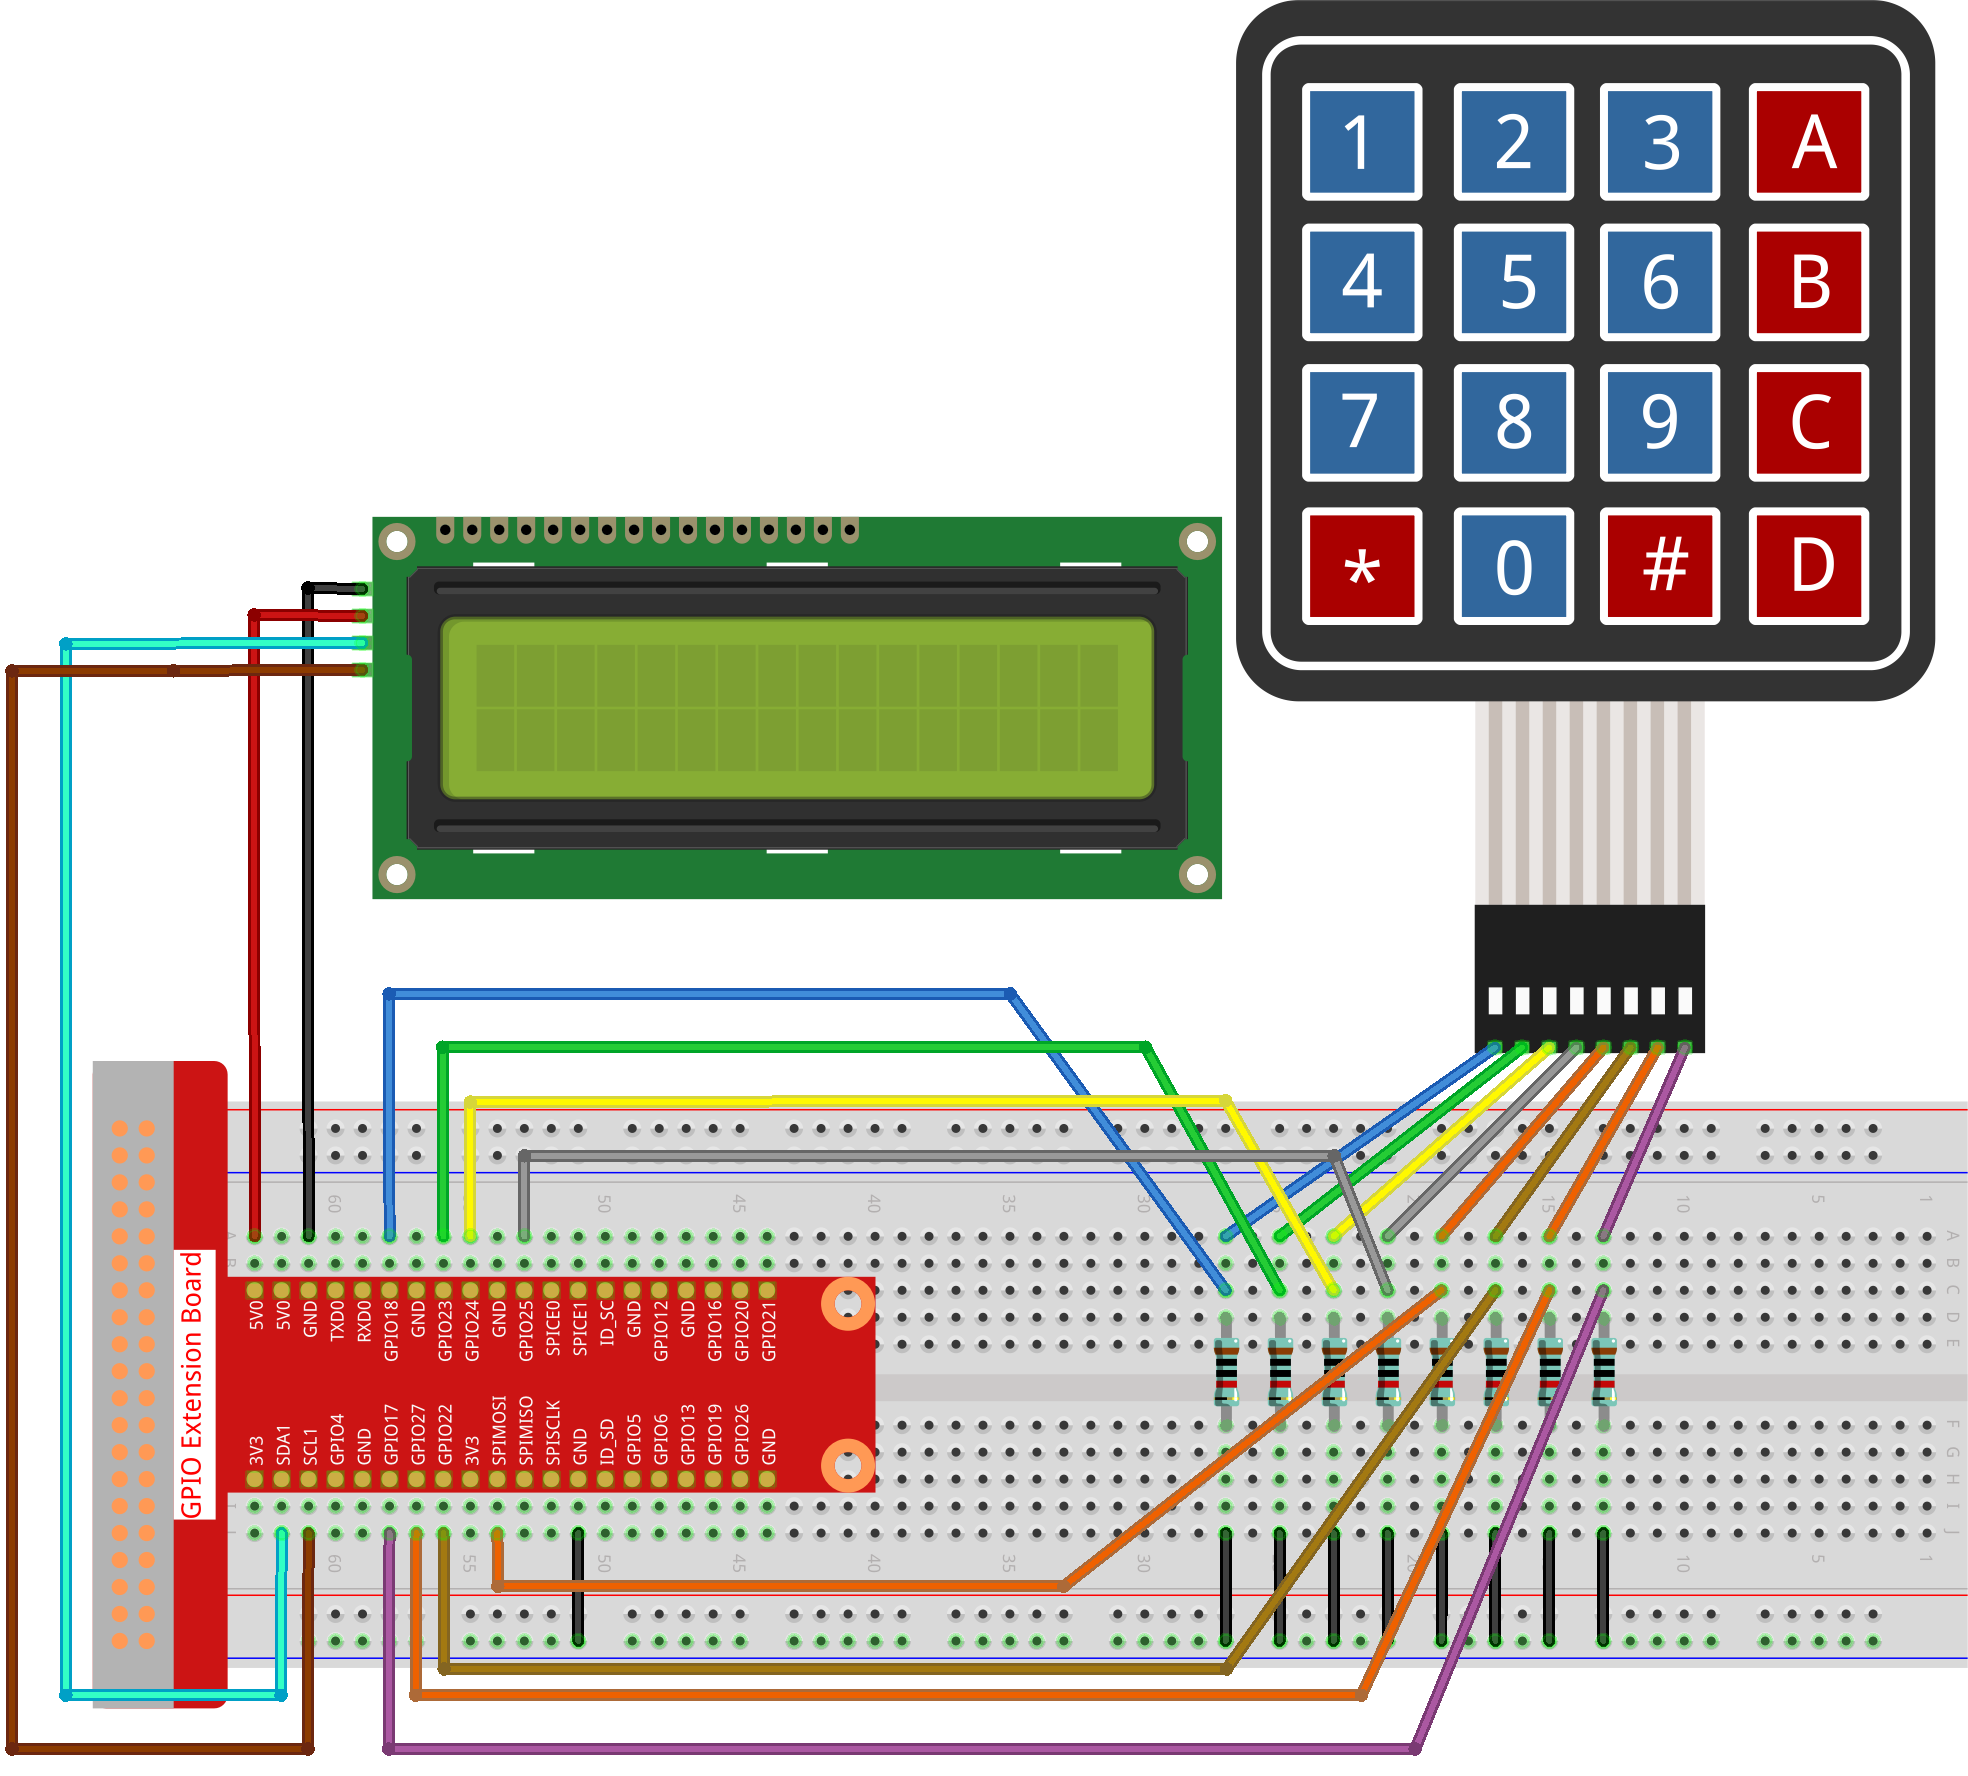
Passo 1: Costruisci il circuito.
Passo 2: Cambia directory.
cd ~/raphael-kit/python-pi5
Passo 3: Esegui.
sudo python3 4.1.14_PasswordLock_zero.py
Dopo l’esecuzione del codice, la tastiera viene utilizzata per inserire la password: 1984. Se appare “CORRECT” su LCD1602, la password è corretta; altrimenti, apparirà “WRONG KEY”.
Nota
Se ricevi l’errore
FileNotFoundError: [Errno 2] No such file or directory: '/dev/i2c-1', devi fare riferimento a Configurazione I²C per abilitare l’I2C.Se ricevi l’errore
ModuleNotFoundError: No module named 'smbus2', eseguisudo apt install python3-smbus2.Se appare l’errore
OSError: [Errno 121] Remote I/O error, significa che il modulo è cablato in modo errato o è danneggiato.Se il codice e il cablaggio sono corretti, ma l’LCD non visualizza contenuti, puoi regolare il potenziometro sul retro per aumentare il contrasto.
Avvertimento
Se viene visualizzato l’errore RuntimeError: Cannot determine SOC peripheral base address, fare riferimento a If gpiozero doesn’t work..
Code
Nota
Puoi Modificare/Resettare/Copiare/Eseguire/Fermare il codice qui sotto. Ma prima devi andare nel percorso del codice sorgente come raphael-kit/python-pi5. Dopo aver modificato il codice, puoi eseguirlo direttamente per vedere l’effetto.
#!/usr/bin/env python3

from gpiozero import DigitalOutputDevice, Button
from time import sleep
import LCD1602

class Keypad:
    def __init__(self, rows_pins, cols_pins, keys):
        """
        Initialize the Keypad with specified row and column pins and keys.
        :param rows_pins: List of GPIO pins for the rows.
        :param cols_pins: List of GPIO pins for the columns.
        :param keys: List of keys in the keypad layout.
        """
        self.rows = [DigitalOutputDevice(pin) for pin in rows_pins]  # Configurazione dei pin delle righe
        self.cols = [Button(pin, pull_up=False) for pin in cols_pins]  # Configurazione dei pin delle colonne
        self.keys = keys  # Layout dei tasti della tastiera

    def read(self):
        """
        Read and return a list of keys that are currently pressed.
        :return: List of pressed keys.
        """
        pressed_keys = []
        for i, row in enumerate(self.rows):
            row.on()  # Attiva la riga corrente
            for j, col in enumerate(self.cols):
                if col.is_pressed:
                    index = i * len(self.cols) + j
                    pressed_keys.append(self.keys[index])
            row.off()  # Disattiva la riga dopo il controllo
        return pressed_keys

# Configurazione per la verifica della password
LENS = 4
password = ['1', '9', '8', '4']  # Password preimpostata
testword = ['0', '0', '0', '0']  # Archiviazione dell'input dell'utente
keyIndex = 0  # Indice per i tasti immessi

def check():
    """
    Check if the entered password matches the preset password.
    :return: 1 if match, 0 otherwise.
    """
    for i in range(LENS):
        if password[i] != testword[i]:
            return 0
    return 1

def setup():
    """
    Setup the keypad and LCD display.
    """
    global keypad, last_key_pressed
    # Configurazione dei pin per la tastiera
    rows_pins = [18, 23, 24, 25]
    cols_pins = [10, 22, 27, 17]
    keys = ["1", "2", "3", "A",
            "4", "5", "6", "B",
            "7", "8", "9", "C",
            "*", "0", "#", "D"]

    # Inizializza tastiera e LCD
    keypad = Keypad(rows_pins, cols_pins, keys)
    last_key_pressed = []
    LCD1602.init(0x27, 1)  # Inizializza LCD
    LCD1602.clear()
    LCD1602.write(0, 0, 'WELCOME!')
    LCD1602.write(2, 1, 'Enter password')
    sleep(2)

def loop():
    """
    Main loop for handling keypad input and password verification.
    """
    global keyIndex, LENS, keypad, last_key_pressed
    while True:
        pressed_keys = keypad.read()
        if pressed_keys and pressed_keys != last_key_pressed:
            if keyIndex < LENS:
                LCD1602.clear()
                LCD1602.write(0, 0, "Enter password:")
                LCD1602.write(15 - keyIndex, 1, pressed_keys[0])
                testword[keyIndex] = pressed_keys[0]
                keyIndex += 1

            if keyIndex == LENS:
                if check() == 0:
                    LCD1602.clear()
                    LCD1602.write(3, 0, "WRONG KEY!")
                    LCD1602.write(0, 1, "please try again")
                else:
                    LCD1602.clear()
                    LCD1602.write(4, 0, "CORRECT!")
                    LCD1602.write(2, 1, "welcome back")
                keyIndex = 0  # Reset key index after checking

        last_key_pressed = pressed_keys
        sleep(0.1)

try:
    setup()
    loop()
except KeyboardInterrupt:
    LCD1602.clear()  # Pulisci il display LCD in caso di interruzione
Spiegazione del Codice
Lo script importa le classi per la gestione dei dispositivi di output digitale e dei pulsanti dalla libreria gpiozero. Importa anche la funzione
sleepdal modulo time, consentendo di aggiungere ritardi nell’esecuzione dello script. Inoltre, viene importata la libreria LCD1602 per controllare il display LCD1602.#!/usr/bin/env python3 from gpiozero import DigitalOutputDevice, Button from time import sleep import LCD1602
Definisce una classe personalizzata per la gestione della tastiera. Inizializza la tastiera con i pin delle righe e delle colonne specificati e fornisce un metodo
readper rilevare i tasti premuti.class Keypad: def __init__(self, rows_pins, cols_pins, keys): """ Initialize the Keypad with specified row and column pins and keys. :param rows_pins: List of GPIO pins for the rows. :param cols_pins: List of GPIO pins for the columns. :param keys: List of keys in the keypad layout. """ self.rows = [DigitalOutputDevice(pin) for pin in rows_pins] # Configurazione dei pin delle righe self.cols = [Button(pin, pull_up=False) for pin in cols_pins] # Configurazione dei pin delle colonne self.keys = keys # Layout dei tasti della tastiera def read(self): """ Read and return a list of keys that are currently pressed. :return: List of pressed keys. """ pressed_keys = [] for i, row in enumerate(self.rows): row.on() # Attiva la riga corrente for j, col in enumerate(self.cols): if col.is_pressed: index = i * len(self.cols) + j pressed_keys.append(self.keys[index]) row.off() # Disattiva la riga dopo il controllo return pressed_keys
Imposta il sistema di verifica della password.
LENSdefinisce la lunghezza della password.passwordè la password preimpostata corretta, mentretestwordviene utilizzato per memorizzare l’input dell’utente.keyIndextraccia la posizione corrente nell’input dell’utente.# Configurazione per la verifica della password LENS = 4 password = ['1', '9', '8', '4'] # Password preimpostata testword = ['0', '0', '0', '0'] # Archiviazione dell'input dell'utente keyIndex = 0 # Indice per i tasti immessi
Funzione per confrontare la password inserita (
testword) con quella preimpostata (password) e restituire il risultato.def check(): """ Check if the entered password matches the preset password. :return: 1 if match, 0 otherwise. """ for i in range(LENS): if password[i] != testword[i]: return 0 return 1
Inizializza la tastiera e il display LCD. Mostra un messaggio di benvenuto e le istruzioni per inserire la password.
def setup():
    """
    Setup the keypad and LCD display.
    """
    global keypad, last_key_pressed
    # Configurazione dei pin per la tastiera
    rows_pins = [18, 23, 24, 25]
    cols_pins = [10, 22, 27, 17]
    keys = ["1", "2", "3", "A",
            "4", "5", "6", "B",
            "7", "8", "9", "C",
            "*", "0", "#", "D"]

    # Inizializza tastiera e LCD
    keypad = Keypad(rows_pins, cols_pins, keys)
    last_key_pressed = []
    LCD1602.init(0x27, 1)  # Inizializza LCD
    LCD1602.clear()
    LCD1602.write(0, 0, 'WELCOME!')
    LCD1602.write(2, 1, 'Enter password')
    sleep(2)
Il ciclo principale gestisce l’input da tastiera e la verifica della password. Aggiorna il display LCD in base alla password inserita e fornisce feedback se la password è corretta o errata.
def loop():
    """
    Main loop for handling keypad input and password verification.
    """
    global keyIndex, LENS, keypad, last_key_pressed
    while True:
        pressed_keys = keypad.read()
        if pressed_keys and pressed_keys != last_key_pressed:
            if keyIndex < LENS:
                LCD1602.clear()
                LCD1602.write(0, 0, "Enter password:")
                LCD1602.write(15 - keyIndex, 1, pressed_keys[0])
                testword[keyIndex] = pressed_keys[0]
                keyIndex += 1

            if keyIndex == LENS:
                if check() == 0:
                    LCD1602.clear()
                    LCD1602.write(3, 0, "WRONG KEY!")
                    LCD1602.write(0, 1, "please try again")
                else:
                    LCD1602.clear()
                    LCD1602.write(4, 0, "CORRECT!")
                    LCD1602.write(2, 1, "welcome back")
                keyIndex = 0  # Reimposta l'indice dei tasti dopo la verifica

        last_key_pressed = pressed_keys
        sleep(0.1)
Esegue la configurazione e avvia il ciclo principale. Permette una chiusura pulita del programma utilizzando l’interruzione da tastiera (Ctrl+C), ripulendo il display LCD.
try:
    setup()
    loop()
except KeyboardInterrupt:
    LCD1602.clear()  # Pulisci il display LCD in caso di interruzione