Note
Bonjour et bienvenue dans la Communauté Facebook des passionnés de Raspberry Pi, Arduino et ESP32 de SunFounder ! Plongez plus profondément dans l’univers des Raspberry Pi, Arduino et ESP32 avec d’autres passionnés.
Pourquoi rejoindre ?
Support d’experts : Résolvez les problèmes après-vente et les défis techniques avec l’aide de notre communauté et de notre équipe.
Apprendre et partager : Échangez des astuces et des tutoriels pour améliorer vos compétences.
Aperçus exclusifs : Accédez en avant-première aux annonces de nouveaux produits et aux aperçus.
Réductions spéciales : Profitez de réductions exclusives sur nos produits les plus récents.
Promotions festives et cadeaux : Participez à des cadeaux et des promotions de vacances.
👉 Prêt à explorer et à créer avec nous ? Cliquez [Ici] et rejoignez-nous aujourd’hui !
4.1.1 Caméra
Introduction
Nous allons ici fabriquer un appareil photo avec un déclencheur. Lorsque vous appuyez sur le bouton, l’appareil photo prend une photo tandis que la LED clignote.
Composants nécessaires
Pour ce projet, nous avons besoin des composants suivants.
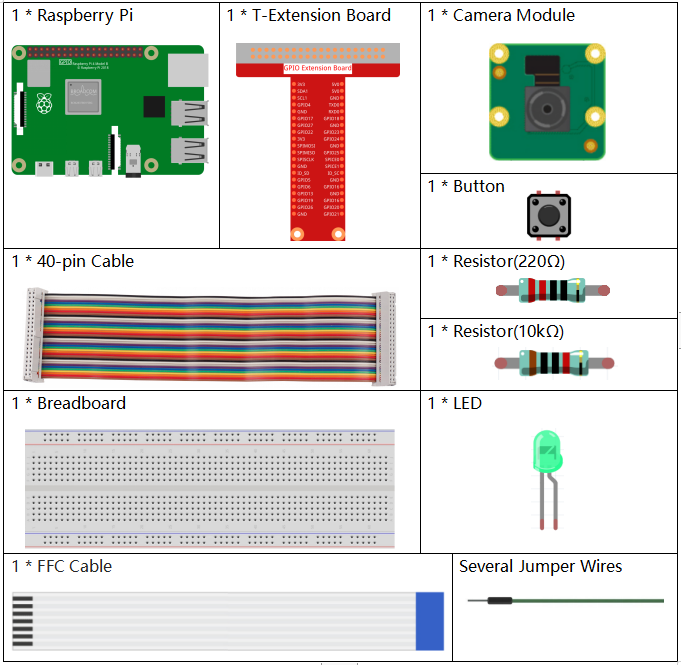
Il est certainement pratique d’acheter un kit complet, voici le lien :
Nom |
ÉLÉMENTS DANS CE KIT |
LIEN |
|---|---|---|
Kit Raphael |
337 |
Vous pouvez également les acheter séparément à partir des liens ci-dessous.
INTRODUCTION AUX COMPOSANTS |
LIEN D’ACHAT |
|---|---|
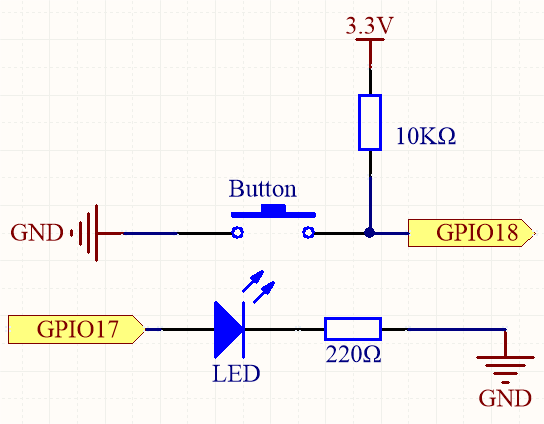
Schéma de montage
Nom T-Board |
physique |
wiringPi |
BCM |
GPIO17 |
Pin 11 |
0 |
17 |
GPIO18 |
Pin 12 |
1 |
18 |
Procédures expérimentales
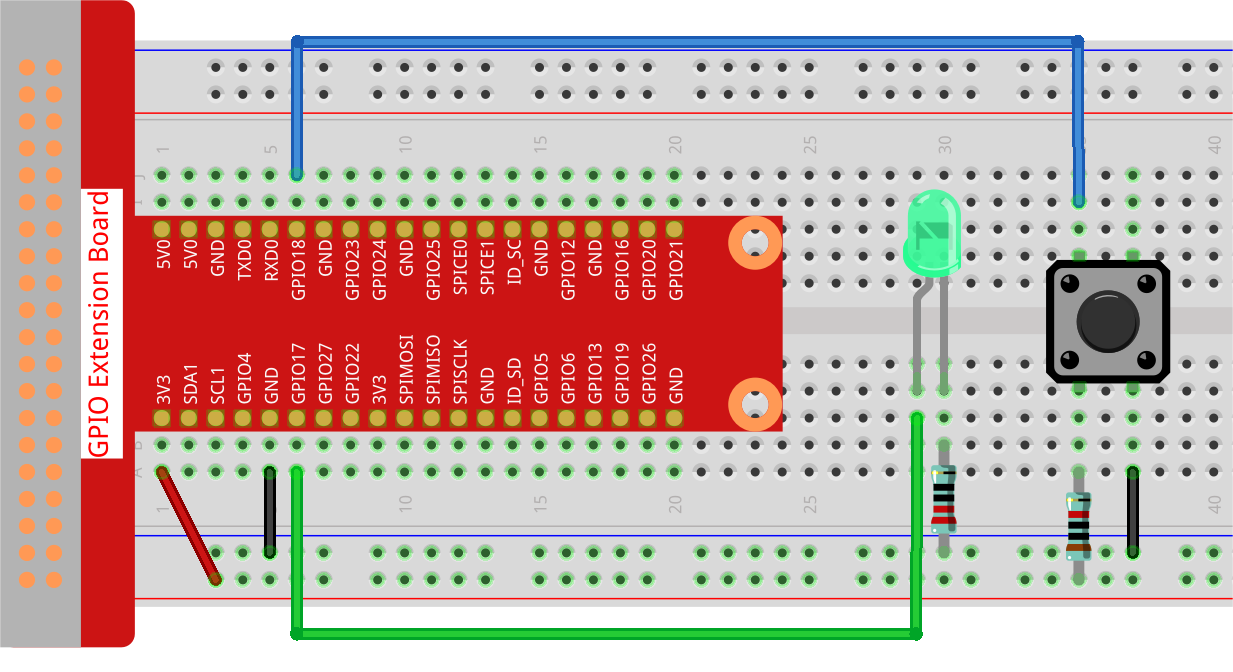
Étape 1 : Construisez le circuit.
Étape 2 : Accédez au bureau du Raspberry Pi. Vous aurez peut-être besoin d’un écran pour une meilleure expérience, référez-vous à : Connect your Raspberry Pi. Ou accédez au bureau du Raspberry Pi à distance, pour un tutoriel détaillé, veuillez vous référer à : Bureau à distance.
Étape 3 : Ouvrez un terminal et accédez au dossier du code.
cd ~/raphael-kit/python-pi5
Étape 4 : Exécutez.
sudo python3 4.1.1_Camera_zero.py
Après avoir exécuté le code, appuyez sur le bouton, le Raspberry Pi fera clignoter la LED et prendra une photo. La photo sera nommée my_photo.jpg et sera stockée dans le répertoire ~.
Note
Vous pouvez également ouvrir 4.1.1_Camera_zero.py dans le chemin ~/raphael-kit/python/ avec un IDE Python, cliquer sur le bouton Exécuter pour exécuter, et arrêter le code avec le bouton Arrêter.
Si vous souhaitez télécharger la photo sur votre PC, veuillez vous référer à : Logiciel FileZilla.
Avertissement
Si vous recevez le message d’erreur RuntimeError: Cannot determine SOC peripheral base address, veuillez consulter Si « gpiozero » ne fonctionne pas.
Code
#!/usr/bin/env python3
from picamera2 import Picamera2, Preview
from gpiozero import LED, Button
import time
import os

# Get the current user's login name and home directory
user = os.getlogin()
user_home = os.path.expanduser(f'~{user}')

# Initialize the camera
camera = Picamera2()
camera.start()

# Initialize a variable to track the camera's status
global status
status = False

# Set up LED and button with their GPIO pin numbers
led = LED(17)
button = Button(18)

def takePhotos(pin):
    """Function to set the camera's status to True when the button is pressed."""
    global status
    status = True

try:
    # Assign the function to be called when the button is pressed
    button.when_pressed = takePhotos

    # Main loop
    while True:
        # Check if the button has been pressed
        if status:
            # Blink the LED five times
            for i in range(5):
                led.on()
                time.sleep(0.1)
                led.off()
                time.sleep(0.1)
            # Capture and save a photo
            camera.capture_file(f'{user_home}/my_photo.jpg')
            print('Take a photo!')
            # Reset the status
            status = False
        else:
            # Turn off the LED if not capturing
            led.off()

        # Wait for a short period before checking the button status again
        time.sleep(1)

except KeyboardInterrupt:
    # Stop the camera and turn off the LED if a KeyboardInterrupt occurs
    camera.stop_preview()
    led.off()
    pass
Explication du code
Importe les bibliothèques nécessaires pour la gestion du temps, le contrôle de la caméra et le contrôle des composants GPIO.
#!/usr/bin/env python3
from picamera2 import Picamera2, Preview
from gpiozero import LED, Button
import time
import os
Récupère le nom de connexion de l’utilisateur actuel et le répertoire personnel pour enregistrer les photos.
# Get the current user's login name and home directory
user = os.getlogin()
user_home = os.path.expanduser(f'~{user}')
Initialise la caméra et la démarre.
# Initialize the camera
camera = Picamera2()
camera.start()
Déclare
statuscomme une variable globale et l’initialise àFalse.# Initialize a variable to track the camera's status global status status = False
Initialise une LED connectée à la broche GPIO 17 et un bouton connecté à la broche GPIO 18.
# Set up LED and button with their GPIO pin numbers
led = LED(17)
button = Button(18)
Définit une fonction
takePhotosqui définit la variable globalestatusàTruelorsque le bouton est pressé.def takePhotos(pin): """Function to set the camera's status to True when the button is pressed.""" global status status = True
Assigne la fonction
takePhotosà appeler lorsque le bouton est pressé.try: # Assign the function to be called when the button is pressed button.when_pressed = takePhotos ...
Vérifie continuellement si le
statusestTrue. Si c’est le cas, il fait clignoter la LED cinq fois, capture une photo et réinitialisestatus. Sinon, la LED reste éteinte. Il y a un délai de 1 seconde entre chaque itération de la boucle.try: ... # Main loop while True: # Check if the button has been pressed if status: # Blink the LED five times for i in range(5): led.on() time.sleep(0.1) led.off() time.sleep(0.1) # Capture and save a photo camera.capture_file(f'{user_home}/my_photo.jpg') print('Take a photo!') # Reset the status status = False else: # Turn off the LED if not capturing led.off() # Wait for a short period before checking the button status again time.sleep(1)
Capture un KeyboardInterrupt (comme Ctrl+C) et arrête l’aperçu de la caméra et éteint la LED avant de quitter.
except KeyboardInterrupt:
    # Stop the camera and turn off the LED if a KeyboardInterrupt occurs
    camera.stop_preview()
    led.off()
    pass