Note
Bonjour et bienvenue dans la Communauté Facebook des passionnés de Raspberry Pi, Arduino et ESP32 de SunFounder ! Plongez plus profondément dans l’univers des Raspberry Pi, Arduino et ESP32 avec d’autres passionnés.
Pourquoi rejoindre ?
Support d’experts : Résolvez les problèmes après-vente et les défis techniques avec l’aide de notre communauté et de notre équipe.
Apprendre et partager : Échangez des astuces et des tutoriels pour améliorer vos compétences.
Aperçus exclusifs : Accédez en avant-première aux annonces de nouveaux produits et aux aperçus.
Réductions spéciales : Profitez de réductions exclusives sur nos produits les plus récents.
Promotions festives et cadeaux : Participez à des cadeaux et des promotions de vacances.
👉 Prêt à explorer et à créer avec nous ? Cliquez [Ici] et rejoignez-nous aujourd’hui !
4.1.15 JEU - 10 Secondes
Introduction
Ensuite, suivez-moi pour créer un dispositif de jeu qui mettra au défi votre concentration. Attachez l’interrupteur à bascule à un bâton pour en faire une baguette magique. Agitez la baguette, l’affichage à 4 chiffres commencera à compter, une nouvelle secousse arrêtera le comptage. Si vous réussissez à maintenir le compte affiché à 10.00, alors vous gagnez. Vous pouvez jouer à ce jeu avec vos amis pour voir qui est le sorcier du temps.
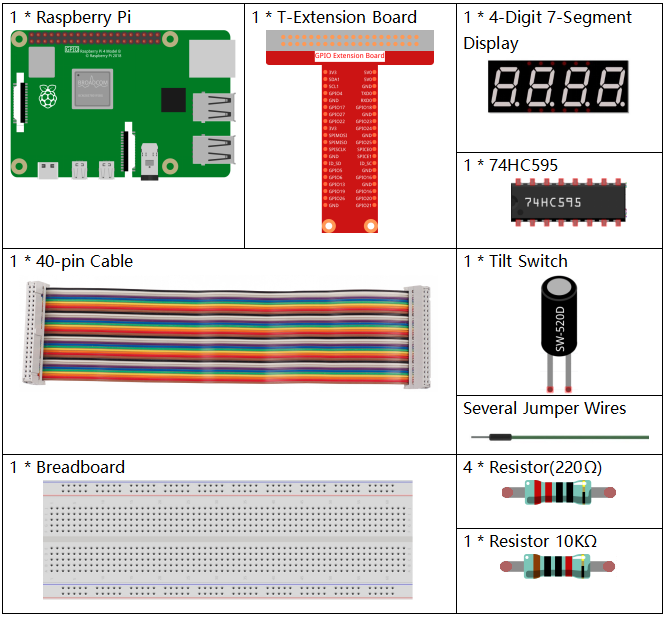
Composants nécessaires
Pour ce projet, nous avons besoin des composants suivants.
Il est certainement pratique d’acheter un kit complet, voici le lien :
Nom |
ARTICLES DANS CE KIT |
LIEN |
|---|---|---|
Kit Raphael |
337 |
Vous pouvez également les acheter séparément via les liens ci-dessous.
INTRODUCTION DU COMPOSANT |
LIEN D’ACHAT |
|---|---|
- |
|
- |
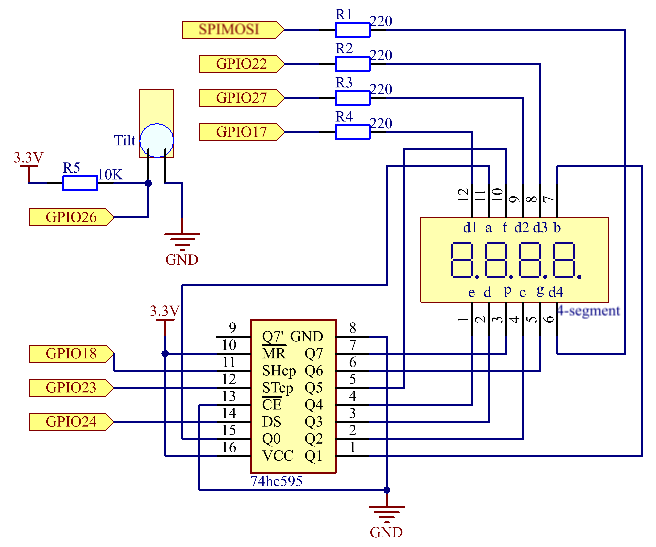
Schéma
Nom T-Board |
physique |
wiringPi |
BCM |
GPIO17 |
Pin 11 |
0 |
17 |
GPIO27 |
Pin 13 |
2 |
27 |
GPIO22 |
Pin 15 |
3 |
22 |
SPIMOSI |
Pin 19 |
12 |
10 |
GPIO18 |
Pin 12 |
1 |
18 |
GPIO23 |
Pin 16 |
4 |
23 |
GPIO24 |
Pin 18 |
5 |
24 |
GPIO26 |
Pin 37 |
25 |
26 |
Procédures expérimentales
Étape 1 : Construisez le circuit.

Étape 2 : Accédez au dossier du code.
cd ~/raphael-kit/python-pi5
Étape 3 : Exécutez le fichier exécutable.
sudo python3 4.1.18_GAME_10Second_zero.py
Secouez la baguette, l’affichage à 4 chiffres commencera à compter, secouez à nouveau pour arrêter le comptage. Si vous réussissez à maintenir le compte affiché à 10.00, alors vous gagnez. Secouez-la une fois de plus pour commencer la prochaine manche du jeu.
Avertissement
Si vous recevez le message d’erreur RuntimeError: Cannot determine SOC peripheral base address, veuillez consulter Si « gpiozero » ne fonctionne pas.
Code
Note
Vous pouvez modifier/réinitialiser/copier/exécuter/arrêter le code ci-dessous. Mais avant cela, vous devez vous rendre au chemin du code source comme raphael-kit/python-pi5. Après avoir modifié le code, vous pouvez l’exécuter directement pour voir l’effet.
#!/usr/bin/env python3

from gpiozero import OutputDevice, Button
import time
import threading

# Initialize the button connected to GPIO 26
sensorPin = Button(26)

# Define GPIO pins connected to the 74HC595 shift register
SDI = OutputDevice(24)   # Serial Data Input
RCLK = OutputDevice(23)  # Register Clock
SRCLK = OutputDevice(18) # Shift Register Clock

# Define GPIO pins for digit selection on the 7-segment display
placePin = [OutputDevice(pin) for pin in (10, 22, 27, 17)]

# Define segment codes for numbers 0 to 9 on the 7-segment display
number = (0xc0, 0xf9, 0xa4, 0xb0, 0x99, 0x92, 0x82, 0xf8, 0x80, 0x90)

# Counter and timer variables
counter = 0
timer1 = None
gameState = 0

def clearDisplay():
    """ Clear all segments on the 7-segment display. """
    for _ in range(8):
        SDI.on()
        SRCLK.on()
        SRCLK.off()
    RCLK.on()
    RCLK.off()

def hc595_shift(data):
    """ Shift data to the 74HC595 shift register to display a digit. """
    for i in range(8):
        SDI.value = 0x80 & (data << i)
        SRCLK.on()
        SRCLK.off()
    RCLK.on()
    RCLK.off()

def pickDigit(digit):
    """ Select which digit to display on the 7-segment display. """
    for pin in placePin:
        pin.off()
    placePin[digit].on()

def display():
    """ Display the current counter value on the 7-segment display. """
    global counter
    clearDisplay()
    pickDigit(0)
    hc595_shift(number[counter % 10])

    clearDisplay()
    pickDigit(1)
    hc595_shift(number[counter % 100 // 10])

    clearDisplay()
    pickDigit(2)
    hc595_shift(number[counter % 1000 // 100] - 0x80)

    clearDisplay()
    pickDigit(3)
    hc595_shift(number[counter % 10000 // 1000])

def stateChange():
    """ Handle state changes for the counter based on button presses. """
    global gameState, counter, timer1
    if gameState == 0:
        counter = 0
        time.sleep(1)
        timer()
    elif gameState == 1 and timer1 is not None:
        timer1.cancel()
        time.sleep(1)
    gameState = (gameState + 1) % 2

def loop():
    """ Main loop to check for button presses and update the display. """
    global counter
    currentState = 0
    lastState = 0
    while True:
        display()
        currentState = sensorPin.value
        if (currentState == 0) and (lastState == 1):
            stateChange()
        lastState = currentState

def timer():
    """ Timer function that increments the counter every 0.01 second. """
    global counter, timer1
    timer1 = threading.Timer(0.01, timer)
    timer1.start()
    counter += 1

try:
    loop()
except KeyboardInterrupt:
    if timer1:
        timer1.cancel()
Explication du code
Le script commence par importer les modules nécessaires. La bibliothèque
gpiozeroest utilisée pour interagir avec les dispositifs GPIO comme les boutons, et les modulestimeetthreadingpeuvent être utilisés pour gérer des tâches liées au temps ou des opérations concurrentes.#!/usr/bin/env python3 from gpiozero import OutputDevice, Button import time import threading
Initialise un objet
Buttonde la bibliothèque GPIO Zero, connecté à la broche GPIO 26. Cette configuration permet de détecter les pressions sur le bouton.# Initialize the button connected to GPIO 26 sensorPin = Button(26)
Initialise les broches GPIO connectées aux entrées de données série (SDI), d’horloge du registre (RCLK) et d’horloge du registre à décalage (SRCLK) du registre à décalage.
# Define GPIO pins connected to the 74HC595 shift register
SDI = OutputDevice(24)   # Serial Data Input
RCLK = OutputDevice(23)  # Register Clock
SRCLK = OutputDevice(18) # Shift Register Clock
Initialise les broches pour chaque chiffre de l’affichage à 7 segments et définit les codes binaires pour afficher les nombres de 0 à 9.
# Define GPIO pins for digit selection on the 7-segment display
placePin = [OutputDevice(pin) for pin in (10, 22, 27, 17)]

# Define segment codes for numbers 0 to 9 on the 7-segment display
number = (0xc0, 0xf9, 0xa4, 0xb0, 0x99, 0x92, 0x82, 0xf8, 0x80, 0x90)
Fonctions pour contrôler l’affichage à 7 segments.
clearDisplayéteint tous les segments,hc595_shifttransfère les données dans le registre à décalage, etpickDigitactive un chiffre spécifique sur l’affichage.def clearDisplay(): """ Clear all segments on the 7-segment display. """ for _ in range(8): SDI.on() SRCLK.on() SRCLK.off() RCLK.on() RCLK.off() def hc595_shift(data): """ Shift data to the 74HC595 shift register to display a digit. """ for i in range(8): SDI.value = 0x80 & (data << i) SRCLK.on() SRCLK.off() RCLK.on() RCLK.off() def pickDigit(digit): """ Select which digit to display on the 7-segment display. """ for pin in placePin: pin.off() placePin[digit].on()
Fonction pour afficher la valeur actuelle du compteur sur l’affichage à 7 segments.
def display():
    """ Display the current counter value on the 7-segment display. """
    global counter
    clearDisplay()
    pickDigit(0)
    hc595_shift(number[counter % 10])

    clearDisplay()
    pickDigit(1)
    hc595_shift(number[counter % 100 // 10])

    clearDisplay()
    pickDigit(2)
    hc595_shift(number[counter % 1000 // 100] - 0x80)

    clearDisplay()
    pickDigit(3)
    hc595_shift(number[counter % 10000 // 1000])
Fonction pour gérer les changements d’état (démarrage/arrêt) du compteur en fonction des pressions sur le bouton.
def stateChange():
    """ Handle state changes for the counter based on button presses. """
    global gameState, counter, timer1
    if gameState == 0:
        counter = 0
        time.sleep(1)
        timer()
    elif gameState == 1 and timer1 is not None:
        timer1.cancel()
        time.sleep(1)
    gameState = (gameState + 1) % 2
Boucle principale qui vérifie en continu l’état du bouton et met à jour l’affichage. Elle appelle
stateChangelorsque l’état du bouton change.def loop(): """ Main loop to check for button presses and update the display. """ global counter currentState = 0 lastState = 0 while True: display() currentState = sensorPin.value if (currentState == 0) and (lastState == 1): stateChange() lastState = currentState
Fonction de minuterie qui incrémente le compteur à intervalle régulier (toutes les 0,01 seconde).
def timer():
    """ Timer function that increments the counter every 0.01 second. """
    global counter, timer1
    timer1 = threading.Timer(0.01, timer)
    timer1.start()
    counter += 1
Exécute la boucle principale et permet une sortie propre du programme à l’aide d’une interruption du clavier (Ctrl+C).
try:
    loop()
except KeyboardInterrupt:
    if timer1:
        timer1.cancel()