Note
Bonjour et bienvenue dans la Communauté Facebook des passionnés de Raspberry Pi, Arduino et ESP32 de SunFounder ! Plongez plus profondément dans l’univers des Raspberry Pi, Arduino et ESP32 avec d’autres passionnés.
Pourquoi rejoindre ?
Support d’experts : Résolvez les problèmes après-vente et les défis techniques avec l’aide de notre communauté et de notre équipe.
Apprendre et partager : Échangez des astuces et des tutoriels pour améliorer vos compétences.
Aperçus exclusifs : Accédez en avant-première aux annonces de nouveaux produits et aux aperçus.
Réductions spéciales : Profitez de réductions exclusives sur nos produits les plus récents.
Promotions festives et cadeaux : Participez à des cadeaux et des promotions de vacances.
👉 Prêt à explorer et à créer avec nous ? Cliquez [Ici] et rejoignez-nous aujourd’hui !
4.1.12 Cloche d’alarme
Introduction
Dans ce projet, nous allons fabriquer un dispositif d’alarme manuel. Vous pouvez remplacer l’interrupteur à bascule par une thermistance ou un capteur photosensible pour créer une alarme de température ou une alarme lumineuse.
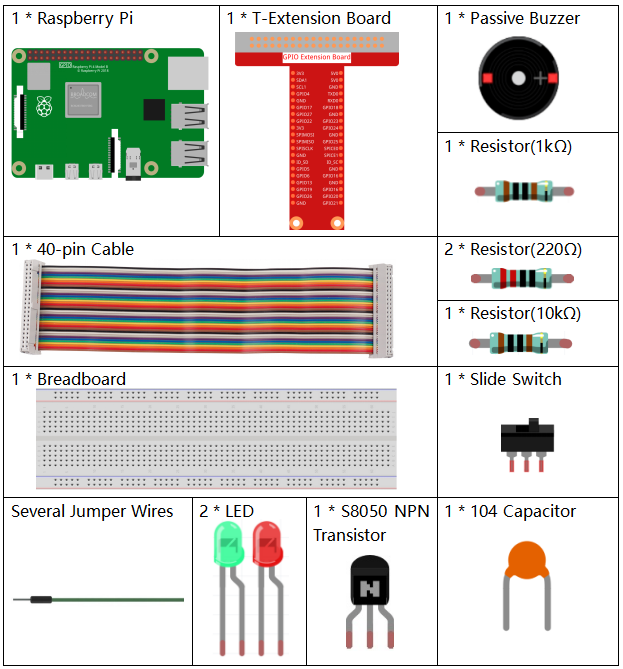
Composants nécessaires
Pour ce projet, nous avons besoin des composants suivants.
Il est certainement pratique d’acheter un kit complet, voici le lien :
Nom |
ARTICLES DANS CE KIT |
LIEN |
|---|---|---|
Kit Raphael |
337 |
Vous pouvez également les acheter séparément via les liens ci-dessous.
INTRODUCTION DU COMPOSANT |
LIEN D’ACHAT |
|---|---|
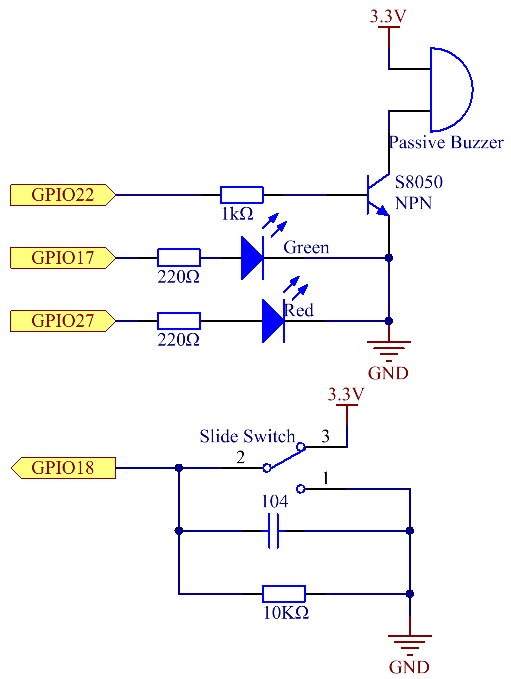
Schéma
Nom T-Board |
physique |
wiringPi |
BCM |
GPIO17 |
Pin 11 |
0 |
17 |
GPIO18 |
Pin 12 |
1 |
18 |
GPIO27 |
Pin 13 |
2 |
27 |
GPIO22 |
Pin 15 |
3 |
22 |
Procédures expérimentales
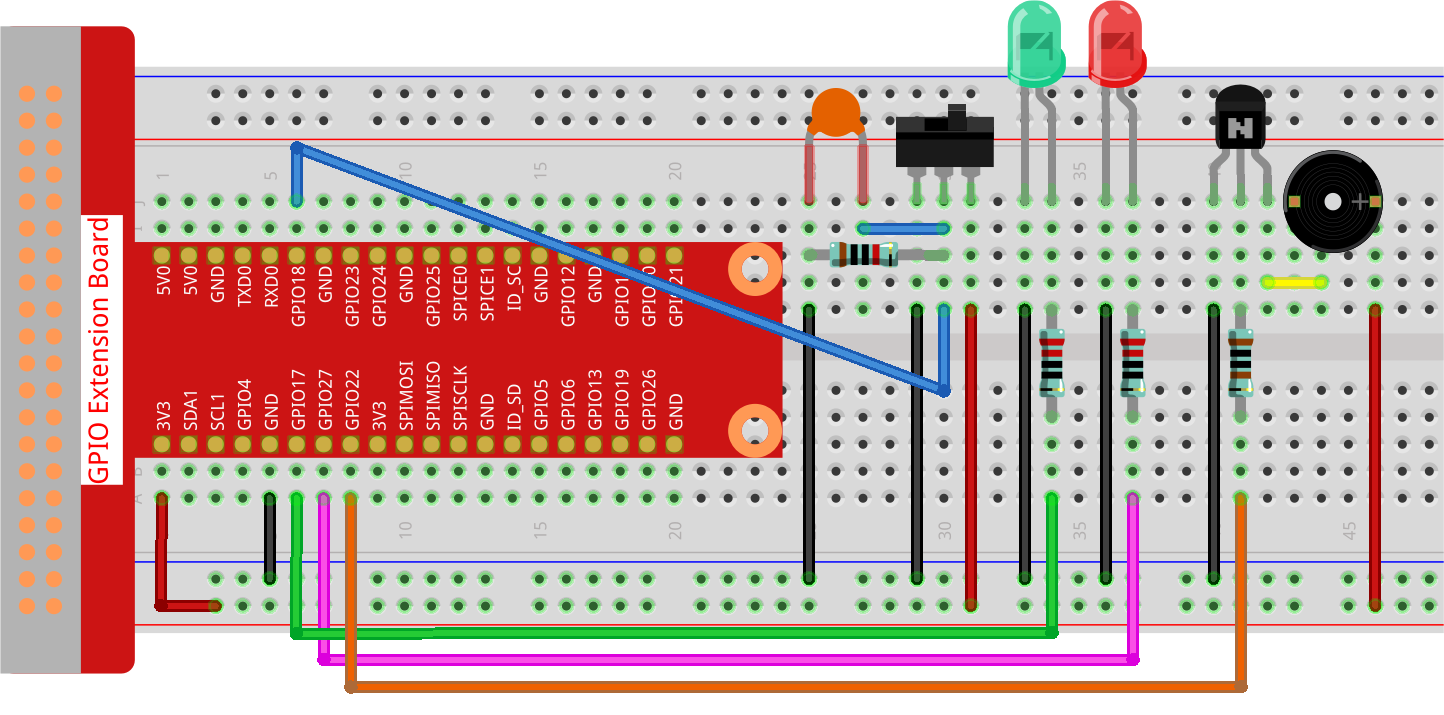
Étape 1 : Construire le circuit.
Étape 2 : Changer de répertoire.
cd ~/raphael-kit/python-pi5
Étape 3 : Exécuter.
sudo python3 4.1.15_AlarmBell_zero.py
Après le démarrage du programme, l’interrupteur à bascule sera activé vers la droite, et le buzzer émettra des sons d’alarme. En même temps, les LED rouges et vertes clignoteront à une certaine fréquence.
Avertissement
Si vous recevez le message d’erreur RuntimeError: Cannot determine SOC peripheral base address, veuillez consulter Si « gpiozero » ne fonctionne pas.
Code
Note
Vous pouvez modifier/réinitialiser/copier/exécuter/arrêter le code ci-dessous. Mais avant cela, vous devez vous rendre au chemin du code source comme raphael-kit/python-pi5.
#!/usr/bin/env python3

from gpiozero import LED, Button, TonalBuzzer
import time
import threading

# Initialize TonalBuzzer on GPIO pin 22
BeepPin = TonalBuzzer(22)

# Initialize LEDs on GPIO pins 17 and 27
ALedPin = LED(17)
BLedPin = LED(27)

# Initialize Button on GPIO pin 18
switchPin = Button(18)

# Global flag to control the buzzer and LED states
flag = 0

def ledWork():
    """
    Control LED blinking pattern based on the flag state.
    When flag is set, alternately blink ALedPin and BLedPin.
    """
    while True:
        if flag:
            # Alternate blinking of LEDs
            ALedPin.on()
            time.sleep(0.5)
            ALedPin.off()
            BLedPin.on()
            time.sleep(0.5)
            BLedPin.off()
        else:
            # Turn off both LEDs if flag is not set
            ALedPin.off()
            BLedPin.off()

# Define the musical tune as a list of notes and their durations
tune = [
    ('C4', 0.1), ('E4', 0.1), ('G4', 0.1),
    (None, 0.1),
    ('E4', 0.1), ('G4', 0.1), ('C5', 0.1),
    (None, 0.1),
    ('C5', 0.1), ('G4', 0.1), ('E4', 0.1),
    (None, 0.1),
    ('G4', 0.1), ('E4', 0.1), ('C4', 0.1),
    (None, 0.1)
]

def buzzerWork():
    """
    Play a tune using the buzzer based on the flag state.
    The tune is played only when the flag is set.
    """
    while True:
        for note, duration in tune:
            if flag == 0:
                break
            print(note)  # Output the current note to the console
            BeepPin.play(note)  # Play the current note
            time.sleep(duration)  # Pause for the duration of the note
        BeepPin.stop()  # Stop the buzzer after playing the tune

def main():
    """
    Monitor button press to update the flag state.
    Sets the flag when the button is pressed.
    """
    global flag
    while True:
        flag = 1 if switchPin.is_pressed else 0

try:
    # Initialize and start threads for buzzer and LED control
    tBuzz = threading.Thread(target=buzzerWork)
    tBuzz.start()
    tLed = threading.Thread(target=ledWork)
    tLed.start()
    main()

except KeyboardInterrupt:
    # Stop the buzzer and turn off LEDs on program interruption
    BeepPin.stop()
    ALedPin.off()
    BLedPin.off()
Explication du code
Ce segment comprend l’importation des bibliothèques essentielles pour la mise en œuvre des délais et du multithreading. Il importe également les classes LED, Button et TonalBuzzer de la bibliothèque gpiozero, cruciales pour le contrôle des dispositifs GPIO sur un Raspberry Pi.
#!/usr/bin/env python3

from gpiozero import LED, Button, TonalBuzzer
import time
import threading
Configure un buzzer sur la broche GPIO 22, deux LEDs sur les broches GPIO 17 et 27, et initialise un bouton sur la broche GPIO 18. Un drapeau global est également défini pour gérer l’état du buzzer et des LEDs.
# Initialize TonalBuzzer on GPIO pin 22
BeepPin = TonalBuzzer(22)

# Initialize LEDs on GPIO pins 17 and 27
ALedPin = LED(17)
BLedPin = LED(27)

# Initialize Button on GPIO pin 18
switchPin = Button(18)

# Global flag to control the buzzer and LED states
flag = 0
Cette fonction contrôle le clignotement des LEDs en fonction de l’état du drapeau. Si le drapeau est levé (1), elle alterne l’allumage et l’extinction de chaque LED. Si non levé (0), les deux LEDs sont éteintes.
def ledWork():
    """
    Control LED blinking pattern based on the flag state.
    When flag is set, alternately blink ALedPin and BLedPin.
    """
    while True:
        if flag:
            # Alternate blinking of LEDs
            ALedPin.on()
            time.sleep(0.5)
            ALedPin.off()
            BLedPin.on()
            time.sleep(0.5)
            BLedPin.off()
        else:
            # Turn off both LEDs if flag is not set
            ALedPin.off()
            BLedPin.off()
La mélodie est définie comme une séquence de notes (fréquence) et de durées (secondes).
# Define the musical tune as a list of notes and their durations
tune = [
    ('C4', 0.1), ('E4', 0.1), ('G4', 0.1),
    (None, 0.1),
    ('E4', 0.1), ('G4', 0.1), ('C5', 0.1),
    (None, 0.1),
    ('C5', 0.1), ('G4', 0.1), ('E4', 0.1),
    (None, 0.1),
    ('G4', 0.1), ('E4', 0.1), ('C4', 0.1),
    (None, 0.1)
]
Joue une mélodie prédéfinie lorsque le drapeau est levé. La mélodie s’arrête si le drapeau est baissé pendant sa lecture.
def buzzerWork():
    """
    Play a tune using the buzzer based on the flag state.
    The tune is played only when the flag is set.
    """
    while True:
        for note, duration in tune:
            if flag == 0:
                break
            print(note)  # Output the current note to the console
            BeepPin.play(note)  # Play the current note
            time.sleep(duration)  # Pause for the duration of the note
        BeepPin.stop()  # Stop the buzzer after playing the tune
Vérifie continuellement l’état du bouton pour lever ou baisser le drapeau.
def main():
    """
    Monitor button press to update the flag state.
    Sets the flag when the button is pressed.
    """
    global flag
    while True:
        flag = 1 if switchPin.is_pressed else 0
Threads for
buzzerWorkandledWorkare started, allowing them to run concurrently with the main function.try: # Initialize and start threads for buzzer and LED control tBuzz = threading.Thread(target=buzzerWork) tBuzz.start() tLed = threading.Thread(target=ledWork) tLed.start() main()
Stops the buzzer and turns off LEDs when the program is interrupted, ensuring a clean exit.
except KeyboardInterrupt:
    # Stop the buzzer and turn off LEDs on program interruption
    BeepPin.stop()
    ALedPin.off()
    BLedPin.off()