Note
Bonjour et bienvenue dans la Communauté Facebook des passionnés de Raspberry Pi, Arduino et ESP32 de SunFounder ! Plongez plus profondément dans l’univers des Raspberry Pi, Arduino et ESP32 avec d’autres passionnés.
Pourquoi rejoindre ?
Support d’experts : Résolvez les problèmes après-vente et les défis techniques avec l’aide de notre communauté et de notre équipe.
Apprendre et partager : Échangez des astuces et des tutoriels pour améliorer vos compétences.
Aperçus exclusifs : Accédez en avant-première aux annonces de nouveaux produits et aux aperçus.
Réductions spéciales : Profitez de réductions exclusives sur nos produits les plus récents.
Promotions festives et cadeaux : Participez à des cadeaux et des promotions de vacances.
👉 Prêt à explorer et à créer avec nous ? Cliquez [Ici] et rejoignez-nous aujourd’hui !
4.1.9 Feu de Circulation
Introduction
Dans ce projet, nous utiliserons des voyants LED de trois couleurs pour simuler le changement des feux de circulation. Un afficheur à sept segments à quatre chiffres sera utilisé pour afficher le compte à rebours de chaque état de trafic.
Composants Nécessaires
Pour ce projet, nous avons besoin des composants suivants.
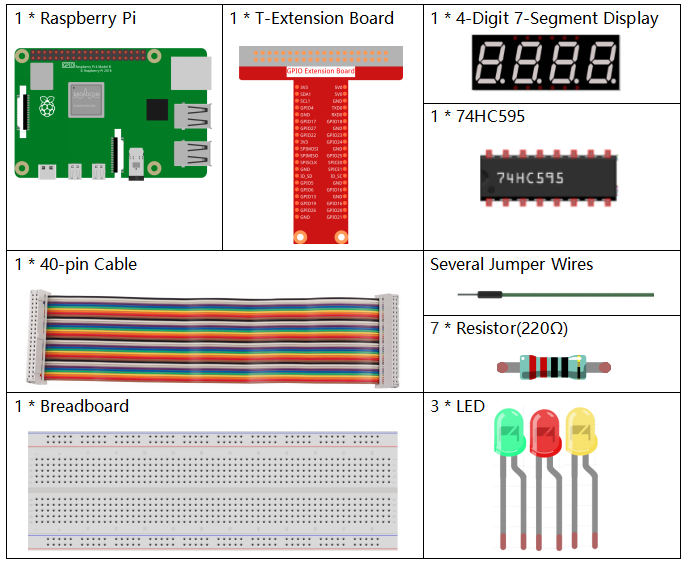
Il est certainement pratique d’acheter un kit complet, voici le lien :
Nom |
ÉLÉMENTS DANS CE KIT |
LIEN |
|---|---|---|
Kit Raphael |
337 |
Vous pouvez également les acheter séparément via les liens ci-dessous.
INTRODUCTION AUX COMPOSANTS |
LIEN D’ACHAT |
|---|---|
- |
|
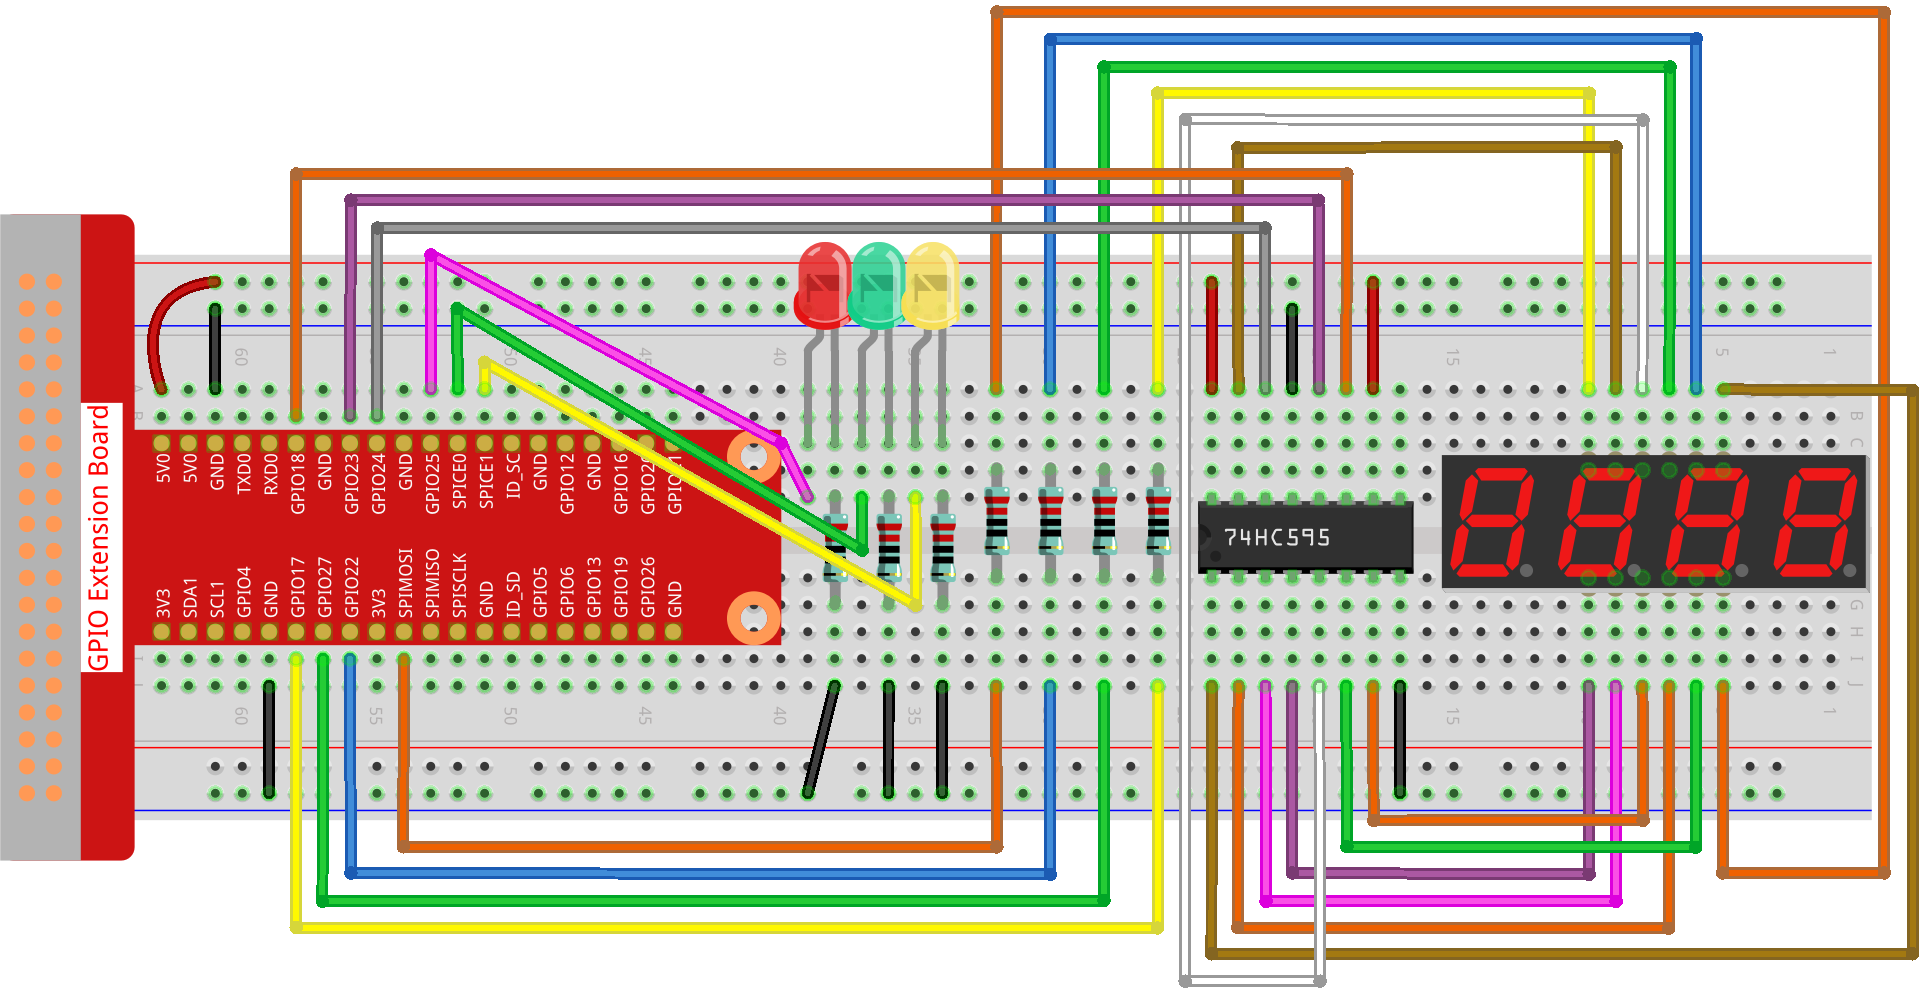
Schéma
Nom T-Board |
Physique |
wiringPi |
BCM |
GPIO17 |
Pin 11 |
0 |
17 |
GPIO27 |
Pin 13 |
2 |
27 |
GPIO22 |
Pin 15 |
3 |
22 |
SPIMOSI |
Pin 19 |
12 |
10 |
GPIO18 |
Pin 12 |
1 |
18 |
GPIO23 |
Pin 16 |
4 |
23 |
GPIO24 |
Pin 18 |
5 |
24 |
GPIO25 |
Pin 22 |
6 |
25 |
SPICE0 |
Pin 24 |
10 |
8 |
SPICE1 |
Pin 26 |
11 |
7 |

Procédures Expérimentales
Étape 1 : Construisez le circuit.
Étape 2 : Changez de répertoire.
cd ~/raphael-kit/python-pi5
Étape 3 : Exécutez le fichier.
sudo python3 4.1.12_TrafficLight_zero.py
Lorsque le code s’exécute, les LED simuleront le changement de couleur des feux de circulation. D’abord, la LED rouge s’allume pendant 60s, puis la LED verte s’allume pendant 30s ; ensuite, la LED jaune s’allume pendant 5s. Après cela, la LED rouge s’allume à nouveau pendant 60s. De cette façon, cette série d’actions sera exécutée en continu. Pendant ce temps, l’afficheur à sept segments affiche en permanence le compte à rebours.
Code
Note
Vous pouvez Modifier/Réinitialiser/Copier/Exécuter/Arrêter le code ci-dessous. Mais avant cela, vous devez accéder au chemin du code source comme raphael-kit/python-pi5. Après avoir modifié le code, vous pouvez l’exécuter directement pour voir l’effet.
#!/usr/bin/env python3

from gpiozero import OutputDevice, LED
import threading

# Setup GPIO pins for 74HC595 shift register
SDI = OutputDevice(24)   # Serial Data Input
RCLK = OutputDevice(23)  # Register Clock
SRCLK = OutputDevice(18) # Shift Register Clock

# Setup GPIO pins for digit selection on 7-segment display
placePin = [OutputDevice(pin) for pin in (10, 22, 27, 17)]

# Segment codes for numbers 0-9 on 7-segment display
number = (0xc0, 0xf9, 0xa4, 0xb0, 0x99, 0x92, 0x82, 0xf8, 0x80, 0x90)

# Setup GPIO pins for traffic light LEDs
ledPinR = LED(25) # Red LED
ledPinG = LED(8)  # Green LED
ledPinY = LED(7)  # Yellow LED

# Duration settings for traffic lights
greenLight = 30
yellowLight = 5
redLight = 60

# Traffic light color names
lightColor = ("Red", "Green", "Yellow")

# Initialize state variables
colorState = 0
counter = 60
timer1 = None

def setup():
    """ Initialize the traffic light system and start the timer. """
    global timer1
    timer1 = threading.Timer(1.0, timer)
    timer1.start()

def clearDisplay():
    """ Clear the 7-segment display. """
    for _ in range(8):
        SDI.on()
        SRCLK.on()
        SRCLK.off()
    RCLK.on()
    RCLK.off()

def hc595_shift(data):
    """ Shift data to the 74HC595 shift register for digit display. """
    for i in range(8):
        SDI.value = 0x80 & (data << i)
        SRCLK.on()
        SRCLK.off()
    RCLK.on()
    RCLK.off()

def pickDigit(digit):
    """ Select a specific digit to display on the 7-segment display. """
    for pin in placePin:
        pin.off()
    placePin[digit].on()

def timer():
    """ Handle the timing for traffic light changes. """
    global counter, colorState, timer1
    timer1 = threading.Timer(1.0, timer)
    timer1.start()
    counter -= 1
    if counter == 0:
        counter = [greenLight, yellowLight, redLight][colorState]
        colorState = (colorState + 1) % 3
    print(f"counter : {counter}    color: {lightColor[colorState]}")

def lightup():
    """ Update the traffic light LED based on the current state. """
    global colorState
    ledPinR.off()
    ledPinG.off()
    ledPinY.off()
    [ledPinR, ledPinG, ledPinY][colorState].on()

def display():
    """ Display the current counter value on the 7-segment display. """
    global counter

    for i in range(4):
        digit = counter // (10 ** (3 - i)) % 10
        if i == 0 and digit == 0:
            continue
        clearDisplay()
        pickDigit(3 - i)
        hc595_shift(number[digit])

def loop():
    """ Main loop to continuously update display and lights. """
    while True:
        display()
        lightup()

def destroy():
    """ Clean up resources when the script is terminated. """
    global timer1
    timer1.cancel()
    ledPinR.off()
    ledPinG.off()
    ledPinY.off()

try:
    setup()
    loop()
except KeyboardInterrupt:
    destroy()
Explication du Code
Importe les classes
OutputDeviceetLEDde la bibliothèque gpiozero, permettant le contrôle des dispositifs de sortie généraux et des LED en particulier. Importe également le module threading de Python, qui sera utilisé pour créer et gérer des threads pour une exécution simultanée.#!/usr/bin/env python3 from gpiozero import OutputDevice, LED import threading
Initialise les broches GPIO connectées à l’entrée de données série du registre à décalage (SDI), à l’entrée de l’horloge du registre (RCLK) et à l’entrée de l’horloge du registre à décalage (SRCLK).
# Setup GPIO pins for 74HC595 shift register
SDI = OutputDevice(24)   # Serial Data Input
RCLK = OutputDevice(23)  # Register Clock
SRCLK = OutputDevice(18) # Shift Register Clock
Initialise les broches pour chaque chiffre de l’afficheur à 7 segments et définit les codes binaires pour afficher les chiffres de 0 à 9.
# Setup GPIO pins for digit selection on 7-segment display
placePin = [OutputDevice(pin) for pin in (10, 22, 27, 17)]

# Segment codes for numbers 0-9 on 7-segment display
number = (0xc0, 0xf9, 0xa4, 0xb0, 0x99, 0x92, 0x82, 0xf8, 0x80, 0x90)
Initialise les broches GPIO pour les LEDs rouge, verte et jaune utilisées dans la simulation des feux de circulation. Définit la durée (en secondes) pour chaque état de couleur dans le système de feux de circulation. Définit les noms des couleurs des feux de circulation pour référence.
# Setup GPIO pins for traffic light LEDs
ledPinR = LED(25) # Red LED
ledPinG = LED(8)  # Green LED
ledPinY = LED(7)  # Yellow LED

# Duration settings for traffic lights
greenLight = 30
yellowLight = 5
redLight = 60

# Traffic light color names
lightColor = ("Red", "Green", "Yellow")
Initialise les variables pour suivre l’état actuel des couleurs, un compteur pour le chronométrage et un espace réservé pour un objet minuteur.
# Initialize state variables
colorState = 0
counter = 60
timer1 = None
Initialise le système de feux de circulation et démarre le thread du minuteur.
def setup():
    """ Initialize the traffic light system and start the timer. """
    global timer1
    timer1 = threading.Timer(1.0, timer)
    timer1.start()
Fonctions pour contrôler l’afficheur à 7 segments.
clearDisplayéteint tous les segments,hc595_shiftdéplace les données dans le registre à décalage, etpickDigitactive un chiffre spécifique sur l’afficheur.def clearDisplay(): """ Clear the 7-segment display. """ for _ in range(8): SDI.on() SRCLK.on() SRCLK.off() RCLK.on() RCLK.off() def hc595_shift(data): """ Shift data to the 74HC595 shift register for digit display. """ for i in range(8): SDI.value = 0x80 & (data << i) SRCLK.on() SRCLK.off() RCLK.on() RCLK.off() def pickDigit(digit): """ Select a specific digit to display on the 7-segment display. """ for pin in placePin: pin.off() placePin[digit].on()
Gère le chronométrage des changements de feux de circulation et met à jour le compteur et l’état des couleurs.
def timer():
    """ Handle the timing for traffic light changes. """
    global counter, colorState, timer1
    timer1 = threading.Timer(1.0, timer)
    timer1.start()
    counter -= 1
    if counter == 0:
        counter = [greenLight, yellowLight, redLight][colorState]
        colorState = (colorState + 1) % 3
    print(f"counter : {counter}    color: {lightColor[colorState]}")
Met à jour l’état des LEDs du feu de circulation en fonction de l’état actuel des couleurs.
def lightup():
    """ Update the traffic light LED based on the current state. """
    global colorState
    ledPinR.off()
    ledPinG.off()
    ledPinY.off()
    [ledPinR, ledPinG, ledPinY][colorState].on()
Calcule le chiffre à afficher sur chaque segment de l’afficheur à 7 segments et le met à jour en conséquence.
def display():
    """ Display the current counter value on the 7-segment display. """
    global counter

    for i in range(4):
        digit = counter // (10 ** (3 - i)) % 10
        if i == 0 and digit == 0:
            continue
        clearDisplay()
        pickDigit(3 - i)
        hc595_shift(number[digit])
La boucle principale qui met continuellement à jour l’affichage et les LEDs des feux de circulation.
def loop():
    """ Main loop to continuously update display and lights. """
    while True:
        display()
        lightup()
Nettoie les ressources lorsque le script est terminé, comme éteindre les LEDs et arrêter le thread du minuteur.
def destroy():
    """ Clean up resources when the script is terminated. """
    global timer1
    timer1.cancel()
    ledPinR.off()
    ledPinG.off()
    ledPinY.off()