Note
Hello, welcome to the SunFounder Raspberry Pi & Arduino & ESP32 Enthusiasts Community on Facebook! Dive deeper into Raspberry Pi, Arduino, and ESP32 with fellow enthusiasts.
Why Join?
Expert Support: Solve post-sale issues and technical challenges with help from our community and team.
Learn & Share: Exchange tips and tutorials to enhance your skills.
Exclusive Previews: Get early access to new product announcements and sneak peeks.
Special Discounts: Enjoy exclusive discounts on our newest products.
Festive Promotions and Giveaways: Take part in giveaways and holiday promotions.
👉 Ready to explore and create with us? Click [here] and join today!
3.1.8 Password Lock
Introduction
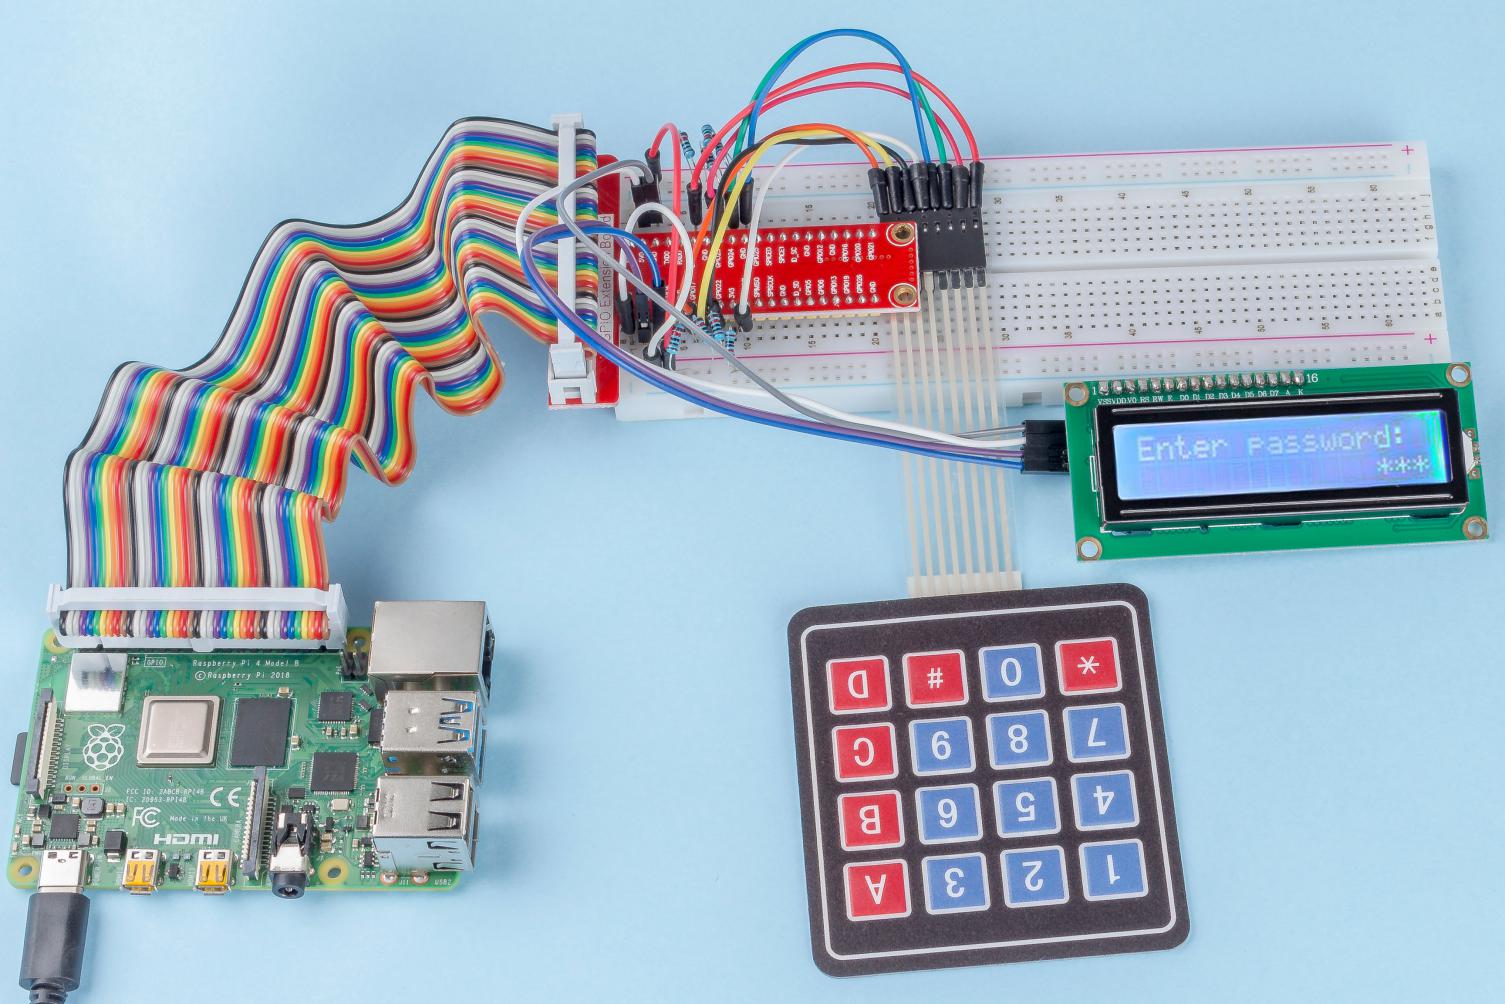
In this project, we will use a keypad and a LCD to make a combination lock. The LCD will display a corresponding prompt for you to type your password on the Keypad. If the password is input correctly, “Correct” will be displayed.
On the basis of this project, we can add additional electronic components, such as buzzer, LED and so on, to add different experimental phenomena for password input.
Required Components
In this project, we need the following components.
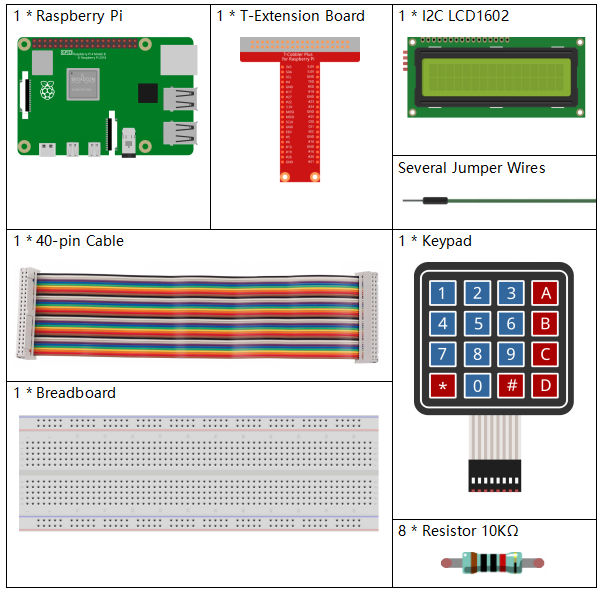
It’s definitely convenient to buy a whole kit, here’s the link:
Name |
ITEMS IN THIS KIT |
LINK |
|---|---|---|
Raphael Kit |
337 |
You can also buy them separately from the links below.
COMPONENT INTRODUCTION |
PURCHASE LINK |
|---|---|
- |
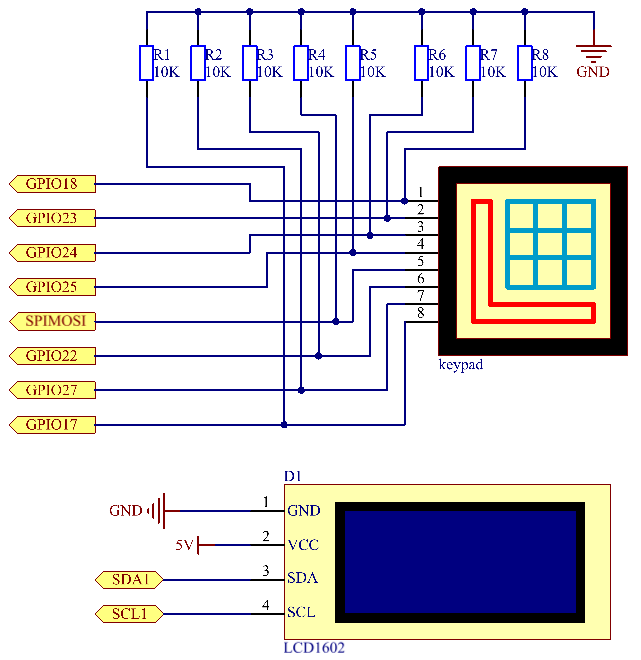
Schematic Diagram
T-Board Name |
physical |
wiringPi |
BCM |
GPIO18 |
Pin 12 |
1 |
18 |
GPIO23 |
Pin 16 |
4 |
23 |
GPIO24 |
Pin 18 |
5 |
24 |
GPIO25 |
Pin 22 |
6 |
25 |
GPIO17 |
Pin 11 |
0 |
17 |
GPIO27 |
Pin 13 |
2 |
27 |
GPIO22 |
Pin 15 |
3 |
22 |
SPIMOSI |
Pin 19 |
12 |
10 |
SDA1 |
Pin 3 |
||
SCL1 |
Pin 5 |
Experimental Procedures
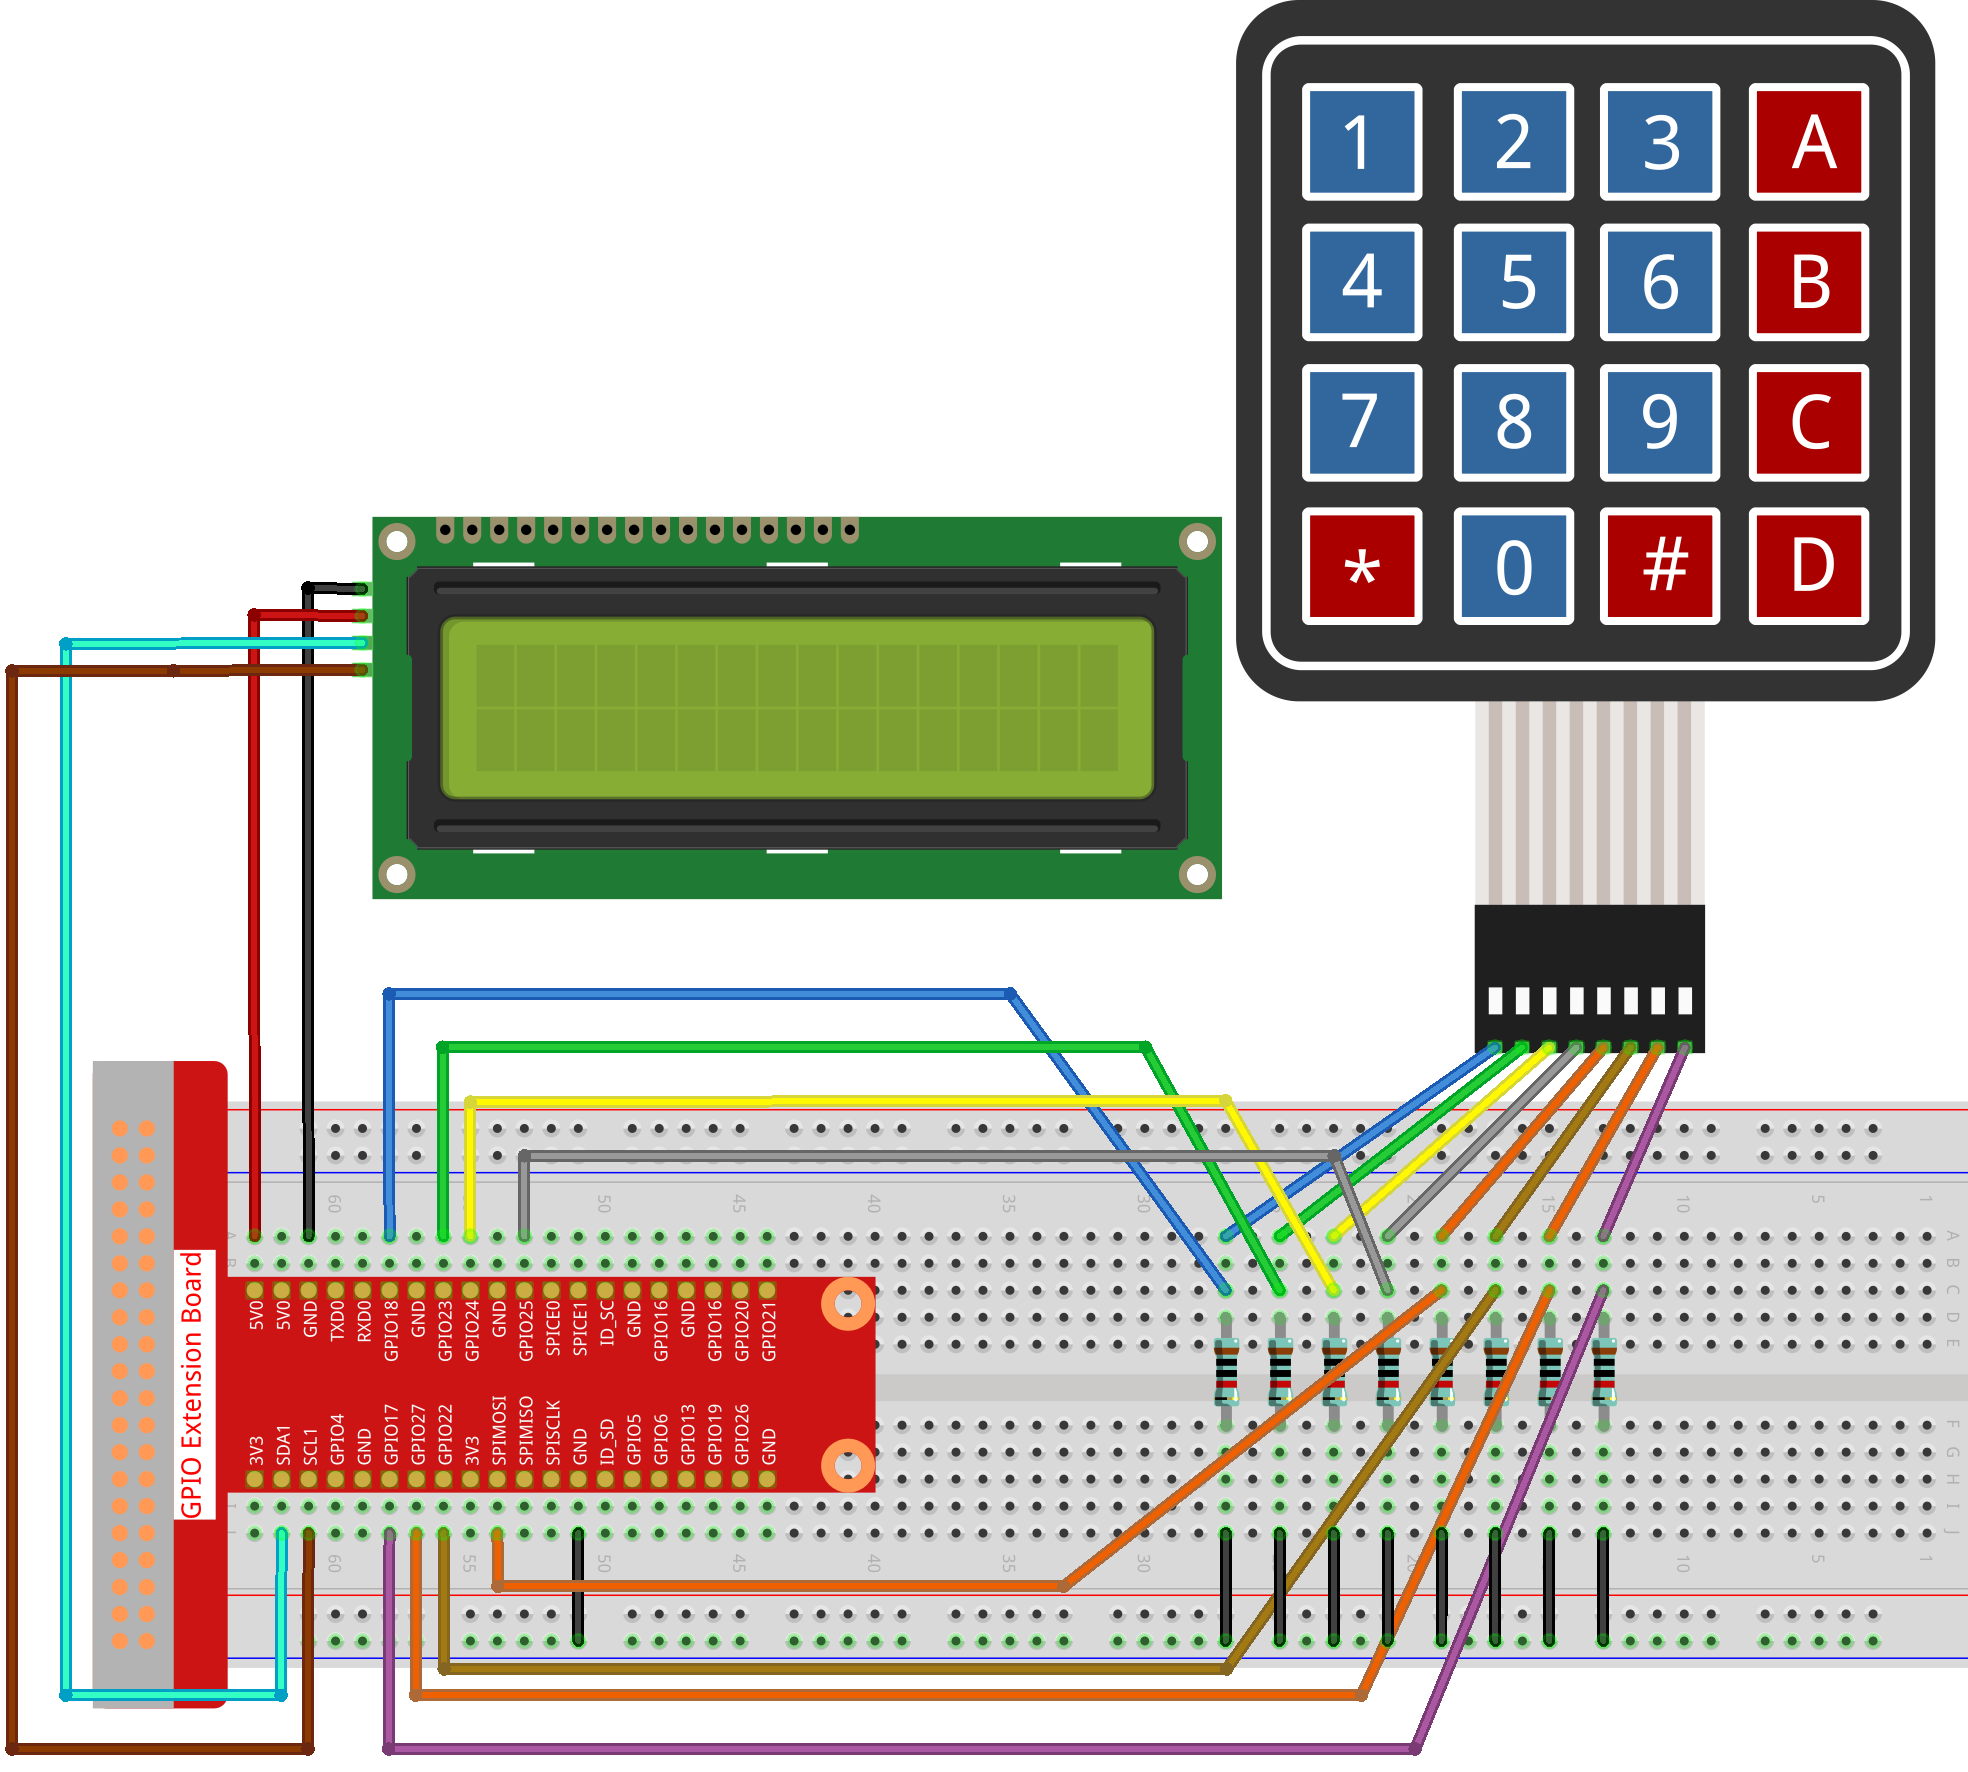
Step 1: Build the circuit.
Step 2: Change directory.
cd ~/raphael-kit/c/3.1.8/
Step 3: Compile.
gcc 3.1.8_PasswordLock.cpp -lwiringPi
Step 4: Run.
sudo ./a.out
After the code runs, use the keypad to enter the correct password: 1984. If the “CORRECT” appears on LCD1602, there is no wrong with the password; otherwise, “WRONG KEY” will appear.
Note
If there is an error prompt
wiringPi.h: No such file or directory, please refer to Install and Check the WiringPi.If you get
Unable to open I2C device: No such file or directoryerror, you need to refer to I²C Configuration to enable I2C and check if the wiring is correct.If the code and wiring are fine, but the LCD still does not display content, you can turn the potentiometer on the back to increase the contrast.
Code Explanation
#define ROWS  4
#define COLS  4
#define BUTTON_NUM (ROWS * COLS)
#define LENS  4

unsigned char KEYS[BUTTON_NUM] {
'1','2','3','A',
'4','5','6','B',
'7','8','9','C',
'*','0','#','D'};

char password[LENS]={'1','9','8','4'};
Here, we define the length of the password LENS, storage matrix keyboard key value array KEYS and the array that stores the correct password.
void keyRead(unsigned char* result);
bool keyCompare(unsigned char* a, unsigned char* b);
void keyCopy(unsigned char* a, unsigned char* b);
void keyPrint(unsigned char* a);
void keyClear(unsigned char* a);
int keyIndexOf(const char value);
There is a declaration of the subfunctions of the matrix keyboard code, refer to 2.1.8 Keypad of this document for more details.
void write_word(int data);
void send_command(int comm);
void send_data(int data);
void lcdInit();
void clear();
void write(int x, int y, char const data[]);
There is a declaration of the subfunctions of LCD1062 code, refer to 1.1.7 I2C LCD1602 of this document for more details.
while(1){
        keyRead(pressed_keys);
        bool comp = keyCompare(pressed_keys, last_key_pressed);
        ...
                testword[keyIndex]=pressed_keys[0];
                keyIndex++;
                if(keyIndex==LENS){
                    if(check()==0){
                        clear();
                        write(3, 0, "WRONG KEY!");
                        write(0, 1, "please try again");
                        }
                ...
Read the key value and store it in the test array testword. If the number of stored key values is more than 4, the correctness of the password is automatically verified, and the verification results are displayed on the LCD interface.
int check(){
    for(int i=0;i<LENS;i++){
        if(password[i]!=testword[i])
        {return 0;}
    }
    return 1;
}
Verify the correctness of the password. Return 1 if the password is entered correctly, and 0 if not.
Phenomenon Picture