Note
Hello, welcome to the SunFounder Raspberry Pi & Arduino & ESP32 Enthusiasts Community on Facebook! Dive deeper into Raspberry Pi, Arduino, and ESP32 with fellow enthusiasts.
Why Join?
Expert Support: Solve post-sale issues and technical challenges with help from our community and team.
Learn & Share: Exchange tips and tutorials to enhance your skills.
Exclusive Previews: Get early access to new product announcements and sneak peeks.
Special Discounts: Enjoy exclusive discounts on our newest products.
Festive Promotions and Giveaways: Take part in giveaways and holiday promotions.
👉 Ready to explore and create with us? Click [here] and join today!
3.1.11 GAME– Guess Number
Introduction
Guessing Numbers is a fun party game where you and your friends take turns inputting a number (0~99). The range will be smaller with the inputting of the number till a player answers the riddle correctly. Then the player is defeated and punished. For example, if the lucky number is 51 which the players cannot see, and the player ① inputs 50, the prompt of number range changes to 50~99; if the player ② inputs 70, the range of number can be 50~70; if the player ③ inputs 51, this player is the unlucky one. Here, we use keypad to input numbers and use LCD to output outcomes.
Required Components
In this project, we need the following components.
It’s definitely convenient to buy a whole kit, here’s the link:
Name |
ITEMS IN THIS KIT |
LINK |
|---|---|---|
Raphael Kit |
337 |
You can also buy them separately from the links below.
COMPONENT INTRODUCTION |
PURCHASE LINK |
|---|---|
- |
|
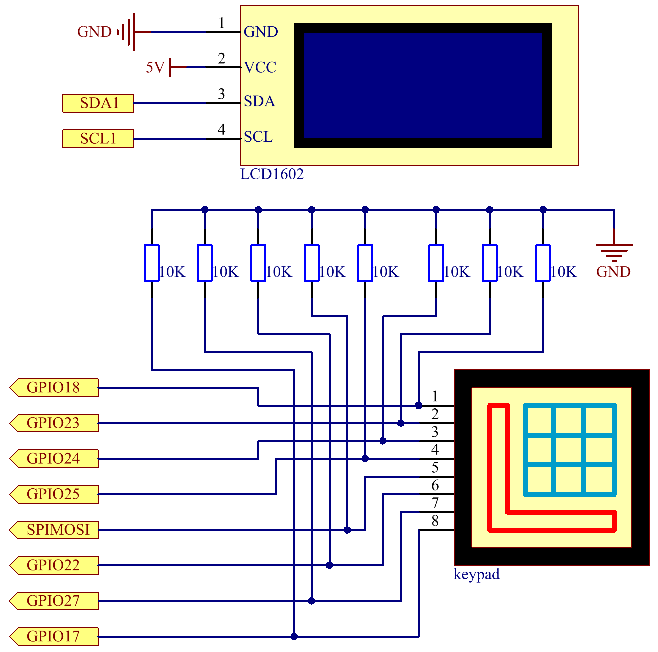
Schematic Diagram
T-Board Name |
physical |
wiringPi |
BCM |
GPIO18 |
Pin 12 |
1 |
18 |
GPIO23 |
Pin 16 |
4 |
23 |
GPIO24 |
Pin 18 |
5 |
24 |
GPIO25 |
Pin 22 |
6 |
25 |
SPIMOSI |
Pin 19 |
12 |
10 |
GPIO22 |
Pin 15 |
3 |
22 |
GPIO27 |
Pin 13 |
2 |
27 |
GPIO17 |
Pin 11 |
0 |
17 |
SDA1 |
Pin 3 |
SDA1(8) |
SDA1(2) |
SCL1 |
Pin 5 |
SCL1(9) |
SDA1(3) |
Experimental Procedures
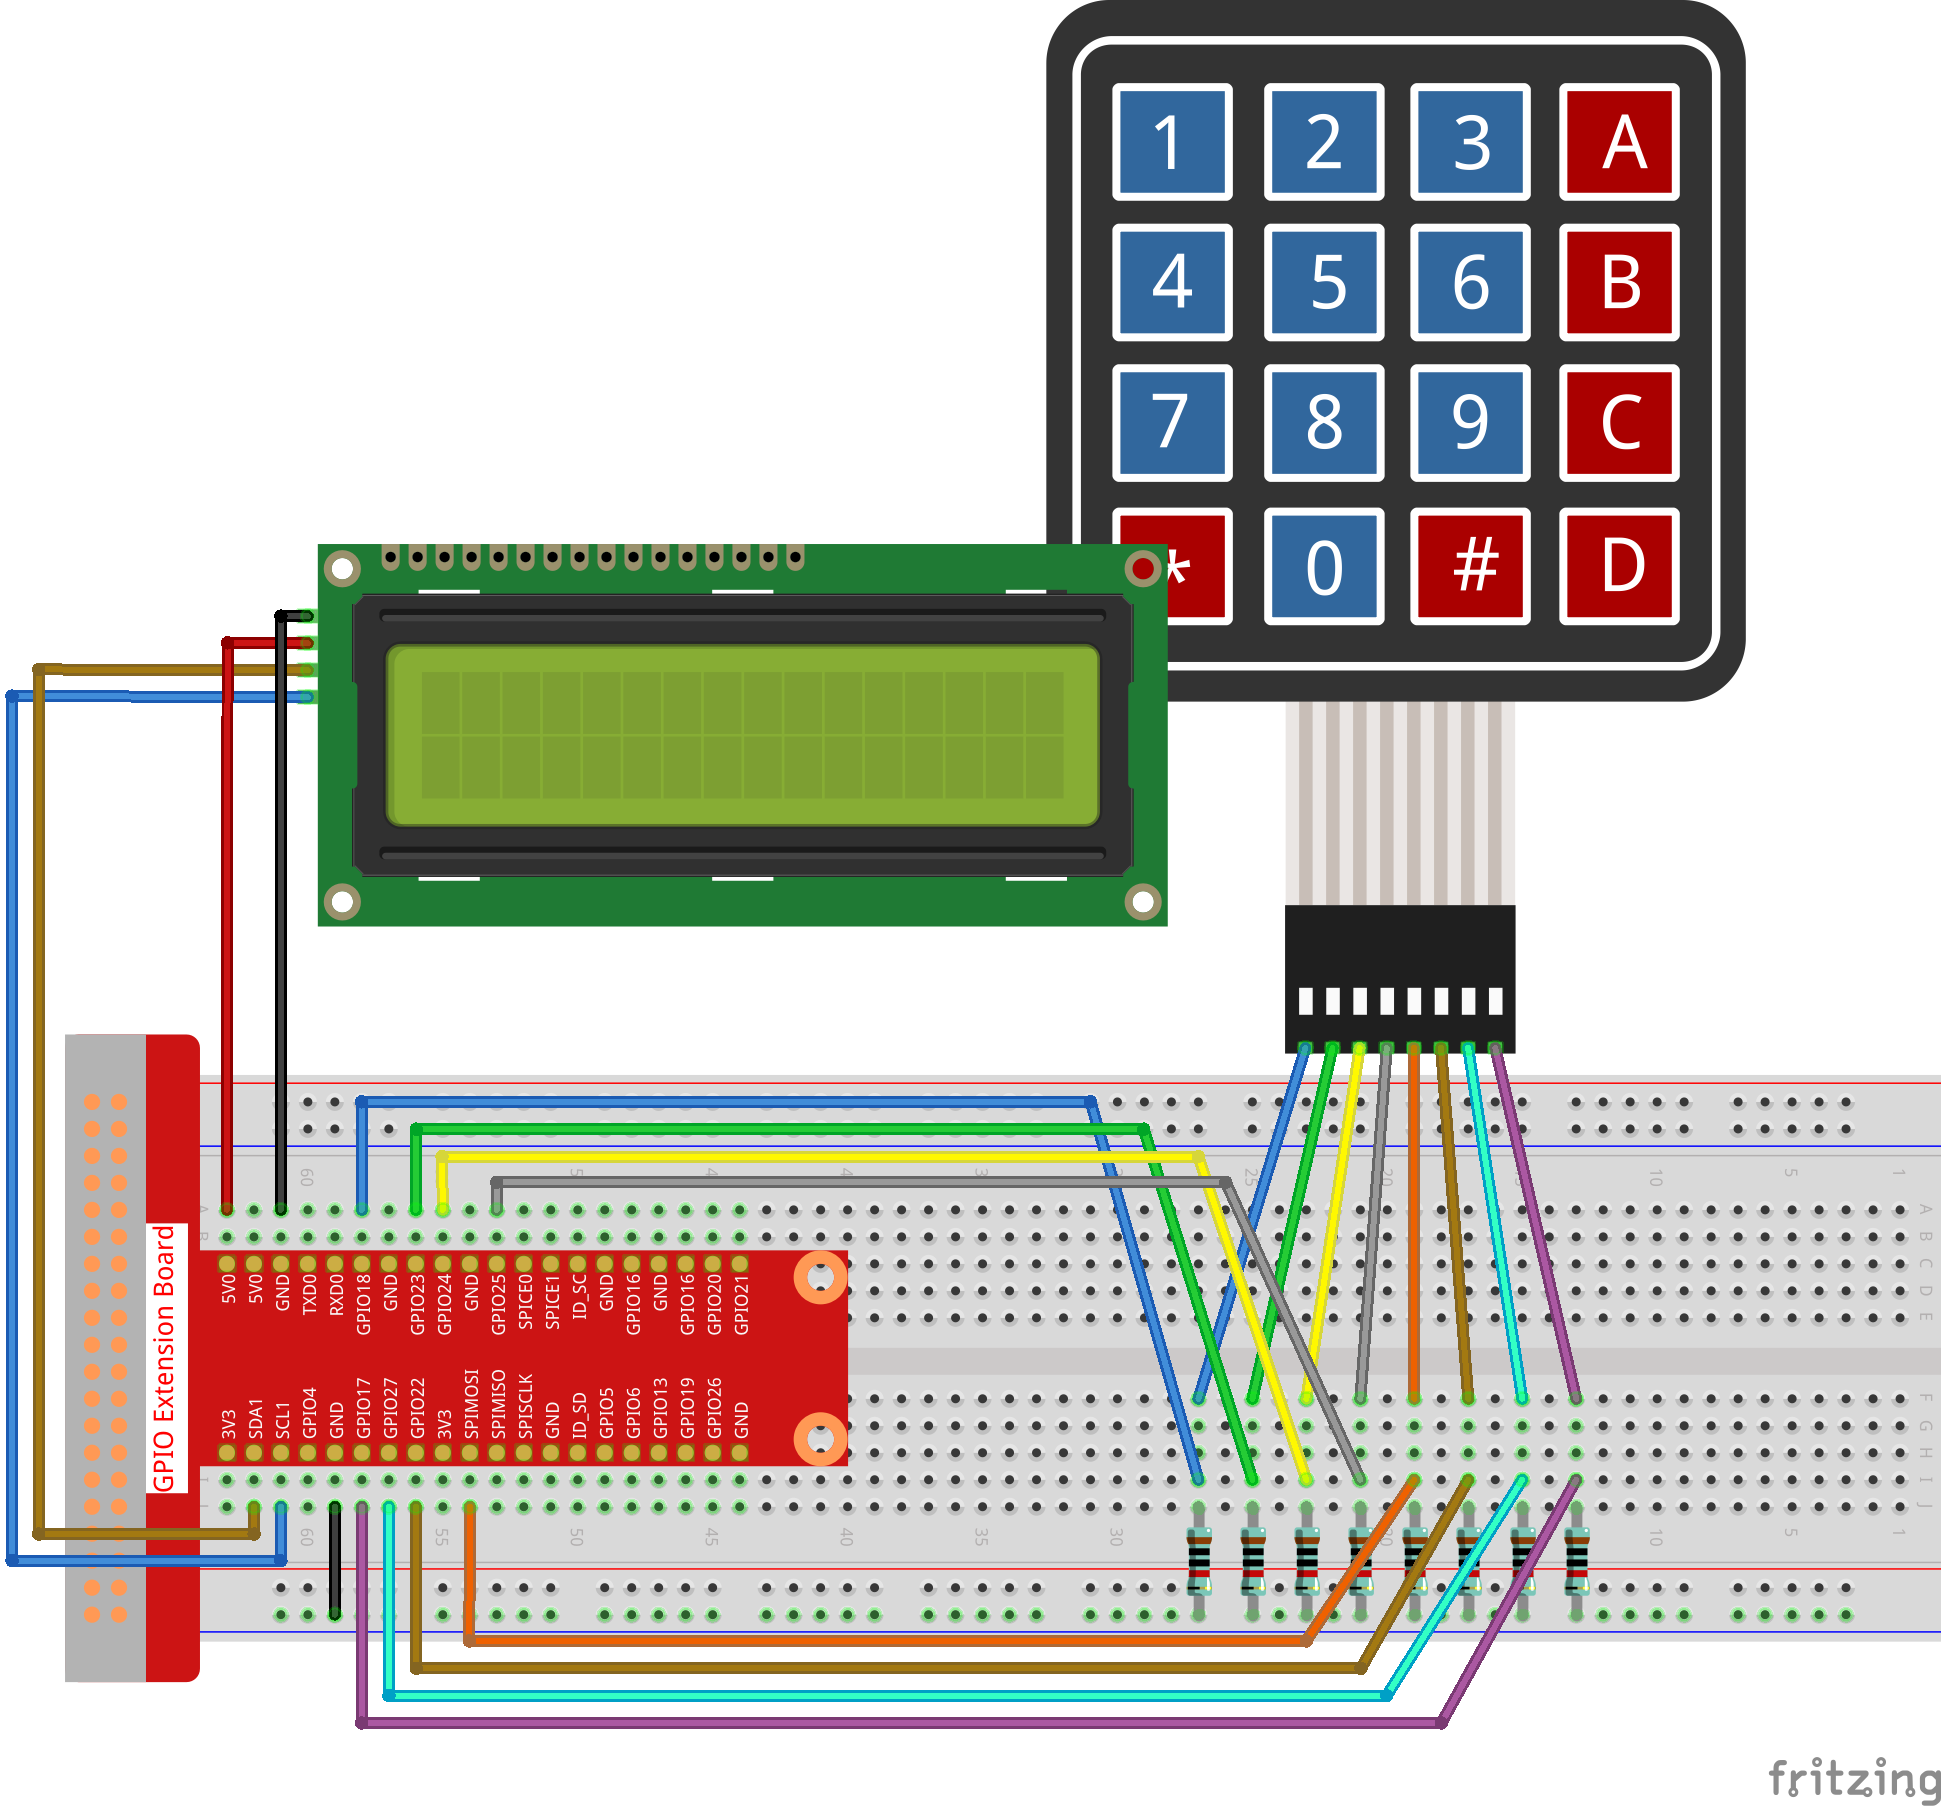
Step 1: Build the circuit.
Step 2: Setup I2C (see Appendix I²C Configuration. If you have set I2C, skip this step.)
Step 3: Change directory.
cd ~/raphael-kit/c/3.1.11/
Step 4: Compile.
gcc 3.1.11_GAME_GuessNumber.c -lwiringPi
Step 5: Run.
sudo ./a.out
After the program runs, there displays the initial page on the LCD:
Note
If there is an error prompt
wiringPi.h: No such file or directory, please refer to Install and Check the WiringPi.If you get
Unable to open I2C device: No such file or directoryerror, you need to refer to I²C Configuration to enable I2C and check if the wiring is correct.If the code and wiring are fine, but the LCD still does not display content, you can turn the potentiometer on the back to increase the contrast.
Welcome!
Press A to go!
Press ‘A’, and the game will start and the game page will appear on the LCD.
Enter number:
0 ‹point‹ 99
A random number ‘point’ is produced but not displayed on the LCD when the game starts, and what you need to do is to guess it. The number you have typed appears at the end of the first line till the final calculation is finished. (Press ‘D’ to start the comparation, and if the input number is larger than 10, the automatic comparation will start.)
The number range of ‘point’ is displayed on the second line. And you must type the number within the range. When you type a number, the range narrows; if you got the lucky number luckily or unluckily, there will appear “You’ve got it!”
Code Explanation
At the beginning part of the code are the functional functions of keypad and I2C LCD1602. You can learning more details about them in 1.1.7 I2C LCD1602 and 2.1.8 Keypad.
Here, what we need to know is as follows:
/****************************************/
//Start from here
/****************************************/
void init(void){
    fd = wiringPiI2CSetup(LCDAddr);
    lcd_init();
    lcd_clear();
    for(int i=0 ; i<4 ; i++) {
        pinMode(rowPins[i], OUTPUT);
        pinMode(colPins[i], INPUT);
    }
    lcd_clear();
    write(0, 0, "Welcome!");
    write(0, 1, "Press A to go!");
}
This function is used to initially define I2C LCD1602 and Keypad and to display “Welcome!” and “Press A to go!”.
void init_new_value(void){
    srand(time(0));
    pointValue = rand()%100;
    upper = 99;
    lower = 0;
    count = 0;
    printf("point is %d\n",pointValue);
}
The function produces the random number ‘point’ and resets the range hint of the point.
bool detect_point(void){
    if(count > pointValue){
        if(count < upper){
            upper = count;
        }
    }
    else if(count < pointValue){
        if(count > lower){
            lower = count;
        }
    }
    else if(count = pointValue){
        count = 0;
        return 1;
    }
    count = 0;
    return 0;
}
detect_point() compares the input number with the produced “point”. If the comparing outcome is that they are not same, count will assign values to upper and lower and return ‘0’; otherwise, if the outcome indicates they are same, there returns ‘1’.
void lcd_show_input(bool result){
    char *str=NULL;
    str =(char*)malloc(sizeof(char)*3);
    lcd_clear();
    if (result == 1){
        write(0,1,"You've got it!");
        delay(5000);
        init_new_value();
        lcd_show_input(0);
        return;
    }
    write(0,0,"Enter number:");
    Int2Str(str,count);
    write(13,0,str);
    Int2Str(str,lower);
    write(0,1,str);
    write(3,1,"<Point<");
    Int2Str(str,upper);
    write(12,1,str);
}
This function works for displaying the game page. Pay attention to the function Int2Str(str,count), it converts these variables count, lower, and upper from integer to character string for the correct display of lcd.
int main(){
    unsigned char pressed_keys[BUTTON_NUM];
    unsigned char last_key_pressed[BUTTON_NUM];
    if(wiringPiSetup() == -1){ //when initialize wiring failed,print messageto screen
        printf("setup wiringPi failed !");
        return 1;
    }
    init();
    init_new_value();
    while(1){
        keyRead(pressed_keys);
        bool comp = keyCompare(pressed_keys, last_key_pressed);
        if (!comp){
            if(pressed_keys[0] != 0){
                bool result = 0;
                if(pressed_keys[0] == 'A'){
                    init_new_value();
                    lcd_show_input(0);
                }
                else if(pressed_keys[0] == 'D'){
                    result = detect_point();
                    lcd_show_input(result);
                }
                else if(pressed_keys[0] >='0' && pressed_keys[0] <= '9'){
                    count = count * 10;
                    count = count + (pressed_keys[0] - 48);
                    if (count>=10){
                        result = detect_point();
                    }
                    lcd_show_input(result);
                }
            }
            keyCopy(last_key_pressed, pressed_keys);
        }
        delay(100);
    }
    return 0;
}
Main() contains the whole process of the program, as show below:
Initialize I2C LCD1602 and Keypad.
Use init_new_value() to create a random number 0-99.
Judge whether the button is pressed and get the button reading.
If the button ‘A’ is pressed, a random number 0-99 will appear then the game starts.
If the button ‘D’ is detected to have been pressed, the program will enter into the outcome judgement and will display the outcome on the LCD. This step helps that you can also judge the outcome when you press only one number and then the button ‘D’.
If the button 0-9 is pressed, the value of count will be changed; if the count is larger than 10, then the judgement starts.
The changes of the game and its values are displayed on LCD1602.
Phenomenon Picture
