Note
Hello, welcome to the SunFounder Raspberry Pi & Arduino & ESP32 Enthusiasts Community on Facebook! Dive deeper into Raspberry Pi, Arduino, and ESP32 with fellow enthusiasts.
Why Join?
Expert Support: Solve post-sale issues and technical challenges with help from our community and team.
Learn & Share: Exchange tips and tutorials to enhance your skills.
Exclusive Previews: Get early access to new product announcements and sneak peeks.
Special Discounts: Enjoy exclusive discounts on our newest products.
Festive Promotions and Giveaways: Take part in giveaways and holiday promotions.
👉 Ready to explore and create with us? Click [here] and join today!
3.1.13 GAME– NotNot
Introduction
In this project, we will make an interesting game device, and we call it “Not Not”.
During the game, the dot matrix will refresh an arrow randomly. What you need to do is to press the button in the opposite direction of the arrow within a limited time. If the time is up, or if the button in the same direction as the arrow is pressed, you are out.
This game can really practice your reverse thinking, and now shall we have a try?
Required Components
In this project, we need the following components.
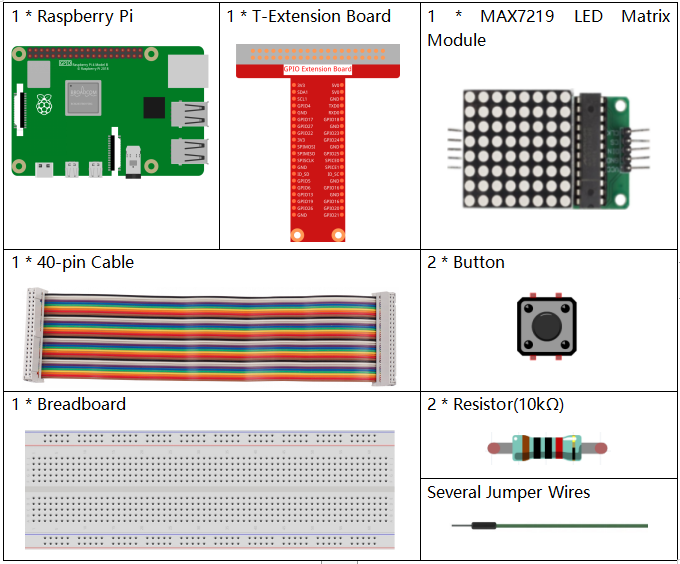
It’s definitely convenient to buy a whole kit, here’s the link:
Name |
ITEMS IN THIS KIT |
LINK |
|---|---|---|
Raphael Kit |
337 |
You can also buy them separately from the links below.
COMPONENT INTRODUCTION |
PURCHASE LINK |
|---|---|
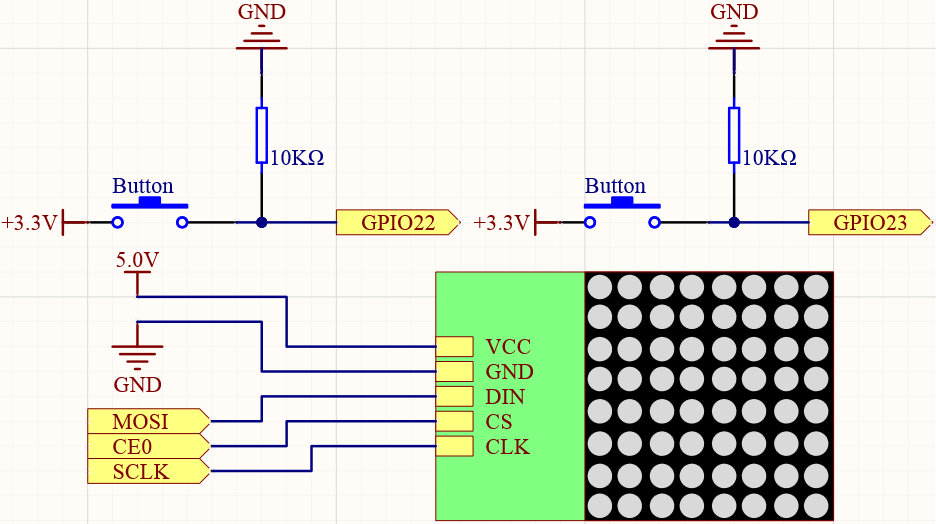
Schematic Diagram
T-Board Name |
physical |
wiringPi |
BCM |
GPIO22 |
Pin 15 |
3 |
22 |
GPIO23 |
Pin 16 |
4 |
23 |
SPIMOSI |
Pin 19 |
12 |
MOSI |
SPICE0 |
pin 24 |
10 |
CE0 |
SPISCLK |
Pin 23 |
14 |
SCLK |
Experimental Procedures
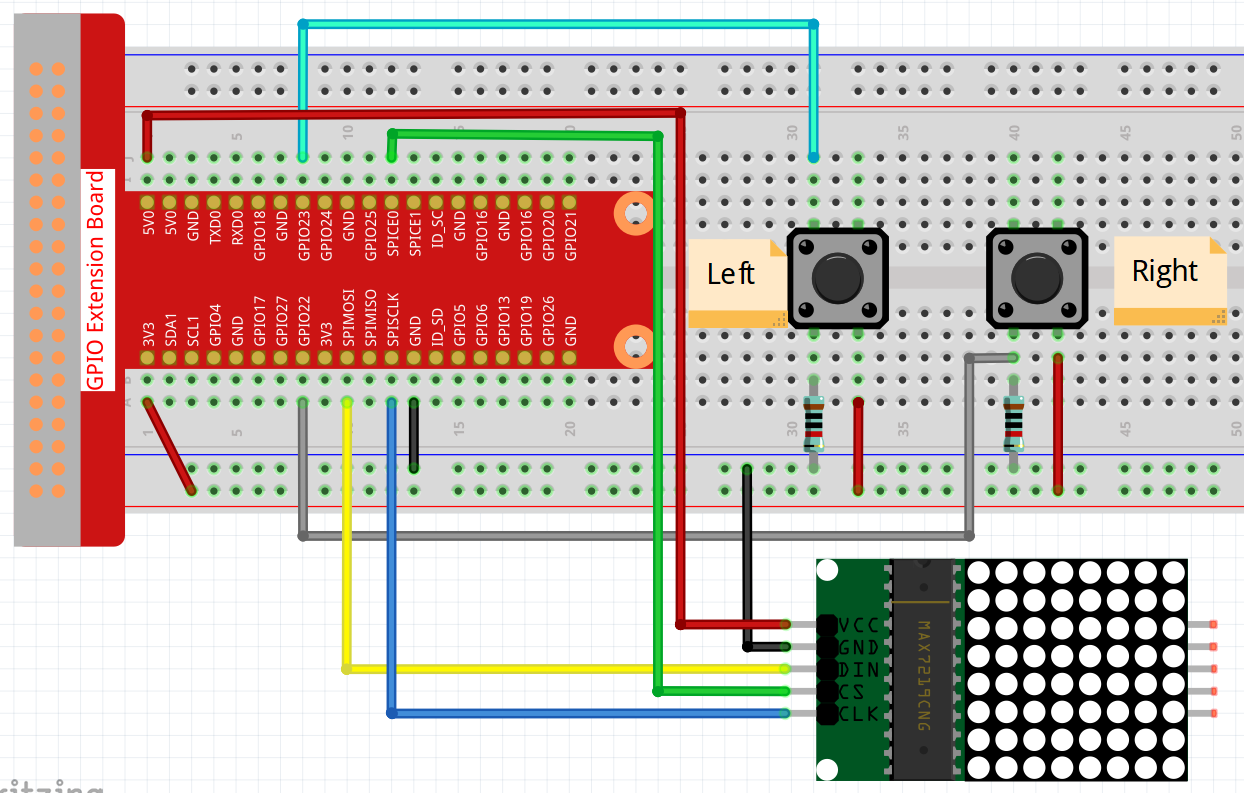
Step 1: Build the circuit.
Step 2: Turn on the SPI before starting the experiment, refer to SPI Configuration for details.
Step 3: Go to the folder of the code.
cd ~/raphael-kit/c/3.1.13/
Step 4: Compile the code.
make
Step 5: Run the executable file.
sudo ./3.1.13_GAME_NotNot
After the program starts, a left or right arrow will be refreshed at random on the dot matrix. What you need to do is to press the button in the opposite direction of the arrow, then “√” appears on the dot matrix. If the button in the same direction as the arrow is pressed, you are out and the dot matrix displays “x”. You can also add 2 new buttons or replace them with Joystick keys for up, down, left and right— 4 directions to increase the difficulty of the game.
Note
If it does not work after running, or there is an error prompt: "wiringPi.h: No such file or directory", please refer to Install and Check the WiringPi.
Code Explanation
This C program is designed to run on a Raspberry Pi using the WiringPi library. It interfaces with an 8x8 LED matrix display controlled by the MAX7219 driver chip and uses two buttons for user interaction. The program randomly displays a left or right arrow on the LED matrix, and the user must press the corresponding button. It then displays a check mark for a correct response or a cross for an incorrect one.
Header Files:
wiringPi.h: Provides functions for GPIO control using the WiringPi library.wiringPiSPI.h: Provides functions for SPI communication.stdio.h: Standard input/output functions (printf, etc.).stdlib.h: Standard library functions (rand,srand,exit).time.h: Functions for manipulating date and time (time,NULL).
Type Definitions:
#define uchar unsigned char: Definesucharas an alias forunsigned char.#define uint unsigned int: Definesuintas an alias forunsigned int.
Constants and Macros:
SPI_CHANNEL: SPI channel used for communication (0 or 1).SPI_SPEED: SPI communication speed set to 1 MHz.AButtonPin: WiringPi pin number for Button A (GPIO 22).BButtonPin: WiringPi pin number for Button B (GPIO 23).
Global Variables:
int stage = 0;: Tracks the current stage of the game (displaying arrow or result).
Data Arrays:
uchar arrow[2][8]: Contains two 8-byte patterns representing right and left arrows for the LED matrix.arrow[0]: Right arrow pattern.arrow[1]: Left arrow pattern.
uchar check[2][8]: Contains two 8-byte patterns representing correct (check mark) and incorrect (cross) symbols.check[0]: Correct symbol pattern.check[1]: Incorrect symbol pattern.
void Delay_xms(uint x)Function:Wrapper function for
delay(x)provided by WiringPi.Delays program execution for
xmilliseconds.
void Write_Max7219_byte(uchar DATA)Function:Sends a single byte (
DATA) to the MAX7219 via SPI.Uses
wiringPiSPIDataRWto perform SPI data transfer.DATA: The data byte to send.
void Write_Max7219(uchar address1, uchar dat1)Function:Sends a command and data to the MAX7219.
Combines
address1(register address) anddat1(data) into a buffer and sends via SPI.address1: Address of the MAX7219 register.dat1: Data to write to the register.
void Init_MAX7219()Function:Initializes the MAX7219 display driver with necessary configurations.
Configures decode mode, intensity, scan limit, shutdown mode, and display test.
Clears any previous data on the display.
void Init_WiringPi()Function:Initializes the WiringPi library and SPI interface.
Sets up the button pins as input with pull-up resistors.
Checks for successful initialization and exits if failed.
int get_index()Function:Generates a random index (0 or 1) to choose between left and right arrow.
Returns:
0or1.
int get_key(uint num)Function:Waits for the user to press a button and determines if the input matches the displayed arrow.
Parameters:
num: The index of the displayed arrow (0 for right, 1 for left).
Returns:
1if the user input is correct.0if the user input is incorrect.
Functionality:
Enters an infinite loop checking the state of the buttons.
Uses
digitalReadto detect button presses (active LOW).Compares the pressed button with the expected input based on
num.
void display(uint index)Function:Displays either an arrow or a result symbol on the LED matrix based on the
stage.Parameters:
index: Index to select the pattern fromarroworcheckarrays.
Functionality:
If
stage == 0, displays an arrow pattern.If
stage == 1, displays a check mark or cross symbol.
Main Function:
Initialization:
Seeds the random number generator with
srand((unsigned)time(NULL)).Calls
Init_WiringPi()to set up GPIO and SPI.Calls
Init_MAX7219()to initialize the LED matrix display.Introduces a short delay with
Delay_xms(50).
Game Loop (``while (1)``):
Stage 0 (Display Arrow):
Calls
get_index()to randomly select an arrow direction.Calls
display(direction)to show the arrow on the LED matrix.Sets
stage = 1to move to the next stage.
Stage 1 (Get User Input and Display Result):
Calls
get_key(direction)to wait for user input and determine correctness.Calls
display(key)to show the result symbol (check mark or cross).Waits for 1 second using
Delay_xms(1000)to allow the user to see the result.Sets
stage = 0to restart the loop.
Program Flow Summary:
Setup:
Initialize WiringPi and SPI.
Configure button pins and MAX7219 settings.
Seed the random number generator.
Display Arrow:
Randomly select an arrow direction (left or right).
Display the corresponding arrow on the LED matrix.
User Interaction:
Wait for the user to press either Button A or Button B.
Determine if the pressed button matches the arrow direction.
Display Result:
Show a check mark if the user’s input is correct.
Show a cross if the user’s input is incorrect.
Wait for 1 second before the next round.
Repeat:
Loop back to display a new arrow and continue the game.