Note
Hello, welcome to the SunFounder Raspberry Pi & Arduino & ESP32 Enthusiasts Community on Facebook! Dive deeper into Raspberry Pi, Arduino, and ESP32 with fellow enthusiasts.
Why Join?
Expert Support: Solve post-sale issues and technical challenges with help from our community and team.
Learn & Share: Exchange tips and tutorials to enhance your skills.
Exclusive Previews: Get early access to new product announcements and sneak peeks.
Special Discounts: Enjoy exclusive discounts on our newest products.
Festive Promotions and Giveaways: Take part in giveaways and holiday promotions.
👉 Ready to explore and create with us? Click [here] and join today!
2.7 PIR Sensor
Introduction
The Passive Infrared (PIR) sensor is a motion detection device that senses infrared radiation emitted by humans and animals. In this project, we will use the PIR sensor to detect motion.
What You’ll Need
Below are the components required for this project:
COMPONENT INTRODUCTION |
PURCHASE LINK |
|---|---|
- |
|
Raspberry Pi |
- |
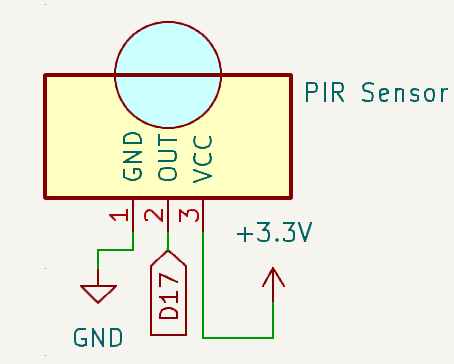
Circuit Diagram
Below is the schematic diagram for this project:
Wiring Diagram
Build the circuit as shown in the diagram below:

Ensure the RGB LED and PIR sensor are connected to the correct GPIO pins as per the schematic.
Note
Adjust the two potentiometers on the PIR module for optimal sensitivity and detection distance. Turn both counterclockwise to their maximum setting for best results.

Running the Example
All example code used in this tutorial is available in the ai-lab-kit directory.
Follow these steps to run the example:
cd ~/ai-lab-kit/python/
sudo python3 2.7_PIR.py
This Python script monitors a PIR (Passive Infrared) motion sensor based on motion detection. When executed:
When Motion is Detected: Prints “Detected Barrier!” to the console.
When No Motion is Detected: Prints “No Barrier” to the console.
The program runs indefinitely, waiting for motion events. It can be terminated by pressing Ctrl+C.
Code
Below is the Python code for this project:
#!/usr/bin/env python3
from fusion_hat.pin import Pin, Mode, Pull
from signal import pause  # Import pause function from signal module

# Initialize a PIR Module object on GPIO pin 17
pir = Pin(17, mode=Mode.IN, pull=Pull.DOWN)

def detect():
   if pir.value() == 1:  # Check if the PIR Module is triggered
      print("Detected Barrier!")
   else:
      print("No Barrier")

try:
   pir.when_activated = detect  # Set up an interrupt to detect changes in the pir sensor state
   pir.when_deactivated = detect

   # Run an event loop that waits for button events and keeps the script running
   print("CTRL + C to exit")
   pause()

except KeyboardInterrupt:
   # Handle KeyboardInterrupt (Ctrl+C) to exit the loop gracefully
   pass
Understanding the Code
Imports:
from fusion_hat.pin import Pin, Mode, Pull
from signal import pause  # Import pause function from signal module
The script uses the
fusion_hatlibrary to control the PIR sensor, and thesignalmodule to handle program termination.Initialization:
pir = Pin(17, mode=Mode.IN, pull=Pull.DOWN)
In this line, a PIR sensor is initialized on pin 17 with an internal pull-down resistor enabled.
Main Loop:
def detect():
   if pir.value() == 1:  # Check if the PIR Module is triggered
      print("Detected Barrier!")
   else:
      print("No Barrier")

try:
   pir.when_activated = detect  # Set up an interrupt to detect changes in the pir sensor state
   pir.when_deactivated = detect

   # Run an event loop that waits for button events and keeps the script running
   print("CTRL + C to exit")
   pause()

except KeyboardInterrupt:
   # Handle KeyboardInterrupt (Ctrl+C) to exit the loop gracefully
   pass
Continuously checks for motion detected by the PIR sensor.
If motion is detected, the message “Detected Barrier!” is printed.
If no motion is detected, the message “No Barrier” is printed.
Troubleshooting
Motion Not Detected:
Cause: PIR sensor is not wired or configured properly.
Solution:
Ensure the PIR sensor is connected to GPIO pin 17, power, and ground.
Adjust the sensor’s sensitivity and delay potentiometers if available.
Extendable Ideas
Auditory Feedback: Add a buzzer that sounds when motion is detected:
from fusion_hat import Buzzer
buzzer = Buzzer(Pin(22))
if pir.value() == 1:
   buzzer.on()
else:
   buzzer.off()
Data Logging: Log motion detection events with timestamps to a file for analysis:
with open("motion_log.txt", "a") as log_file:
   log_file.write(f"Motion detected at {time.time():.3f}\n")
Conclusion
This project demonstrates how to use a PIR sensor. By understanding the basics of motion sensing control, you can expand this project into more advanced applications such as security systems, automated lighting, or interactive devices. The PIR sensor’s versatility and simplicity make it an excellent component for countless DIY and professional projects.