注釈
こんにちは、SunFounder Raspberry Pi & Arduino & ESP32 Enthusiast Community on Facebookへようこそ!他の愛好家と一緒に、Raspberry Pi、Arduino、ESP32の世界により深く入り込みましょう。
参加する理由
専門家サポート: 購入後の問題や技術的な課題を、コミュニティと私たちのチームの助けを借りて解決します。
学習と共有: ヒントやチュートリアルを交換して、スキルを向上させましょう。
限定プレビュー: 新製品の発表や先行プレビューに早期アクセスできます。
特別割引: 最新製品を特別割引でお楽しみいただけます。
季節限定キャンペーンとプレゼント: プレゼント企画やホリデーキャンペーンに参加しましょう。
👉 一緒に発見し、創造する準備はできましたか? [こちら] をクリックして、今すぐ参加しましょう!
4.8 GAME - 10秒チャレンジ
はじめに
「10秒チャレンジ」ゲームで、あなたの集中力とタイミング感覚を試してみましょう! このプロジェクトでは、傾斜スイッチを棒に取り付けて魔法の杖を作ります。杖を振ると、4桁のセグメントディスプレイ上でタイマーがスタートします。もう一度振るとタイマーが停止します。目標は、10.00秒 にできるだけ近いところでタイマーを止めることです。誰が究極のタイムウィザードか、友達と競ってみましょう!
必要なもの
このプロジェクトに必要なコンポーネントは以下のとおりです。
COMPONENT INTRODUCTION |
PURCHASE LINK |
|---|---|
- |
|
- |
|
- |
|
Raspberry Pi |
- |
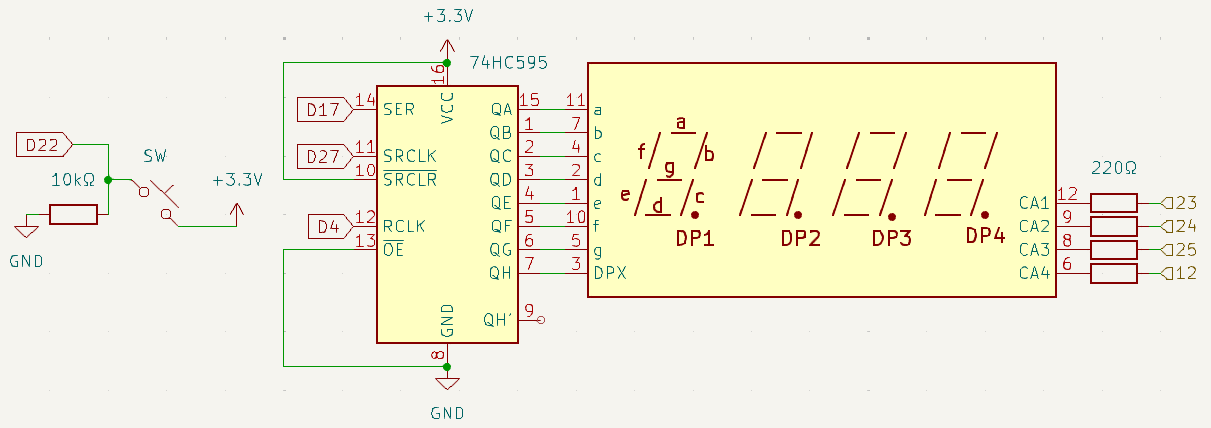
回路図
以下は「10秒チャレンジ」の回路図です。
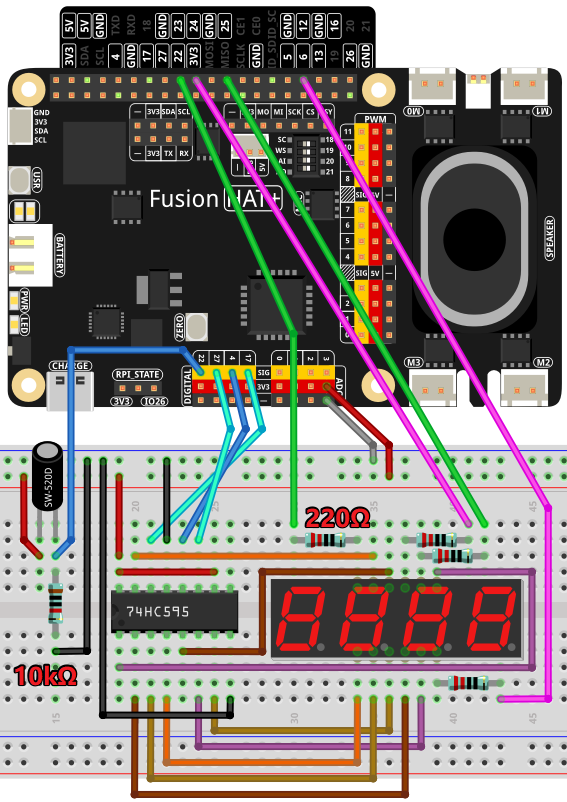
配線図
以下の配線図に従って回路を組み立ててください。
サンプルの実行
このチュートリアルで使用するすべてのサンプルコードは ai-lab-kit ディレクトリに含まれています。
以下の手順に従ってサンプルを実行してください。
cd ~/ai-lab-kit/python/
sudo python3 4.8_GAME_10Second.py
スクリプトを実行すると、次のように動作します。
杖を振ると、4桁のセグメントディスプレイ上でタイマーがスタートします。
もう一度杖を振ると、タイマーが停止します。
タイマー表示が 10.00 秒なら、そのラウンドの勝ちです。
さらにもう一度杖を振ると、ゲームがリセットされ、新しいラウンドが始まります。
コード
以下は、このプロジェクトで使用する Python コードです。
#!/usr/bin/env python3

# Import Pin control, modes, and pull-up/down definitions
from fusion_hat.pin import Pin, Mode, Pull
# Import time for delays
import time
# Import threading to use Timer for repeated callbacks
import threading

# Initialize the button connected to GPIO 22, set as input with pull-down resistor
sensorPin = Pin(22, mode=Mode.IN, pull=Pull.DOWN)

# Define GPIO pins for the 74HC595 shift register
SDI = Pin(17, mode=Mode.OUT)    # Serial Data Input
RCLK = Pin(4, mode=Mode.OUT)    # Register Clock (latch)
SRCLK = Pin(27, mode=Mode.OUT)  # Shift Register Clock

# Define GPIO pins controlling digit selection on the 4-digit 7-segment display
placePin = [Pin(pin, mode=Mode.OUT) for pin in (23, 24, 25, 12)]

# Define the segment encoding for digits 0–9 (common cathode)
number = (0xc0, 0xf9, 0xa4, 0xb0, 0x99, 0x92, 0x82, 0xf8, 0x80, 0x90)

# Counter value, timer object, and game state variable
counter = 0
timer1 = None
gameState = 0

def clearDisplay():
   """Clear all segments by shifting out 'all off' bits to the 74HC595."""
   for _ in range(8):
      SDI.on()      # Send high bits (turned off segments)
      SRCLK.on()    # Pulse shift clock
      SRCLK.off()
   RCLK.on()         # Latch the data
   RCLK.off()

def hc595_shift(data):
   """Shift out one byte to the 74HC595 to control segment lighting."""
   for i in range(8):
      SDI.value(0x80 & (data << i))  # Output next bit
      SRCLK.on()                     # Clock pulse
      SRCLK.off()
   RCLK.on()                          # Latch data to output
   RCLK.off()

def pickDigit(digit):
   """Enable one of the 4 digits on the display by activating its control pin."""
   for pin in placePin:
      pin.off()          # Disable all digits
   placePin[digit].on()   # Enable selected digit

def display():
   """Render the current 4-digit counter value onto the 7-segment display."""
   global counter

   # Units digit
   clearDisplay()
   pickDigit(3)
   hc595_shift(number[counter % 10])

   # Tens digit
   clearDisplay()
   pickDigit(2)
   hc595_shift(number[counter % 100 // 10])

   # Hundreds digit (minus 0x80 to enable decimal point if needed)
   clearDisplay()
   pickDigit(1)
   hc595_shift(number[counter % 1000 // 100] - 0x80)

   # Thousands digit
   clearDisplay()
   pickDigit(0)
   hc595_shift(number[counter % 10000 // 1000])

def stateChange():
   """Handle button-triggered mode changes: start or stop the timer."""
   global gameState, counter, timer1

   # When gameState = 0 → Reset counter and start timer
   if gameState == 0:
      counter = 0           # Reset counter
      time.sleep(1)         # Small delay before start
      timer()               # Start counting

   # When gameState = 1 → Stop the timer
   elif gameState == 1 and timer1 is not None:
      timer1.cancel()       # Stop Timer thread
      time.sleep(1)

   # Toggle between state 0 and 1
   gameState = (gameState + 1) % 2

def loop():
   """Main loop: refresh the display and detect button presses."""
   global counter
   currentState = 0
   lastState = 0

   while True:
      display()                     # Continuously update display
      currentState = sensorPin.value()   # Read button state
      # Detect falling edge: button released → pressed transition
      if (currentState == 0) and (lastState == 1):
            stateChange()             # Trigger state change
      lastState = currentState      # Save state for edge detection

def timer():
   """Timer callback: increments counter every 0.01 seconds using threading.Timer."""
   global counter, timer1
   timer1 = threading.Timer(0.01, timer)  # Create next timer event
   timer1.start()                         # Start timer loop
   counter += 1                           # Increase counter value

try:
   loop()                                 # Run main loop
except KeyboardInterrupt:
   if timer1:
      timer1.cancel()                    # Cleanly stop timer on exit
コードの解説
ボタン入力: 傾斜スイッチは GPIO22 に接続されており、杖が振られたことを検出します。
74HC595 シフトレジスタ: シフトレジスタは、7セグメントディスプレイのどの桁を点灯させるかを制御します。
タイマー処理:
threading.Timerを使用して 0.01 秒ごとにカウンターを増加させ、高い精度で時間を計測します。状態管理: ゲームはボタン入力に応じて状態(開始、停止)を切り替え、必要に応じてカウンターをリセットします。
表示更新: 7セグメントディスプレイには、タイマーの値が小数点以下 2 桁まで表示されます。
トラブルシューティング
7セグメントディスプレイに数字が表示されない:
原因: 配線ミス、または GPIO ピン設定の誤り。
対処方法:
74HC595 シフトレジスタと 7 セグメントディスプレイの接続を確認してください。
numberのセグメントコードが、使用しているディスプレイの仕様に合っていることを確認してください。
傾斜スイッチの動きが検出されない:
原因: 傾斜スイッチの配線不良、またはチャタリングの影響。
対処方法:
傾斜スイッチが GPIO22 に接続されていることを確認してください。
loop()関数内に短いデバウンス遅延を追加してください。time.sleep(0.05)
カウンターが増加しない:
原因: タイマー関数が正しく開始されていません。
対処方法:
timer()関数を確認し、timer1.start()が呼び出されていることを確認してください。timer()の中でcounterを表示してデバッグしてください。
ディスプレイに誤った数字が表示される:
原因:
numberリスト内のセグメントコードが実際のハードウェア構成と一致していません。対処方法: 各数字を固定表示して、セグメントの対応関係を確認してください。
拡張アイデア
タイマー速度の調整: 2つ目のボタンを追加し、0.01 秒、0.1 秒、1 秒単位など、タイマーの増加速度を切り替えられるようにします。
カウントダウンモード: あらかじめ設定した値から 0 まで減少するカウントダウンモードを実装します。
一時停止と再開: 別のボタンを追加し、リセットせずにカウンターを一時停止・再開できるようにします。
音によるフィードバック: カウンターが特定の節目(たとえば 10 の倍数)に到達したとき、ブザーで音を鳴らします。
まとめ
「10秒チャレンジ」は、傾斜スイッチや 7 セグメントディスプレイのようなシンプルな部品を使って、楽しいインタラクティブゲームを作れることを示しています。このプロジェクトでは、GPIO 制御、タイマー処理、状態管理を Python で扱う方法を学ぶことができ、楽しみながら実践的に理解を深められます。ぜひ自分自身や友達と競い合い、完璧なタイミングを目指してみてください。