注釈
こんにちは、SunFounder Raspberry Pi & Arduino & ESP32 Enthusiast Community on Facebookへようこそ!他の愛好家と一緒に、Raspberry Pi、Arduino、ESP32の世界により深く入り込みましょう。
参加する理由
専門家サポート: 購入後の問題や技術的な課題を、コミュニティと私たちのチームの助けを借りて解決します。
学習と共有: ヒントやチュートリアルを交換して、スキルを向上させましょう。
限定プレビュー: 新製品の発表や先行プレビューに早期アクセスできます。
特別割引: 最新製品を特別割引でお楽しみいただけます。
季節限定キャンペーンとプレゼント: プレゼント企画やホリデーキャンペーンに参加しましょう。
👉 一緒に発見し、創造する準備はできましたか? [こちら] をクリックして、今すぐ参加しましょう!
4.12 環境モニター
はじめに
このレッスンでは、温度、湿度、周囲の明るさを読み取り、それらすべての値を 128×64 OLED 画面にリアルタイムで表示する Environment Monitor Dashboard を作成します。
このプロジェクトでは以下を使用します。
温度と湿度を測定する DHT11 センサー
周囲光レベルを測定するために Fusion HAT+ の ADC に接続された LDR(光依存抵抗)
環境データと動的なライトバーを表示する SSD1306 OLED
画面は継続的に更新され、DHT11 が有効な値を返したかどうかに応じて、ステータス表示( OK または TIMEOUT)も表示されます。
必要なもの
このプロジェクトで必要なコンポーネントは以下のとおりです。
COMPONENT INTRODUCTION |
PURCHASE LINK |
|---|---|
- |
|
- |
|
Raspberry Pi |
- |
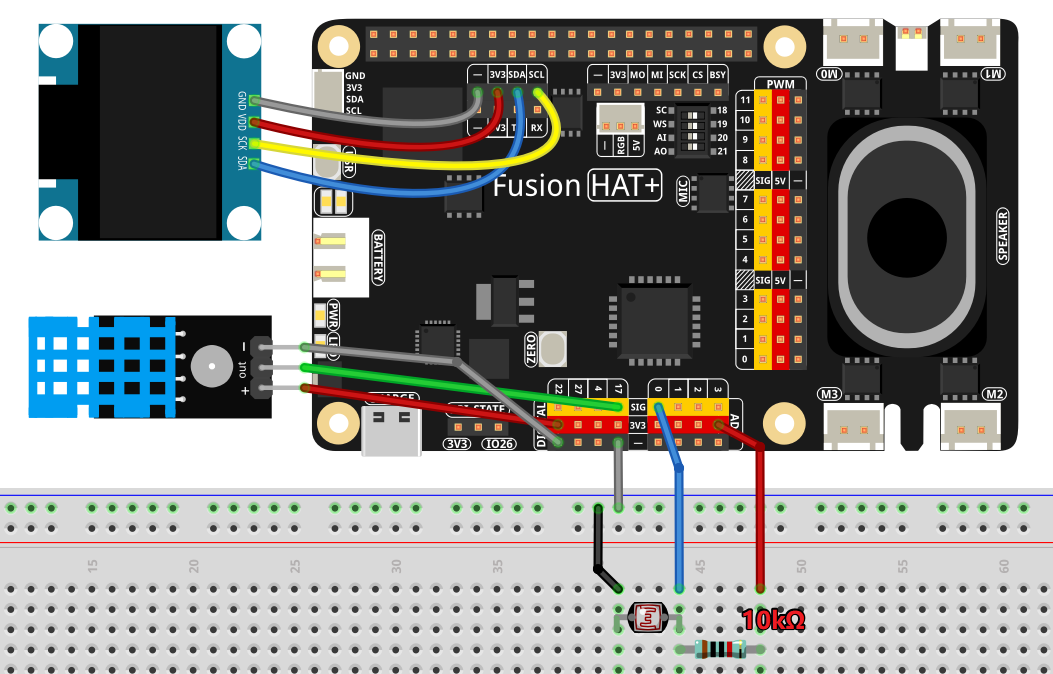
配線図
各コンポーネントの組み立ては、以下の配線図を参照してください。
セットアップ手順
必要なライブラリをインストールします。
sudo pip3 install adafruit-circuitpython-ssd1306 --break
ai-lab-kitディレクトリからサンプルコードを実行します。cd ~/ai-lab-kit/python/ sudo python3 4.12_RoomMonitor.py
スクリプトを実行すると、次のように動作します。
OLED に温度、湿度、明るさの割合が表示されます
横向きのバーグラフで現在の明るさレベルを表示します
DHT11 の読み取り状態を示すために
OKまたはTIMEOUTが表示されますデータは 0.5 秒ごとに更新されます
Ctrl+C を押すと終了し、画面はクリアされます
コード
以下は、環境モニターダッシュボード用の Python スクリプトです。
import time
from statistics import mean
from fusion_hat.modules import DHT11
from fusion_hat.adc import ADC
from PIL import Image, ImageDraw, ImageFont
import adafruit_ssd1306
import board

# ---------- Hardware configuration ----------
DHT_PIN = 17          # BCM numbering for the DHT11 data pin
LDR_CH  = 0           # ADC channel for LDR (e.g., 0,1, ...)
I2C_ADDR = 0x3C       # OLED I2C address (commonly 0x3C)

# ---------- OLED setup ----------
WIDTH, HEIGHT = 128, 64
i2c = board.I2C()
oled = adafruit_ssd1306.SSD1306_I2C(WIDTH, HEIGHT, i2c, addr=I2C_ADDR)
oled.fill(0)
oled.show()

# Framebuffer
image = Image.new("1", (WIDTH, HEIGHT))
draw = ImageDraw.Draw(image)
font  = ImageFont.load_default()

def text_size(font, text):
   l, t, r, b = font.getbbox(text)
   return (r - l, b - t)

# ---------- Sensors ----------
dht = DHT11(pin=DHT_PIN)
ldr = ADC(LDR_CH)

# ---------- Light normalization ----------
# Map ADC raw (0..4095) to percentage (0..100). You can adjust the calibration
# range to your circuit by putting typical min/max readings below:
LDR_RAW_MIN = 0       # raw value in darkness  (tune if needed)
LDR_RAW_MAX = 4095    # raw value in bright light (tune if needed)

def clamp(v, vmin, vmax):
   return vmax if v > vmax else vmin if v < vmin else v

def linear_map(x, in_min, in_max, out_min, out_max):
   if in_max == in_min:
      return out_min
   return (x - in_min) * (out_max - out_min) / (in_max - in_min) + out_min

# Simple moving average for light to reduce flicker
_light_window = []

def light_percent(raw):
   """Convert raw ADC to smoothed light percentage."""
   global _light_window
   # Windowed average of last few samples
   _light_window.append(raw)
   if len(_light_window) > 5:
      _light_window.pop(0)
   smooth_raw = int(mean(_light_window))
   pct = linear_map(smooth_raw, LDR_RAW_MIN, LDR_RAW_MAX, 0, 100)
   return int(clamp(pct, 0, 100)), smooth_raw

# ---------- UI drawing ----------
BAR_W, BAR_H = WIDTH - 16, 10   # width/height for the light bar
BAR_X, BAR_Y = 8, HEIGHT - 12   # position of the light bar

def draw_bar(x, y, w, h, percent):
   """Draw a horizontal bar [0..100]%."""
   # Border
   draw.rectangle((x, y, x + w, y + h), outline=255, fill=0)
   # Fill
   fill_w = int((w - 2) * percent / 100.0)
   if fill_w > 0:
      draw.rectangle((x + 1, y + 1, x + 1 + fill_w, y + h - 1), outline=0, fill=255)

def render_screen(temp_c, hum_pct, light_pct, raw_adc, status_text="OK"):
   """Render all text and graphics to the framebuffer."""
   draw.rectangle((0, 0, WIDTH, HEIGHT), outline=0, fill=0)

   # Title
   title = "Env Monitor"
   tw, th = text_size(font, title)
   draw.text(((WIDTH - tw) // 2, 0), title, font=font, fill=255)

   # Temperature & Humidity lines
   line1 = f"Temp: {temp_c:.1f} degC"
   line2 = f"Hum : {hum_pct:.1f} %"
   draw.text((2, 16), line1, font=font, fill=255)
   draw.text((2, 28), line2, font=font, fill=255)

   # Light line and bar
   line3 = f"Light: {light_pct:3d}%  (raw {raw_adc})"
   draw.text((2, 40), line3, font=font, fill=255)
   draw_bar(BAR_X, BAR_Y, BAR_W, BAR_H, light_pct)

   # Status (e.g., "OK" or "TIMEOUT")
   sw, sh = text_size(font, status_text)
   draw.text((WIDTH - sw - 2, 0), status_text, font=font, fill=255)

# ---------- Main loop ----------
# Keep last good readings so display stays meaningful if a DHT read times out
last_temp = 0.0
last_hum  = 0.0

try:
   while True:
      # Read DHT11 (may return None / timeout)
      status = "OK"
      result = dht.read()
      if result:
            hum, temp = result  # order per your DHT11 wrapper: (humidity, temperature)
            last_temp, last_hum = float(temp), float(hum)
      else:
            status = "TIMEOUT"

      # Read LDR
      raw = ldr.read()
      light_pct, raw_smooth = light_percent(raw)

      # Draw to OLED
      render_screen(last_temp, last_hum, light_pct, raw_smooth, status_text=status)
      oled.image(image)
      oled.show()

      # Console log (optional)
      # print(f"T={last_temp:.1f}C  H={last_hum:.1f}%  Light={light_pct}% (raw {raw_smooth})  [{status}]")

      time.sleep(0.5)

except KeyboardInterrupt:
   oled.fill(0)
   oled.show()
   print("\nExited.")
コードの解説
インポート
このスクリプトでは、以下のモジュールを使用します。
温度と湿度の測定に使う
DHT11アナログ入力から LDR の明るさを読み取る
ADCOLED 描画用の
PILOLED 制御用の
adafruit_ssd1306明るさの値を平滑化するための
mean()
OLED の設定
128×64 の SSD1306 OLED を I2C で初期化します。 すべての UI 要素は、表示に送る前にフレームバッファ(Pillow の画像)へ描画されます。
# ---------- OLED setup ----------
WIDTH, HEIGHT = 128, 64
i2c = board.I2C()
oled = adafruit_ssd1306.SSD1306_I2C(WIDTH, HEIGHT, i2c, addr=I2C_ADDR)
oled.fill(0)
oled.show()

# Framebuffer
image = Image.new("1", (WIDTH, HEIGHT))
draw = ImageDraw.Draw(image)
font  = ImageFont.load_default()
センサーの読み取り
DHT11 はときどき読み取りに失敗することがあります。その場合、スクリプトは
TIMEOUTを表示しつつ、前回の有効な値を保持します。LDR の生の読み取り値(0..4095)は、ちらつきを減らすために移動平均で平滑化されます。
# Read DHT11 (may return None / timeout)
status = "OK"
result = dht.read()
if result:
   hum, temp = result  # order per your DHT11 wrapper: (humidity, temperature)
   last_temp, last_hum = float(temp), float(hum)
else:
   status = "TIMEOUT"

# Read LDR
raw = ldr.read()
light_pct, raw_smooth = light_percent(raw)
明るさのマッピング
linear_map()は生の ADC 値をパーセンテージ(0..100%)に変換します。clamp()は最終的な値が範囲内に収まるようにします。def light_percent(raw): """Convert raw ADC to smoothed light percentage.""" global _light_window # Windowed average of last few samples _light_window.append(raw) if len(_light_window) > 5: _light_window.pop(0) smooth_raw = int(mean(_light_window)) pct = linear_map(smooth_raw, LDR_RAW_MIN, LDR_RAW_MAX, 0, 100) return int(clamp(pct, 0, 100)), smooth_raw
ダッシュボードの描画
OLED には次の内容が表示されます。
タイトル
温度(°C)
湿度(%)
明るさの割合と ADC 生値
明るさを示す横向きのバーグラフ
センサー状態を示すステータステキスト
def render_screen(temp_c, hum_pct, light_pct, raw_adc, status_text="OK"):
   """Render all text and graphics to the framebuffer."""
   draw.rectangle((0, 0, WIDTH, HEIGHT), outline=0, fill=0)

   # Title
   title = "Env Monitor"
   tw, th = text_size(font, title)
   draw.text(((WIDTH - tw) // 2, 0), title, font=font, fill=255)

   # Temperature & Humidity lines
   line1 = f"Temp: {temp_c:.1f} degC"
   line2 = f"Hum : {hum_pct:.1f} %"
   draw.text((2, 16), line1, font=font, fill=255)
   draw.text((2, 28), line2, font=font, fill=255)

   # Light line and bar
   line3 = f"Light: {light_pct:3d}%  (raw {raw_adc})"
   draw.text((2, 40), line3, font=font, fill=255)
   draw_bar(BAR_X, BAR_Y, BAR_W, BAR_H, light_pct)

   # Status (e.g., "OK" or "TIMEOUT")
   sw, sh = text_size(font, status_text)
   draw.text((WIDTH - sw - 2, 0), status_text, font=font, fill=255)
メインループ
0.5 秒ごとに、次の処理を実行します。
DHT11 を読み取る
LDR を読み取り、平滑化する
画面を更新する
必要に応じてデバッグログを表示する
安全な終了処理
Ctrl+C が押されると、次の処理を行います。
OLED をクリアする
メッセージを表示する
トラブルシューティング
DHT11 が頻繁に TIMEOUT を返す
読み取り間隔を長くしてください
配線と信号ピンを確認してください
必要に応じてプルアップ抵抗が使われていることを確認してください
OLED が真っ白/真っ黒のままで何も表示されない
I2C アドレス(
0x3C)を確認してくださいSDA/SCL の配線を確認してください
ライブラリが正しくインストールされていることを確認してください
明るさの割合が逆に見える
LDR_RAW_MINとLDR_RAW_MAXを入れ替えてくださいLDR 回路の向き(分圧回路)を確認してください
表示がちらつく
明るさの平滑化ウィンドウを大きくしてください
更新頻度を下げてください(
time.sleep(1.0)を使用)
自分で試してみよう
華氏表示(°F)を追加する
画面に °C と °F の両方を表示します。
最大値/最小値の履歴を追加する
温度、湿度、明るさの最高値/最低値を記録します。
アラート機能を追加する
湿度が低すぎる、または温度が高すぎるときに OLED の枠を点滅させます。
グラフ表示モードを追加する
温度や湿度の推移をスクロールグラフで表示します。
アニメーションアイコンを追加する
太陽、雨、温度計、水滴などの小さなビットマップを表示します。
これらのアイデアを加えることで、シンプルな環境モニターを高機能な環境ダッシュボードへ発展させることができます。