注釈
こんにちは、SunFounder Raspberry Pi & Arduino & ESP32 Enthusiast Community on Facebookへようこそ!他の愛好家と一緒に、Raspberry Pi、Arduino、ESP32の世界により深く入り込みましょう。
参加する理由
専門家サポート: 購入後の問題や技術的な課題を、コミュニティと私たちのチームの助けを借りて解決します。
学習と共有: ヒントやチュートリアルを交換して、スキルを向上させましょう。
限定プレビュー: 新製品の発表や先行プレビューに早期アクセスできます。
特別割引: 最新製品を特別割引でお楽しみいただけます。
季節限定キャンペーンとプレゼント: プレゼント企画やホリデーキャンペーンに参加しましょう。
👉 一緒に発見し、創造する準備はできましたか? [こちら] をクリックして、今すぐ参加しましょう!
4.14 グラビティキューブ
はじめに
このレッスンでは、IMU によって駆動される、128×64 SSD1306 OLED 上に表示される 重力基準の 3D キューブ を作成します。 このキューブは、加速度センサーのみを用いて算出したロールとピッチに基づき、重力に対する基板の向きに応じて傾きます。
主な特徴は次のとおりです。
正射影による 3D キューブ描画(透視歪みなし)
初期姿勢を基準とした、加速度センサー由来の姿勢推定
前後方向を把握しやすくするため、キューブの一面を塗りつぶして表示
実際の取り付け方向に合わせて X/Y の向きを反転できる 2 つの設定フラグ
基板を傾けると、キューブが滑らかに回転し、デバイスの向きを直感的に可視化できます。
必要なもの
このプロジェクトで必要なコンポーネントは以下のとおりです。
COMPONENT INTRODUCTION |
PURCHASE LINK |
|---|---|
- |
|
- |
|
- |
|
Raspberry Pi |
- |
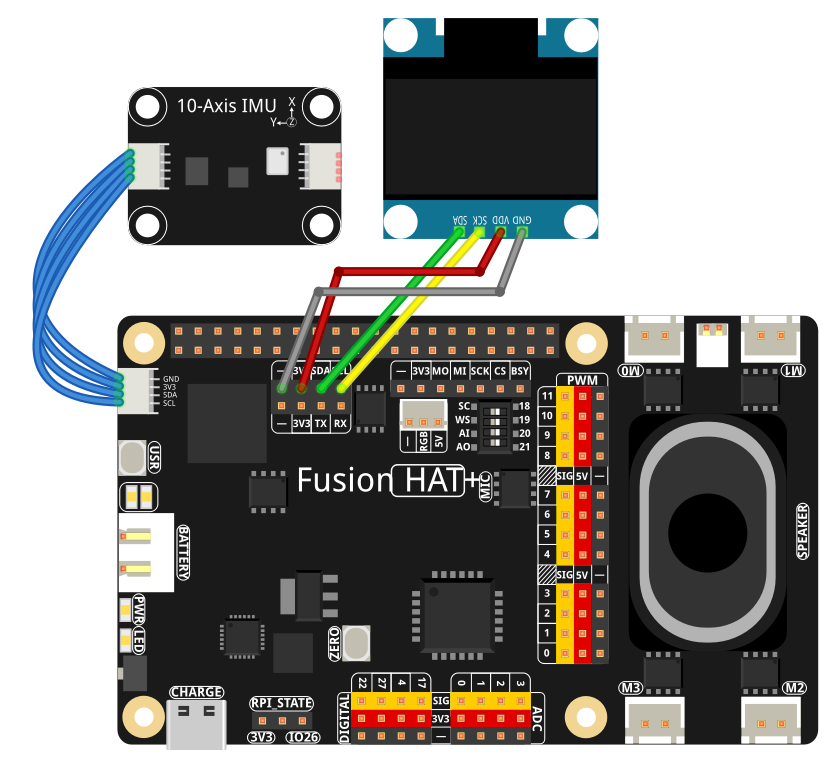
配線図
各コンポーネントの組み立ては、以下の配線図を参照してください。
セットアップ手順
OLED 用ライブラリをインストールします。
sudo pip3 install adafruit-circuitpython-ssd1306 --break
IMU 用ライブラリをインストールします。
sudo pip install git+https://github.com/sunfounder/sunfounder-imu-python.git --break-system-packages
ai-lab-kitディレクトリからサンプルを実行します。cd ~/ai-lab-kit/python/ sudo python3 4.14_Cube.py
スクリプトを実行すると、次のように動作します。
加速度センサーが重力基準の X/Y/Z データを提供します。
コードは、初期姿勢を基準(現在の向きが 0°, 0°)としてロールとピッチを計算します。
前面を塗りつぶした ワイヤーフレームキューブが OLED に描画されます。
基板を傾けると、画面上のキューブが回転します。
Ctrl+C を押すと終了し、OLED はクリアされます。
コード
以下は、重力基準キューブ用の Python スクリプトです。
import time
import math
from PIL import Image, ImageDraw, ImageFont
import adafruit_ssd1306
import board
from sunfounder_imu import IMU

# ========== User-configurable axis flip ==========
# Flip X/Y to match your physical mounting and perceived motion on the OLED.
# If motion looks reversed on a given axis, set that axis to True.
FLIP_X = False   # True = invert roll direction on display; False = normal
FLIP_Y = False   # True = invert pitch direction on display; False = normal

# ========== OLED setup ==========
WIDTH, HEIGHT = 128, 64
i2c = board.I2C()
oled = adafruit_ssd1306.SSD1306_I2C(WIDTH, HEIGHT, i2c, addr=0x3C)
oled.fill(0)
oled.show()

# Framebuffer
image = Image.new("1", (WIDTH, HEIGHT))
draw = ImageDraw.Draw(image)
font = ImageFont.load_default()

# ========== IMU initialization ==========
imu = IMU()

# ========== Cube model ==========
CUBE_SIZE = 9  # smaller cube for 128x64 OLED

VERTS = [
   (-1, -1, -1), (+1, -1, -1), (+1, +1, -1), (-1, +1, -1),
   (-1, -1, +1), (+1, -1, +1), (+1, +1, +1), (-1, +1, +1),
]
EDGES = [
   (0,1),(1,2),(2,3),(3,0),
   (4,5),(5,6),(6,7),(7,4),
   (0,4),(1,5),(2,6),(3,7)
]
FRONT_FACE = [4,5,6,7]  # +Z face gets filled

# ========== Projection (orthographic) ==========
def project_point(p, scale=CUBE_SIZE, cx=WIDTH//2, cy=HEIGHT//2):
   """
   Orthographic projection. We flip the screen Y here so that positive 3D Y
   appears upward on the OLED (more intuitive for tilt).
   """
   x, y, _z = p
   return int(cx + scale * x), int(cy - scale * y)

# ========== Math / orientation helpers ==========
def ema(prev, new, alpha):
   """Exponential smoothing to reduce jitter."""
   return alpha * new + (1.0 - alpha) * prev

def rotate_point(p, roll, pitch, yaw=0.0):
   """Rotate p=(x,y,z) by Rx(roll)*Ry(pitch)*Rz(yaw). Yaw fixed to 0 for gravity-only."""
   x, y, z = p
   # Rx
   cr, sr = math.cos(roll), math.sin(roll)
   y, z = (y*cr - z*sr), (y*sr + z*cr)
   # Ry
   cp, sp = math.cos(pitch), math.sin(pitch)
   x, z = (x*cp + z*sp), (-x*sp + z*cp)
   # Rz (kept for completeness)
   if yaw:
      cz, sz = math.cos(yaw), math.sin(yaw)
      x, y = (x*cz - y*sz), (x*sz + y*cz)
   return (x, y, z)

def accel_to_rp(ax, ay, az):
   """
   Convert accelerometer (m/s²) to roll/pitch in radians (gravity-referenced).
   roll  = rotation around X (right-hand rule)
   pitch = rotation around Y
   """
   # Convert from m/s² to g (9.80665 m/s² = 1g)
   ax_g = ax / 9.80665
   ay_g = ay / 9.80665
   az_g = az / 9.80665

   g = math.sqrt(ax_g*ax_g + ay_g*ay_g + az_g*az_g) + 1e-9
   axn, ayn, azn = ax_g / g, ay_g / g, az_g / g
   roll  = math.atan2(ayn, azn)
   pitch = math.atan2(-axn, math.sqrt(ayn*ayn + azn*azn))
   return roll, pitch

def draw_cube(roll, pitch, yaw=0.0, annotate=True):
   """Render the cube with one filled face."""
   draw.rectangle((0, 0, WIDTH, HEIGHT), outline=0, fill=0)

   rverts = [rotate_point(v, roll, pitch, yaw) for v in VERTS]
   pts = [project_point(v) for v in rverts]

   # Filled front face
   face_xy = [pts[i] for i in FRONT_FACE]
   draw.polygon(face_xy, outline=255, fill=255)

   # Wireframe edges
   for a, b in EDGES:
      x0, y0 = pts[a]
      x1, y1 = pts[b]
      draw.line((x0, y0, x1, y1), fill=255)

   if annotate:
      rdeg = math.degrees(roll)
      pdeg = math.degrees(pitch)
      draw.text((2, 2), f"R:{rdeg:+.0f}  P:{pdeg:+.0f}", font=font, fill=255)

# ========== Baseline & smoothing ==========
baseline_set = False
roll0 = pitch0 = 0.0

ROLL_EMA  = 0.20
PITCH_EMA = 0.20
roll_disp = pitch_disp = 0.0

try:
   while True:
      # Read IMU data
      data = imu.read()

      # Extract accelerometer data (in m/s²)
      ax = data['accel_x']
      ay = data['accel_y']
      az = data['accel_z']

      # Absolute roll/pitch from gravity
      roll_abs, pitch_abs = accel_to_rp(ax, ay, az)

      # First reading defines baseline (0°,0°)
      if not baseline_set:
            roll0, pitch0 = roll_abs, pitch_abs
            baseline_set = True

      # Relative orientation
      roll_rel  = roll_abs  - roll0
      pitch_rel = pitch_abs - pitch0

      # Apply user flips to match perceived direction on OLED
      if FLIP_X:
            roll_rel = -roll_rel
      if FLIP_Y:
            pitch_rel = -pitch_rel

      # Smooth
      roll_disp  = ema(roll_disp,  roll_rel,  ROLL_EMA)
      pitch_disp = ema(pitch_disp, pitch_rel, PITCH_EMA)

      # Render (yaw fixed to 0 in gravity-only mode)
      draw_cube(roll_disp, pitch_disp, yaw=0.0, annotate=True)

      # Show on OLED
      oled.image(image)
      oled.show()

      time.sleep(0.02)

except KeyboardInterrupt:
   oled.fill(0)
   oled.show()
   print("\nExited.")
コードの解説
IMU の初期化
スクリプトは Fusion HAT+ モジュールから
IMUインスタンスを生成します。 加速度センサーは、m/s² 単位の生の X、Y、Z 加速度値を提供します。重力基準の角度計算
accel_to_rp()は、加速度センサーの読み取り値を roll と pitch に変換します。Roll: X 軸まわりの回転
Pitch: Y 軸まわりの回転
重力のみを用いるため、yaw は求められず、常に 0 に固定されます。
def accel_to_rp(ax, ay, az):
   """
   Convert accelerometer (m/s²) to roll/pitch in radians (gravity-referenced).
   roll  = rotation around X (right-hand rule)
   pitch = rotation around Y
   """
   # Convert from m/s² to g (9.80665 m/s² = 1g)
   ax_g = ax / 9.80665
   ay_g = ay / 9.80665
   az_g = az / 9.80665

   g = math.sqrt(ax_g*ax_g + ay_g*ay_g + az_g*az_g) + 1e-9
   axn, ayn, azn = ax_g / g, ay_g / g, az_g / g
   roll  = math.atan2(ayn, azn)
   pitch = math.atan2(-axn, math.sqrt(ayn*ayn + azn*azn))
   return roll, pitch
基準姿勢
最初の読み取り時に、
現在の
rollとpitchを基準値(roll0、pitch0)として保存します。以後の姿勢は 相対角度 として表されます。
roll_rel  = roll_abs  - roll0
pitch_rel = pitch_abs - pitch0
これにより、プログラム開始時のデバイスの向きが 0°, 0° になります。
ユーザー設定可能な軸反転
FLIP_XとFLIP_Yの 2 つのフラグを使うと、各軸の表示方向を反転できます。Roll の動きが逆に感じる場合は
FLIP_X = TruePitch の動きが逆に感じる場合は
FLIP_Y = True
IMU の取り付け方向や配線方向が異なる場合に便利です。
平滑化(EMA)
ema()関数は 指数移動平均 による平滑化を行います。センサーノイズによる揺れを低減
キューブの動きをより自然に見せる
ROLL_EMAとPITCH_EMAの値で、応答性と滑らかさのバランスを調整できます。def ema(prev, new, alpha): """Exponential smoothing to reduce jitter.""" return alpha * new + (1.0 - alpha) * prev
3D キューブの回転
rotate_point()は、各キューブ頂点に回転行列を適用します。def rotate_point(p, roll, pitch, yaw=0.0): """Rotate p=(x,y,z) by Rx(roll)*Ry(pitch)*Rz(yaw). Yaw fixed to 0 for gravity-only.""" x, y, z = p # Rx cr, sr = math.cos(roll), math.sin(roll) y, z = (y*cr - z*sr), (y*sr + z*cr) # Ry cp, sp = math.cos(pitch), math.sin(pitch) x, z = (x*cp + z*sp), (-x*sp + z*cp) # Rz (kept for completeness) if yaw: cz, sz = math.cos(yaw), math.sin(yaw) x, y = (x*cz - y*sz), (x*sz + y*cz) return (x, y, z)
Rx(roll)の後にRy(pitch)を適用します(yaw は 0 のまま)これにより回転後の 3D 座標が得られます
その後、
project_point()により、 正射影 を用いて 3D 座標を 2D の OLED 座標へ変換します。def project_point(p, scale=CUBE_SIZE, cx=WIDTH//2, cy=HEIGHT//2): """ Orthographic projection. We flip the screen Y here so that positive 3D Y appears upward on the OLED (more intuitive for tilt). """ x, y, _z = p return int(cx + scale * x), int(cy - scale * y)
キューブの描画
draw_cube()は次の処理を行います。画面をクリアする
8 個すべての頂点を回転・投影する
全エッジをワイヤーフレームとして描画する
1 つの面(
FRONT_FACE)を塗りつぶして、どの面が手前を向いているか分かりやすくする必要に応じて左上に roll と pitch を度数で表示する
def draw_cube(roll, pitch, yaw=0.0, annotate=True):
   """Render the cube with one filled face."""
   draw.rectangle((0, 0, WIDTH, HEIGHT), outline=0, fill=0)

   rverts = [rotate_point(v, roll, pitch, yaw) for v in VERTS]
   pts = [project_point(v) for v in rverts]

   # Filled front face
   face_xy = [pts[i] for i in FRONT_FACE]
   draw.polygon(face_xy, outline=255, fill=255)

   # Wireframe edges
   for a, b in EDGES:
      x0, y0 = pts[a]
      x1, y1 = pts[b]
      draw.line((x0, y0, x1, y1), fill=255)

   if annotate:
      rdeg = math.degrees(roll)
      pdeg = math.degrees(pitch)
      draw.text((2, 2), f"R:{rdeg:+.0f}  P:{pdeg:+.0f}", font=font, fill=255)
トラブルシューティング
キューブが動かない
Raspberry Pi で I2C が有効になっていることを確認してください。
使用している IMU ドライバで正しい I2C アドレスが使われていることを確認してください。
動きが逆に見える
FLIP_XまたはFLIP_Yを切り替えて方向を反転してください。基板を水平に置いた状態から、1 軸ずつゆっくり傾けて、どちらを反転すべきか確認してください。
キューブの動きが揺れすぎる
ROLL_EMA/PITCH_EMAを小さくして平滑化を強めてください(例: 0.1)。基板がしっかり固定され、ケーブルに引っ張られていないことを確認してください。
平らに置いているのにキューブが傾いて見える
基板を静止させた状態でスクリプトを再起動してください。最初の読み取り値が基準になります。
プログラム開始時に基板が本当に水平であることを確認してください。
OLED に何も表示されない
OLED の I2C アドレス(一般的には
0x3C)を確認してください。配線とコントラスト設定を確認してください。
adafruit-circuitpython-ssd1306が正しくインストールされていることを確認してください。
試してみよう
ジャイロから Yaw を追加する
ジャイロ積分と加速度センサーのデータを組み合わせたコンプリメンタリフィルタを使い、yaw 軸を追加して完全な 3D 回転を実現します。
キューブのサイズや位置を変更する
CUBE_SIZEや投影中心を調整して、キューブの位置や大きさを変更できます。拡大してより迫力のある表示にする
少し上へ移動して文字表示用のスペースを増やす
ワイヤーフレームのグリッドを追加する
キューブの背後に簡単な「床」グリッドを描いて、3D の動きをより分かりやすくします。
自動再センタリング機能を追加する
ボタンの長押しやキー入力で、実行中に基準姿勢をリセットできるようにします。
複数の表示モード
次のモードを切り替えられるようにします。
ワイヤーフレームのみ
塗りつぶし面のみ
傾き角度に応じた面のシェーディング
これらの拡張により、シンプルな重力キューブを高機能な 3D IMU 可視化ツールへ発展させることができます。