注釈
こんにちは、SunFounder Raspberry Pi & Arduino & ESP32 Enthusiast Community on Facebookへようこそ!他の愛好家と一緒に、Raspberry Pi、Arduino、ESP32の世界により深く入り込みましょう。
参加する理由
専門家サポート: 購入後の問題や技術的な課題を、コミュニティと私たちのチームの助けを借りて解決します。
学習と共有: ヒントやチュートリアルを交換して、スキルを向上させましょう。
限定プレビュー: 新製品の発表や先行プレビューに早期アクセスできます。
特別割引: 最新製品を特別割引でお楽しみいただけます。
季節限定キャンペーンとプレゼント: プレゼント企画やホリデーキャンペーンに参加しましょう。
👉 一緒に発見し、創造する準備はできましたか? [こちら] をクリックして、今すぐ参加しましょう!
4.7 スマートファン
はじめに
このプロジェクトでは、手動モードと自動モードの両方で動作する「スマートファン」を作成します。モーター、ボタン、サーミスタを組み合わせることで、ファンの風量を調整できるだけでなく、温度変化にも応答できるようになります。モーター制御、温度検知、GPIO の使い方を学ぶのに最適な実験です。
必要なもの
このプロジェクトで必要なコンポーネントは以下のとおりです。
COMPONENT INTRODUCTION |
PURCHASE LINK |
|---|---|
- |
|
Raspberry Pi |
- |
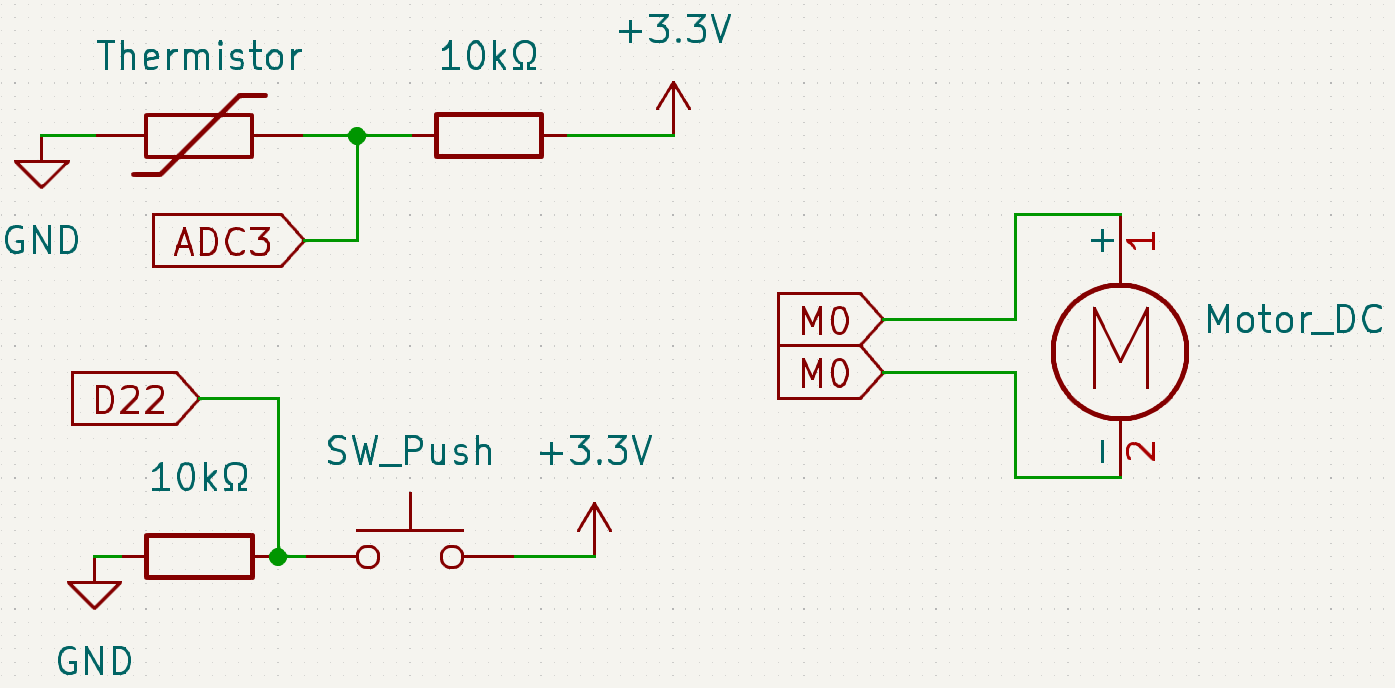
回路図
以下の回路図は、サーミスタ、ボタン、モータードライバー、およびモーターの接続方法を示しています。
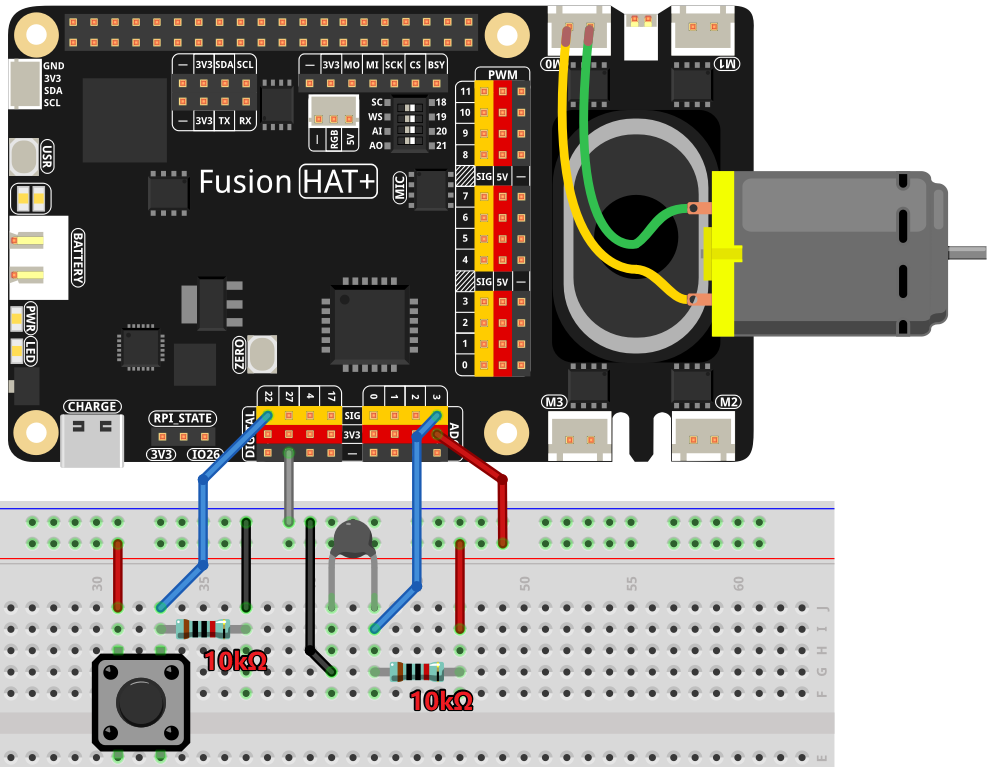
配線図
ブレッドボード上のレイアウトと配線接続は、以下の図を参照してください。
サンプルの実行
このチュートリアルで使用するすべてのサンプルコードは ai-lab-kit ディレクトリに含まれています。
以下の手順に従ってサンプルを実行してください。
cd ~/ai-lab-kit/python/
sudo python3 4.7_SmartFan.py
コード
以下は、このプロジェクトで使用する Python スクリプトです。
#!/usr/bin/env python3

from fusion_hat.motor import Motor
from fusion_hat.pin import Pin, Mode, Pull
from fusion_hat.adc import ADC
from time import sleep, time
import math

BtnPin = Pin(22, mode=Mode.IN, pull=Pull.DOWN)
motor = Motor("M0")
thermistor = ADC("A3")

level = 0
currentTemp = None
markTemp = None

PRINT_INTERVAL = 1.0
_last_print = 0.0

button_event = False  # flag: button was pressed


def temperature(samples=5, delay=0.01):
   """Read thermistor multiple times and return averaged Celsius (float) or None."""
   vals = []
   for _ in range(samples):
      analogVal = thermistor.read()
      Vr = 3.3 * float(analogVal) / 4095.0
      if (3.3 - Vr) <= 0.1:
            return None
      Rt = 10000.0 * Vr / (3.3 - Vr)
      tempK = 1.0 / (((math.log(Rt / 10000.0)) / 3950.0) + (1.0 / (273.15 + 25.0)))
      vals.append(tempK - 273.15)
      sleep(delay)
   return sum(vals) / len(vals)


def motor_run(lv):
   lv = max(0, min(4, lv))
   motor.power(0 if lv == 0 else lv * 25)
   return lv


def changeLevel():
   """Button press: cycle level 0~4 and set a flag for main loop to print."""
   global level, button_event
   level = (level + 1) % 5
   button_event = True


BtnPin.when_activated = changeLevel


def main():
   global level, currentTemp, markTemp, _last_print, button_event

   markTemp = temperature()
   while True:
      currentTemp = temperature()
      if currentTemp is None:
            print("Sensor read failed. Please check the sensor.")
            sleep(0.5)
            continue

      # Handle button event in main loop (stable timing)
      if button_event:
            button_event = False
            markTemp = currentTemp
            print(f"[Button] Level -> {level} | Temp: {currentTemp:.2f} °C | Mark: {markTemp:.2f} °C")

      # Periodic temperature print
      now = time()
      if now - _last_print >= PRINT_INTERVAL:
            if markTemp is None:
               markTemp = currentTemp
            print(f"Temp: {currentTemp:.2f} °C | Mark: {markTemp:.2f} °C | Level: {level}")
            _last_print = now

      # Auto adjust level based on ±5°C
      if markTemp is None:
            markTemp = currentTemp

      if level != 0:
            diff = currentTemp - markTemp
            if diff <= -5:
               level = max(0, level - 1)
               markTemp = currentTemp
               print(f"[Auto] Temp down -> Level {level} (Temp: {currentTemp:.2f} °C)")
            elif diff >= 5:
               level = min(4, level + 1)
               markTemp = currentTemp
               print(f"[Auto] Temp up   -> Level {level} (Temp: {currentTemp:.2f} °C)")

      level = motor_run(level)
      sleep(0.5)


try:
   main()
except KeyboardInterrupt:
   print("\nExiting...")
finally:
   motor.stop()
   sleep(0.1)
この Python スクリプトは、モーター、ボタン、および温度センサーを組み合わせて、温度に応じて動作し、速度を調整できるファンシステムを作成します。実行すると、次のように動作します。
温度の測定: サーミスタを使用して現在の摂氏温度を読み取ります。
手動での風量調整:
GPIO22 に接続されたボタンにより、ユーザーは 5 段階の風量レベル(0~4)を順番に切り替えることができます。
ボタンを押すたびに風量レベルが 1 段階上がり、モーターは対応する速度で動作します。レベル 0 ではモーターが停止します。
自動風量制御: システムは温度変化に応じてモーター速度を自動調整します。
温度が 5°C 以上上昇すると、風量レベルが 1 段階上がります(最大レベル 4)。
温度が 5°C 以上低下すると、風量レベルが 1 段階下がります(最小レベル 0)。
継続的な監視: システムは温度を継続的に監視し、それに応じてファン速度を調整します。
安全な終了:
Ctrl+Cを押すと、モーターを停止し、スクリプトは安全に終了します。
コードの解説
温度の計算:
def temperature(samples=5, delay=0.01):
   """Read thermistor multiple times and return averaged Celsius (float) or None."""
   vals = []
   for _ in range(samples):
      analogVal = thermistor.read()
      Vr = 3.3 * float(analogVal) / 4095.0
      if (3.3 - Vr) <= 0.1:
            return None
      Rt = 10000.0 * Vr / (3.3 - Vr)
      tempK = 1.0 / (((math.log(Rt / 10000.0)) / 3950.0) + (1.0 / (273.15 + 25.0)))
      vals.append(tempK - 273.15)
      sleep(delay)
   return sum(vals) / len(vals)
temperature()関数は、サーミスタのアナログ値を複数回読み取り、抵抗値へ変換し、数式を用いて対応する温度を計算します。モーター速度制御:
def motor_run(lv):
   lv = max(0, min(4, lv))
   motor.power(0 if lv == 0 else lv * 25)
   return lv
motor_run()関数は、level変数に応じてモーター速度を調整します。速度は 0~4 の範囲に制限され、それに応じた出力が設定されます。手動での風量調整:
def changeLevel():
   """Button press: cycle level 0~4 and set a flag for main loop to print."""
   global level, button_event
   level = (level + 1) % 5
   button_event = True


BtnPin.when_activated = changeLevel
changeLevel()関数は、ボタンが押されるたびに風量レベルを 0~4 の範囲で順番に切り替えます。自動での風量調整:
def main():
   global level, currentTemp, markTemp, _last_print, button_event

   markTemp = temperature()
   while True:
      currentTemp = temperature()
      if currentTemp is None:
            print("Sensor read failed. Please check the sensor.")
            sleep(0.5)
            continue
   ...
main()関数は温度を継続的に監視し、基準温度から 5°C 以上ずれた場合にファン速度を自動調整します。
トラブルシューティング
モーターが動作しない :
原因 : 配線ミス、または電源不足。
対処方法 :
モーターが M0 に接続されていることを確認してください。
モーターの電源が必要電圧を満たしていることを確認してください。
温度読み取りが正しくない:
原因 : サーミスタの不具合。
対処方法:
サーミスタの配線を確認し、仕様範囲内で使用されていることを確認してください。
ボタン入力が検出されない :
原因 : ボタン配線または GPIO 設定の誤り。
対処方法 :
ボタンが GPIO22 と GND に接続されていることを確認してください。
ボタン単体で、押したときに回路が閉じるかどうかをテストしてください。
風量レベルが自動で変わらない:
原因 : 温度差の計算が正しくありません。
対処方法 :
main()関数内でcurrentTempとmarkTempが正しく更新されていることを確認してください。
拡張アイデア
過熱アラート: 温度が危険なしきい値を超えたときに、ブザーや LED で警告を出します。
if currentTemp > 50:
    buzzer.on()
スマートボタン機能: ボタンの長押しで風量レベルを 0 にリセットしたり、自動/手動モードを切り替えたりできるようにします。
まとめ
スマートファンのプロジェクトでは、手動制御と自動制御を 1 つのシステムに統合する方法を学べます。これは、センサー、モーター、ユーザー操作を組み合わせた、実用的で効率的な設計例です。さらに機能を追加して、自分だけの温度制御システムへ発展させてみてください。