Nota
Ciao, benvenuto nella Community di Appassionati di Raspberry Pi & Arduino & ESP32 di SunFounder su Facebook! Approfondisci Raspberry Pi, Arduino ed ESP32 insieme ad altri appassionati.
Perché Unirsi?
Supporto da Esperti: Risolvi problemi post-vendita e sfide tecniche con l’aiuto della nostra community e del nostro team.
Impara e Condividi: Scambia suggerimenti e tutorial per migliorare le tue competenze.
Anteprime Esclusive: Ottieni accesso anticipato agli annunci dei nuovi prodotti e alle anteprime.
Sconti Speciali: Approfitta di sconti esclusivi sui nostri prodotti più recenti.
Promozioni e Giveaway Festivi: Partecipa ai giveaway e alle promozioni festive.
👉 Pronto a esplorare e creare con noi? Clicca [Qui] e unisciti oggi stesso!
7.9 Pianoforte con la Frutta
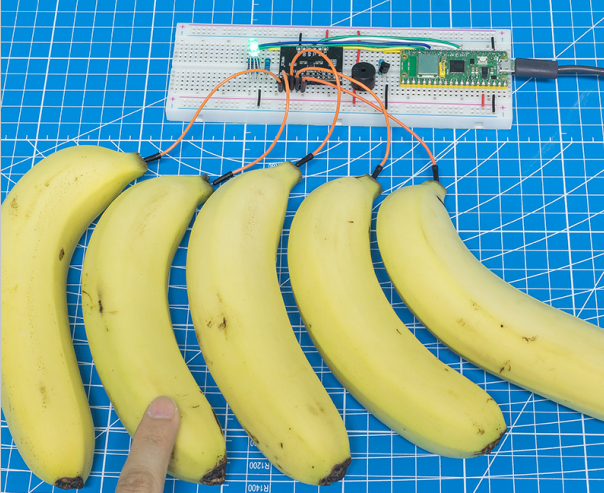
La conduttività elettrica si trova in molti oggetti metallici, così come nel corpo umano e nella frutta. Questa proprietà può essere sfruttata per creare un progetto divertente: un pianoforte fatto con la frutta. In altre parole, trasformiamo la frutta in tastiere che possono suonare musica semplicemente toccandole.
Componenti Necessari
In questo progetto, abbiamo bisogno dei seguenti componenti.
È sicuramente conveniente acquistare un kit completo, ecco il link:
Nome |
ELEMENTI IN QUESTO KIT |
LINK |
|---|---|---|
Kepler Kit |
450+ |
Puoi anche acquistarli separatamente dai link sottostanti.
SN |
COMPONENTE |
QUANTITÀ |
LINK |
|---|---|---|---|
1 |
1 |
||
2 |
Cavo Micro USB |
1 |
|
3 |
1 |
||
4 |
Diversi |
||
5 |
1(S8050) |
||
6 |
4(1-1KΩ, 1-330Ω, 2-220Ω) |
||
7 |
Passive Cicalino |
1 |
|
8 |
1 |
||
9 |
1 |
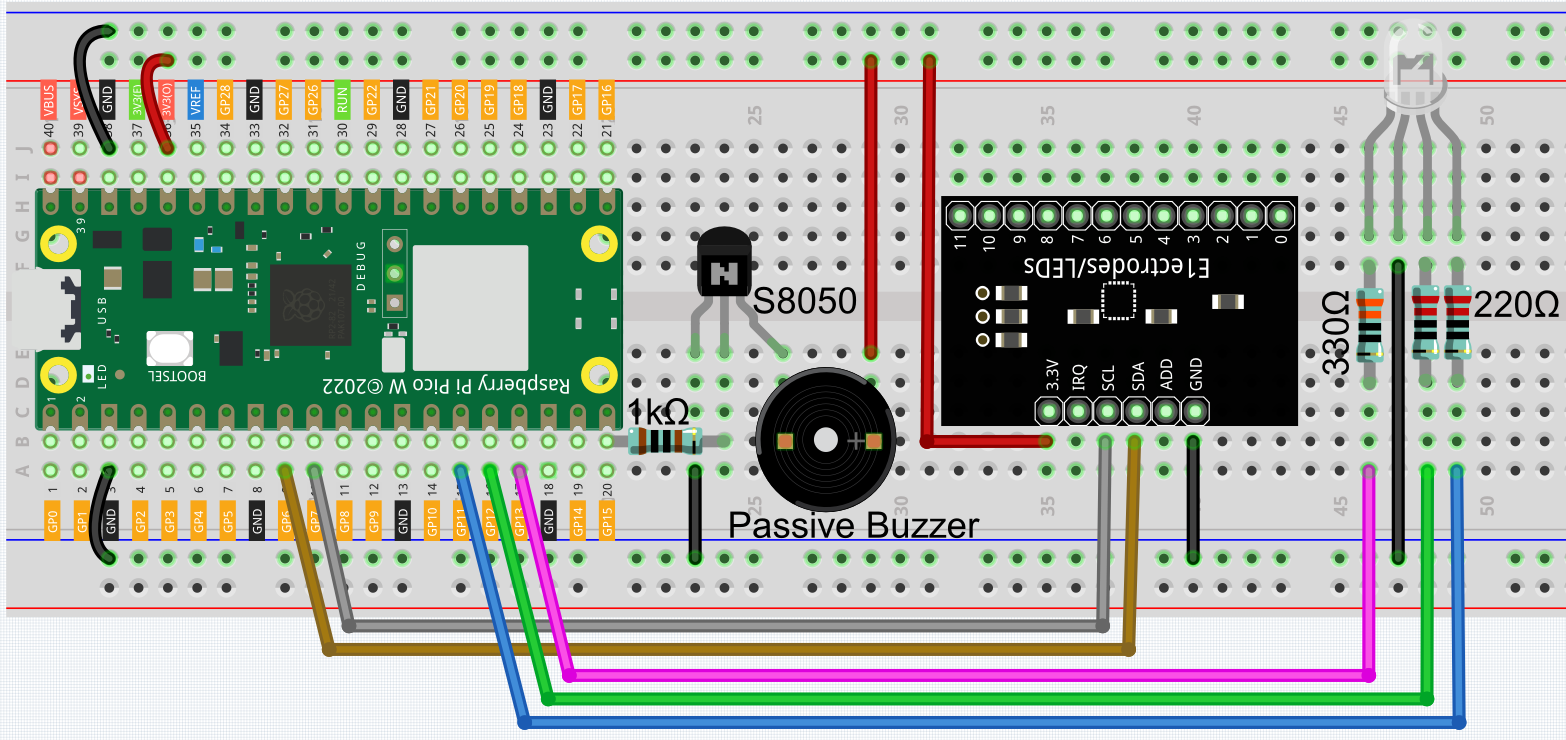
Schema

Per trasformare la frutta in un tasto di pianoforte, è necessario collegare gli elettrodi dell’MPR121 alla frutta (ad esempio, inserendo l’elettrodo nel manico della banana).
All’inizio, l’MPR121 si inizializza e ogni elettrodo ottiene un valore basato sulla carica corrente; quando un conduttore (come il corpo umano) tocca un elettrodo, la carica si sposta e si riequilibra. Di conseguenza, il valore dell’elettrodo cambia rispetto al valore iniziale, segnalando alla scheda di controllo principale che è stato toccato. Durante questo processo, assicurati che il cablaggio di ciascun elettrodo sia stabile in modo che la carica sia bilanciata durante l’inizializzazione.
Cablaggio
Codice
Nota
Apri il file
7.9_fruit_piano.pynel percorsokepler-kit-main/micropythonoppure copia questo codice in Thonny, quindi clicca su «Run Current Script» o semplicemente premi F5 per eseguirlo.Non dimenticare di selezionare l’interprete «MicroPython (Raspberry Pi Pico)» nell’angolo in basso a destra.
Per tutorial dettagliati, fai riferimento a Aprire ed Eseguire Codice Direttamente.
Qui devi usare la libreria chiamata
mpr121.py, verifica se è stata caricata su Pico W; per un tutorial dettagliato fai riferimento a 1.4 Caricare le Librerie su Pico.
from mpr121 import MPR121
from machine import Pin, I2C
import time
import urandom

# Initialize I2C connection for MPR121 capacitive touch sensor
i2c = I2C(1, sda=Pin(6), scl=Pin(7))  # Set up I2C bus with SDA on pin 6 and SCL on pin 7
mpr = MPR121(i2c)  # Create an instance of the MPR121 touch sensor

# Buzzer notes frequencies (in Hertz) for different musical notes
NOTE_A3 = 220
NOTE_B3 = 247
NOTE_C4 = 262
NOTE_D4 = 294
NOTE_E4 = 330
NOTE_F4 = 349
NOTE_G4 = 392
NOTE_A4 = 440
NOTE_B4 = 494
NOTE_C5 = 523
NOTE_D5 = 587
NOTE_E5 = 659

# Initialize PWM for buzzer on pin 15
buzzer = machine.PWM(machine.Pin(15))

# List of note frequencies to be played by the buzzer
note = [NOTE_A3, NOTE_B3, NOTE_C4, NOTE_D4, NOTE_E4, NOTE_F4, NOTE_G4, NOTE_A4, NOTE_B4, NOTE_C5, NOTE_D5, NOTE_E5]

# Function to play a tone on the buzzer at a specified frequency
def tone(pin, frequency):
    pin.freq(frequency)  # Set buzzer frequency
    pin.duty_u16(30000)  # Set duty cycle to 50% (approx)

# Function to stop playing the tone (mute the buzzer)
def noTone(pin):
    pin.duty_u16(0)  # Set duty cycle to 0% (mute)

# RGB LED initialization using PWM on pins 13, 12, and 11 (for red, green, blue)
red = machine.PWM(machine.Pin(13))
green = machine.PWM(machine.Pin(12))
blue = machine.PWM(machine.Pin(11))

# Set the PWM frequency for each color (1kHz)
red.freq(1000)
green.freq(1000)
blue.freq(1000)

# Function to map a value `x` from one range to another
def interval_mapping(x, in_min, in_max, out_min, out_max):
    return (x - in_min) * (out_max - out_min) / (in_max - in_min) + out_min

# Function to randomly light up the RGB LED with random color values
def lightup():
    red.duty_u16(int(urandom.uniform(0, 65535)))  # Set random intensity for red
    green.duty_u16(int(urandom.uniform(0, 65535)))  # Set random intensity for green
    blue.duty_u16(int(urandom.uniform(0, 65535)))  # Set random intensity for blue

# Function to turn off all RGB LED colors (set all to 0)
def dark():
    red.duty_u16(0)  # Turn off red LED
    green.duty_u16(0)  # Turn off green LED
    blue.duty_u16(0)  # Turn off blue LED

# Main project loop
lastState = mpr.get_all_states()  # Get initial state of all touch inputs
touchMills = time.ticks_ms()  # Record the time of the last touch event
beat = 500  # Set the duration of sound and light effect (500ms)

# Main loop to handle touch detection and effects
while True:
    currentState = mpr.get_all_states()  # Get current state of all touch inputs

    # Check if there's a change in the touch input state (touch started or ended)
    if currentState != lastState:
        for i in range(12):  # Iterate over 12 possible touch inputs
            # Check if a touch has started (touched in current state but not in the last state)
            if i in list(currentState) and not i in list(lastState):
                tone(buzzer, note[i])  # Play corresponding note for the touched input
                lightup()  # Light up the RGB LED with random colors
                touchMills = time.ticks_ms()  # Record the time of the touch event

    # Check if the beat duration has passed or if no touch inputs are active
    if time.ticks_diff(time.ticks_ms(), touchMills) >= beat or len(currentState) == 0:
        noTone(buzzer)  # Stop playing the buzzer
        dark()  # Turn off the RGB LED

    # Update the last state to the current state for the next iteration
    lastState = currentState
Non toccare la frutta prima che il programma sia in esecuzione per evitare di ottenere un riferimento non corretto durante l’inizializzazione. Dopo l’avvio del programma, tocca delicatamente la frutta, il buzzer emetterà il tono corrispondente e la luce RGB lampeggerà una volta in modo casuale.