Nota
Ciao, benvenuto nella Community SunFounder Raspberry Pi & Arduino & ESP32 Enthusiasts su Facebook! Approfondisci le tue conoscenze su Raspberry Pi, Arduino ed ESP32 insieme ad altri appassionati.
Perché unirti?
Supporto Esperti: Risolvi problemi post-vendita e sfide tecniche con l’aiuto della nostra community e del nostro team.
Impara e Condividi: Scambia consigli e tutorial per migliorare le tue competenze.
Anteprime Esclusive: Ottieni accesso anticipato ai nuovi annunci di prodotti e alle anteprime.
Sconti Speciali: Godi di sconti esclusivi sui nostri prodotti più recenti.
Promozioni Festive e Giveaway: Partecipa a giveaway e promozioni festive.
👉 Pronto a esplorare e creare con noi? Clicca [Qui] e unisciti oggi stesso!
7.6 Semaforo
Il Traffic Light è un dispositivo di segnalazione situato agli incroci stradali, alle strisce pedonali e in altri punti per controllare il flusso del traffico.
I segnali stradali sono standardizzati dalla Vienna Convention on Road Signs and Signals. Fornisce agli utenti la precedenza alternando i LED in tre colori standard.
Luce rossa: Il traffico deve fermarsi quando vede una luce rossa lampeggiante, equivalente a un segnale di stop.
Luce gialla: Segnale di avvertimento che sta per diventare rosso. Le luci gialle sono interpretate in modo diverso nei vari paesi (regioni).
Luce verde: Consente al traffico di muoversi nella direzione indicata.
In questo progetto, utilizzeremo tre colori di LED per implementare i cambiamenti del semaforo e un display a 4 cifre a 7 segmenti per mostrare il tempo di ciascun stato del traffico.
Componenti Necessari
In questo progetto, abbiamo bisogno dei seguenti componenti.
È sicuramente conveniente acquistare un kit completo, ecco il link:
Nome |
ELEMENTI IN QUESTO KIT |
LINK |
|---|---|---|
Kepler Kit |
450+ |
Puoi anche acquistarli separatamente dai link sottostanti.
SN |
COMPONENTE |
QUANTITÀ |
LINK |
|---|---|---|---|
1 |
1 |
||
2 |
Cavo Micro USB |
1 |
|
3 |
1 |
||
4 |
Diversi |
||
5 |
7(220Ω) |
||
6 |
1 |
||
7 |
1 |
||
8 |
3 |
Schema
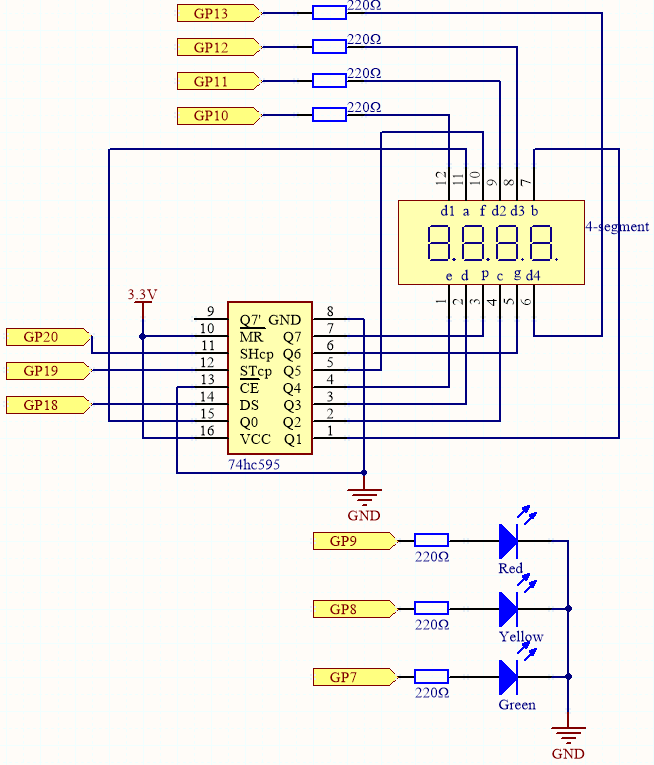
Questo circuito è basato su 5.3 Contatore di Tempo con l’aggiunta di 3 LED.
I 3 LED rosso, giallo e verde sono collegati rispettivamente ai pin GP7~GP9.
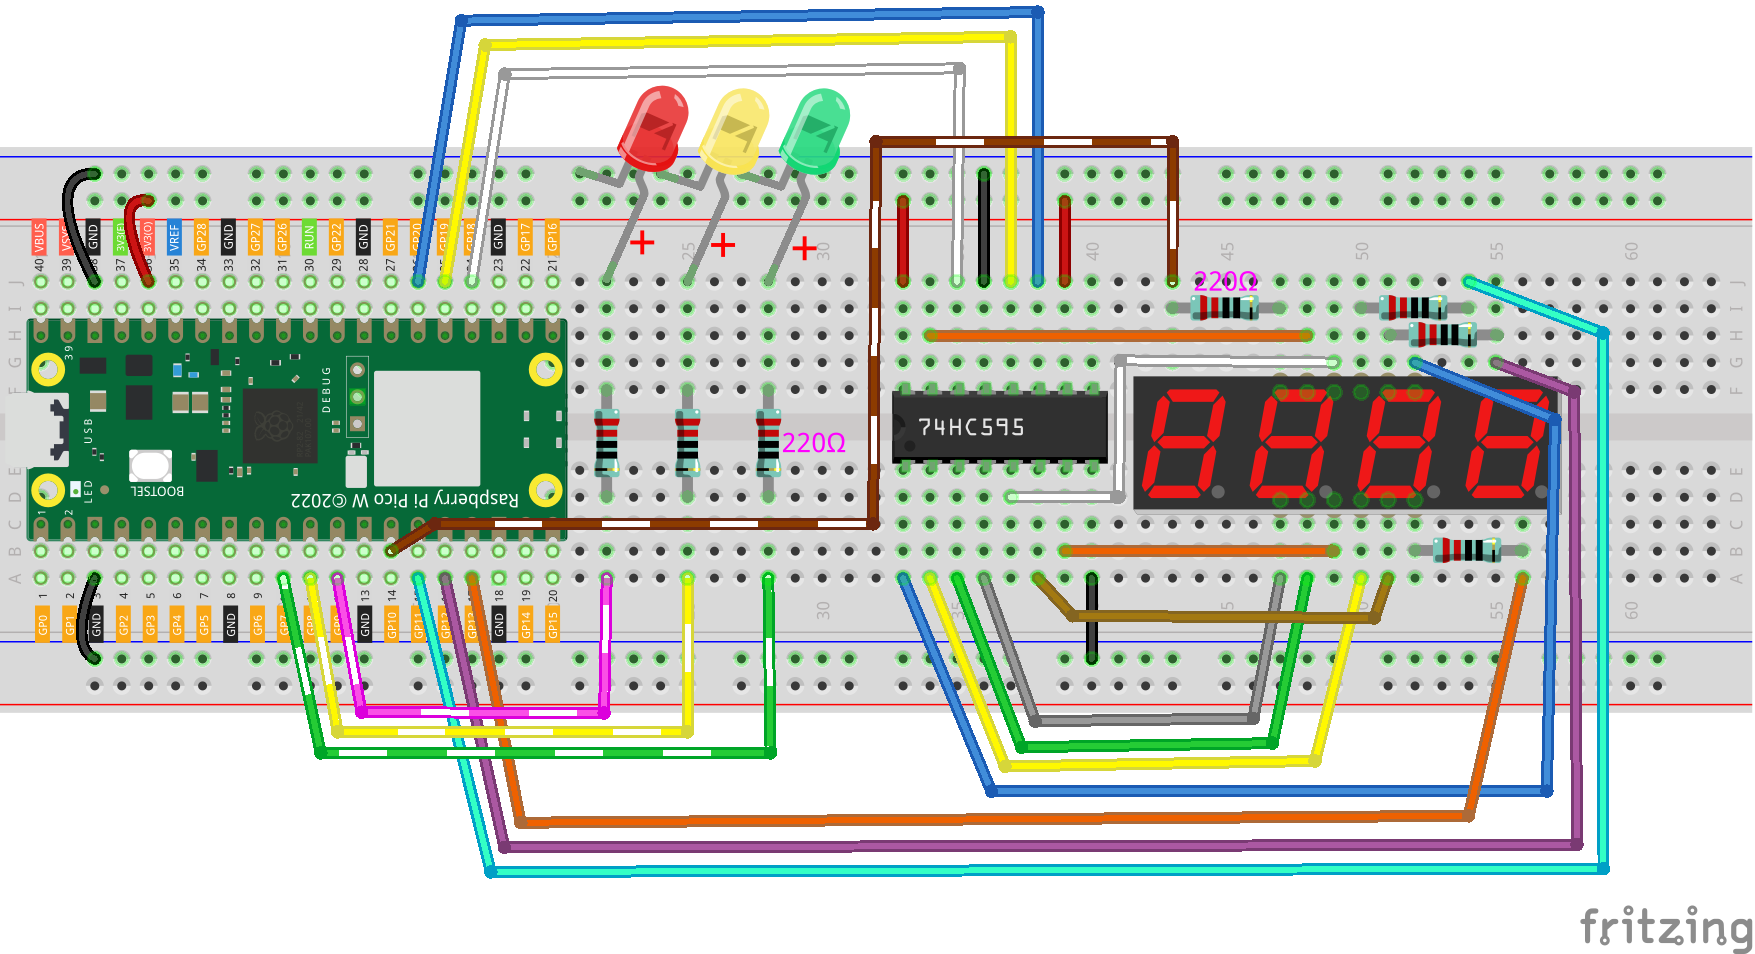
Collegamenti
Codice
Nota
Apri il file
7.6_traffic_light.pynel percorsokepler-kit-main/micropythono copia questo codice in Thonny, poi clicca su «Esegui Script Corrente» o semplicemente premi F5 per eseguirlo.Non dimenticare di selezionare l’interprete «MicroPython (Raspberry Pi Pico)» nell’angolo in basso a destra.
Per tutorial dettagliati, fai riferimento a Aprire ed Eseguire Codice Direttamente.
import machine
import time
from machine import Timer

# Define the duration for each traffic light color in seconds [Green, Yellow, Red]
lightTime = [30, 5, 30]

# 7-segment display codes for digits 0-9, using hexadecimal to represent LED segments
SEGCODE = [0x3f, 0x06, 0x5b, 0x4f, 0x66, 0x6d, 0x7d, 0x07, 0x7f, 0x6f]

# Initialize pins for shift register communication (74HC595)
sdi = machine.Pin(18, machine.Pin.OUT)   # Serial Data Input
rclk = machine.Pin(19, machine.Pin.OUT)  # Register Clock (Latch)
srclk = machine.Pin(20, machine.Pin.OUT) # Shift Register Clock

# Initialize list to store 4 digit control pins for the 7-segment display
placePin = []
pin = [10, 13, 12, 11]  # Pin numbers for the 4-digit display
for i in range(4):
    placePin.append(None)  # Reserve space in list
    placePin[i] = machine.Pin(pin[i], machine.Pin.OUT)  # Initialize pins as output

# Function to select which digit (0-3) to display by controlling the common anode pins
def pickDigit(digit):
    for i in range(4):
        placePin[i].value(1)  # Turn off all digits
    placePin[digit].value(0)  # Turn on the selected digit

# Function to clear the display by sending '0x00' to the shift register
def clearDisplay():
    hc595_shift(0x00)

# Function to send data to the shift register (74HC595)
def hc595_shift(dat):
    rclk.low()  # Pull latch low to prepare for data shifting
    time.sleep_us(200)  # Small delay for timing stability
    for bit in range(7, -1, -1):  # Loop through each bit (MSB first)
        srclk.low()  # Prepare to send the next bit
        time.sleep_us(200)
        value = 1 & (dat >> bit)  # Extract the current bit from the data
        sdi.value(value)  # Set the data line to the current bit value
        time.sleep_us(200)
        srclk.high()  # Pulse the shift clock to store the bit in the register
        time.sleep_us(200)
    time.sleep_us(200)
    rclk.high()  # Pulse the register clock to move the data to the output

# Function to display a number on the 7-segment display
# This function breaks down the number into its individual digits and displays them
def display(num):
    pickDigit(0)  # Select the units place
    hc595_shift(SEGCODE[num % 10])  # Display units

    pickDigit(1)  # Select the tens place
    hc595_shift(SEGCODE[num % 100 // 10])  # Display tens

    pickDigit(2)  # Select the hundreds place
    hc595_shift(SEGCODE[num % 1000 // 100])  # Display hundreds

    pickDigit(3)  # Select the thousands place
    hc595_shift(SEGCODE[num % 10000 // 1000])  # Display thousands

# Setup for traffic light LEDs (Red, Yellow, Green)
# LEDs are connected to pins 9 (Green), 8 (Yellow), and 7 (Red)
pin = [7, 8, 9]  # LED pin numbers
led = []
for i in range(3):
    led.append(None)  # Reserve space in list
    led[i] = machine.Pin(pin[i], machine.Pin.OUT)  # Initialize each pin as output for LEDs

# Function to turn on the correct LED based on the current state
# 0 = Green, 1 = Yellow, 2 = Red
def lightup(state):
    for i in range(3):
        led[i].value(0)  # Turn off all LEDs
    led[state].value(1)  # Turn on the selected LED (Green, Yellow, or Red)

# Timer-related variables
counter = 0  # Counter for the remaining time
color_state = 0  # Current state of the traffic light (0 = Green, 1 = Yellow, 2 = Red)

# Timer interrupt callback to update the traffic light state and counter
def time_count(ev):
    global counter, color_state
    counter -= 1  # Decrease the counter by 1 second
    if counter <= 0:  # If the counter reaches zero, switch to the next light color
        color_state = (color_state + 1) % 3  # Cycle through Green, Yellow, and Red
        counter = lightTime[color_state]  # Reset counter based on the new color's duration

# Initialize a timer to call the time_count function every 1 second (1000ms)
tim = Timer(period=1000, mode=Timer.PERIODIC, callback=time_count)

# Main loop to update the 7-segment display and traffic light LEDs
while True:
    display(counter)  # Update the display with the remaining time
    lightup(color_state)  # Update the traffic light LEDs based on the current color
Quando il codice viene eseguito, il LED verde rimane acceso per 30 secondi, il LED giallo rimane acceso per 5 secondi e il LED rosso rimane acceso per 30 secondi.