Nota
Ciao, benvenuto nella Community SunFounder Raspberry Pi & Arduino & ESP32 Enthusiasts su Facebook! Approfondisci le tue conoscenze su Raspberry Pi, Arduino ed ESP32 insieme ad altri appassionati.
Perché unirsi?
Supporto Esperti: Risolvi problemi post-vendita e sfide tecniche con l’aiuto della nostra community e del nostro team.
Impara e Condividi: Scambia consigli e tutorial per migliorare le tue competenze.
Anteprime Esclusive: Ottieni accesso anticipato ai nuovi annunci di prodotti e anteprime esclusive.
Sconti Speciali: Godi di sconti esclusivi sui nostri prodotti più recenti.
Promozioni Festive e Giveaway: Partecipa a giveaway e promozioni festive.
👉 Pronto a esplorare e creare con noi? Clicca [Qui] e unisciti oggi stesso!
7.2 Termometro Ambientale
Utilizzando un termistore e un I2C LCD1602, possiamo creare un termometro ambientale.
Questo progetto è molto semplice, basato su 2.13 Termometro con l’I2C LCD1602 per visualizzare la temperatura.
Componenti Necessari
In questo progetto, abbiamo bisogno dei seguenti componenti.
È sicuramente conveniente acquistare un kit completo, ecco il link:
Nome |
ELEMENTI IN QUESTO KIT |
LINK |
|---|---|---|
Kepler Kit |
450+ |
Puoi anche acquistarli separatamente dai link sottostanti.
SN |
COMPONENTE |
QUANTITÀ |
LINK |
|---|---|---|---|
1 |
1 |
||
2 |
Cavo Micro USB |
1 |
|
3 |
1 |
||
4 |
Diversi |
||
5 |
1(10KΩ) |
||
6 |
1 |
||
7 |
1 |
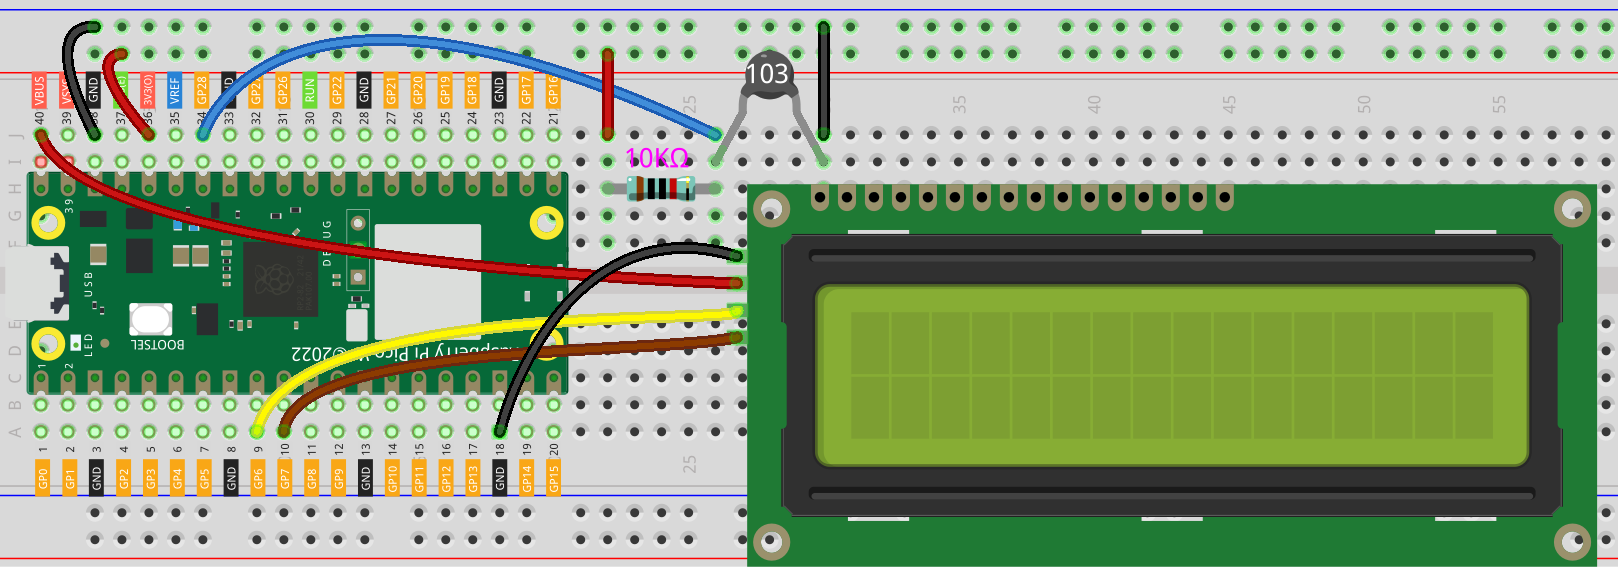
Schema

Collegamenti
Codice
Nota
Apri il file
7.2_room_temperature_meter.pynel percorsokepler-kit-main/micropythono copia questo codice in Thonny, poi clicca su «Esegui Script Corrente» o semplicemente premi F5 per eseguirlo.Non dimenticare di selezionare l’interprete «MicroPython (Raspberry Pi Pico)» nell’angolo in basso a destra.
Per tutorial dettagliati, fai riferimento a Aprire ed Eseguire Codice Direttamente.
from lcd1602 import LCD
from machine import I2C, Pin
import utime
import math

# Initialize the thermistor (ADC on pin 28) and LCD display
thermistor = machine.ADC(28)  # Analog input from the thermistor

# Initialize I2C communication for the LCD1602 display
i2c = I2C(1, sda=Pin(6), scl=Pin(7), freq=400000)

# Create an LCD object for controlling the LCD1602 display
lcd = LCD(i2c)

# Main loop to continuously read temperature and display it
while True:
    # Read raw ADC value from the thermistor
    temperature_value = thermistor.read_u16()

    # Convert the raw ADC value to a voltage (0-3.3V range)
    Vr = 3.3 * float(temperature_value) / 65535  # ADC value to voltage conversion

    # Calculate the thermistor resistance (using a voltage divider with a 10kOhm resistor)
    Rt = 10000 * Vr / (3.3 - Vr)  # Rt = thermistor resistance

    # Use the Steinhart-Hart equation to calculate the temperature in Kelvin
    # The values used are specific to the thermistor (3950 is the beta coefficient)
    temp = 1 / (((math.log(Rt / 10000)) / 3950) + (1 / (273.15 + 25)))  # Temperature in Kelvin

    # Convert temperature from Kelvin to Celsius
    Cel = temp - 273.15

    # Display the temperature on the LCD in Celsius
    string = " Temperature is \n    " + str('{:.2f}'.format(Cel)) + " C"  # Format string for the LCD
    lcd.message(string)  # Display the string on the LCD

    utime.sleep(1)  # Wait for 1 second
    lcd.clear()  # Clear the LCD for the next reading
Il display LCD mostrerà il valore della temperatura nell’ambiente corrente dopo l’esecuzione del programma.
Nota
Se il codice e i collegamenti sono corretti, ma l’LCD non visualizza comunque nulla, prova a regolare il potenziometro sul retro per aumentare il contrasto.