Nota
Ciao, benvenuto nella Community di SunFounder Raspberry Pi & Arduino & ESP32 Enthusiasts su Facebook! Approfondisci le tue conoscenze su Raspberry Pi, Arduino ed ESP32 insieme ad altri appassionati.
Perché Unirsi?
Supporto da Esperti: Risolvi i problemi post-vendita e le sfide tecniche con l’aiuto della nostra community e del nostro team.
Impara e Condividi: Scambia consigli e tutorial per migliorare le tue competenze.
Anteprime Esclusive: Ottieni accesso anticipato agli annunci di nuovi prodotti e alle anteprime.
Sconti Speciali: Approfitta di sconti esclusivi sui nostri prodotti più recenti.
Promozioni Festive e Giveaway: Partecipa a giveaway e promozioni festive.
👉 Pronto a esplorare e creare con noi? Clicca [Qui] e unisciti oggi stesso!
7.4 Contatore di Passeggeri
Per i grandi centri commerciali, catene di negozi, aeroporti, stazioni, musei e luoghi pubblici come le sale espositive, il flusso di passeggeri è un dato indispensabile.
Ad esempio, negli aeroporti e nelle stazioni, è necessario controllare rigorosamente il numero di persone per garantire la sicurezza e il flusso regolare. È inoltre possibile conoscere i momenti di maggiore affluenza nei centri commerciali e nelle catene di negozi, quanti ordini può generare ogni utente, ecc. Di conseguenza, possiamo analizzare le abitudini di consumo delle persone e aumentare il fatturato.
I contatori di passeggeri possono aiutare a comprendere l’operatività di questi luoghi pubblici e a organizzare le attività in modo efficiente.
Un semplice contatore di passeggeri viene creato utilizzando un sensore PIR e un display a 7 segmenti a 4 cifre.
Componenti Necessari
In questo progetto, abbiamo bisogno dei seguenti componenti.
È sicuramente conveniente acquistare un kit completo, ecco il link:
Nome |
ELEMENTI IN QUESTO KIT |
LINK |
|---|---|---|
Kepler Kit |
450+ |
Puoi anche acquistarli separatamente dai link sottostanti.
SN |
COMPONENTE |
QUANTITÀ |
LINK |
|---|---|---|---|
1 |
1 |
||
2 |
Cavo Micro USB |
1 |
|
3 |
1 |
||
4 |
Diversi |
||
5 |
4 (220Ω) |
||
6 |
1 |
||
7 |
1 |
||
8 |
1 |
Schema Elettrico
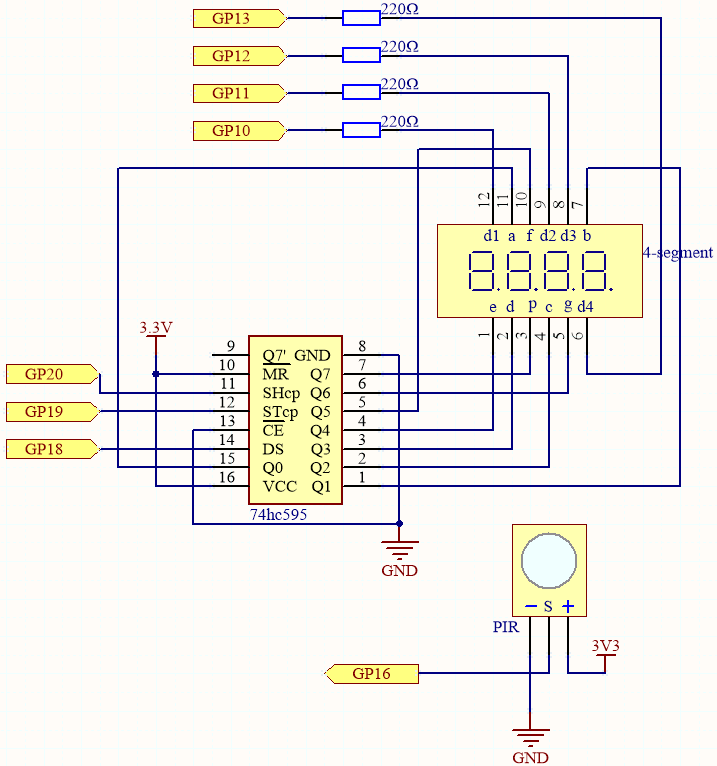
Questo circuito è basato su 5.3 Contatore di Tempo con l’aggiunta di un modulo PIR.
Il PIR invierà un segnale alto di circa 2,8 secondi quando qualcuno passa davanti.
Il modulo PIR ha due potenziometri: uno regola la sensibilità, l’altro regola la distanza di rilevamento. Per far funzionare meglio il modulo PIR, è necessario girarli entrambi in senso antiorario fino alla fine.

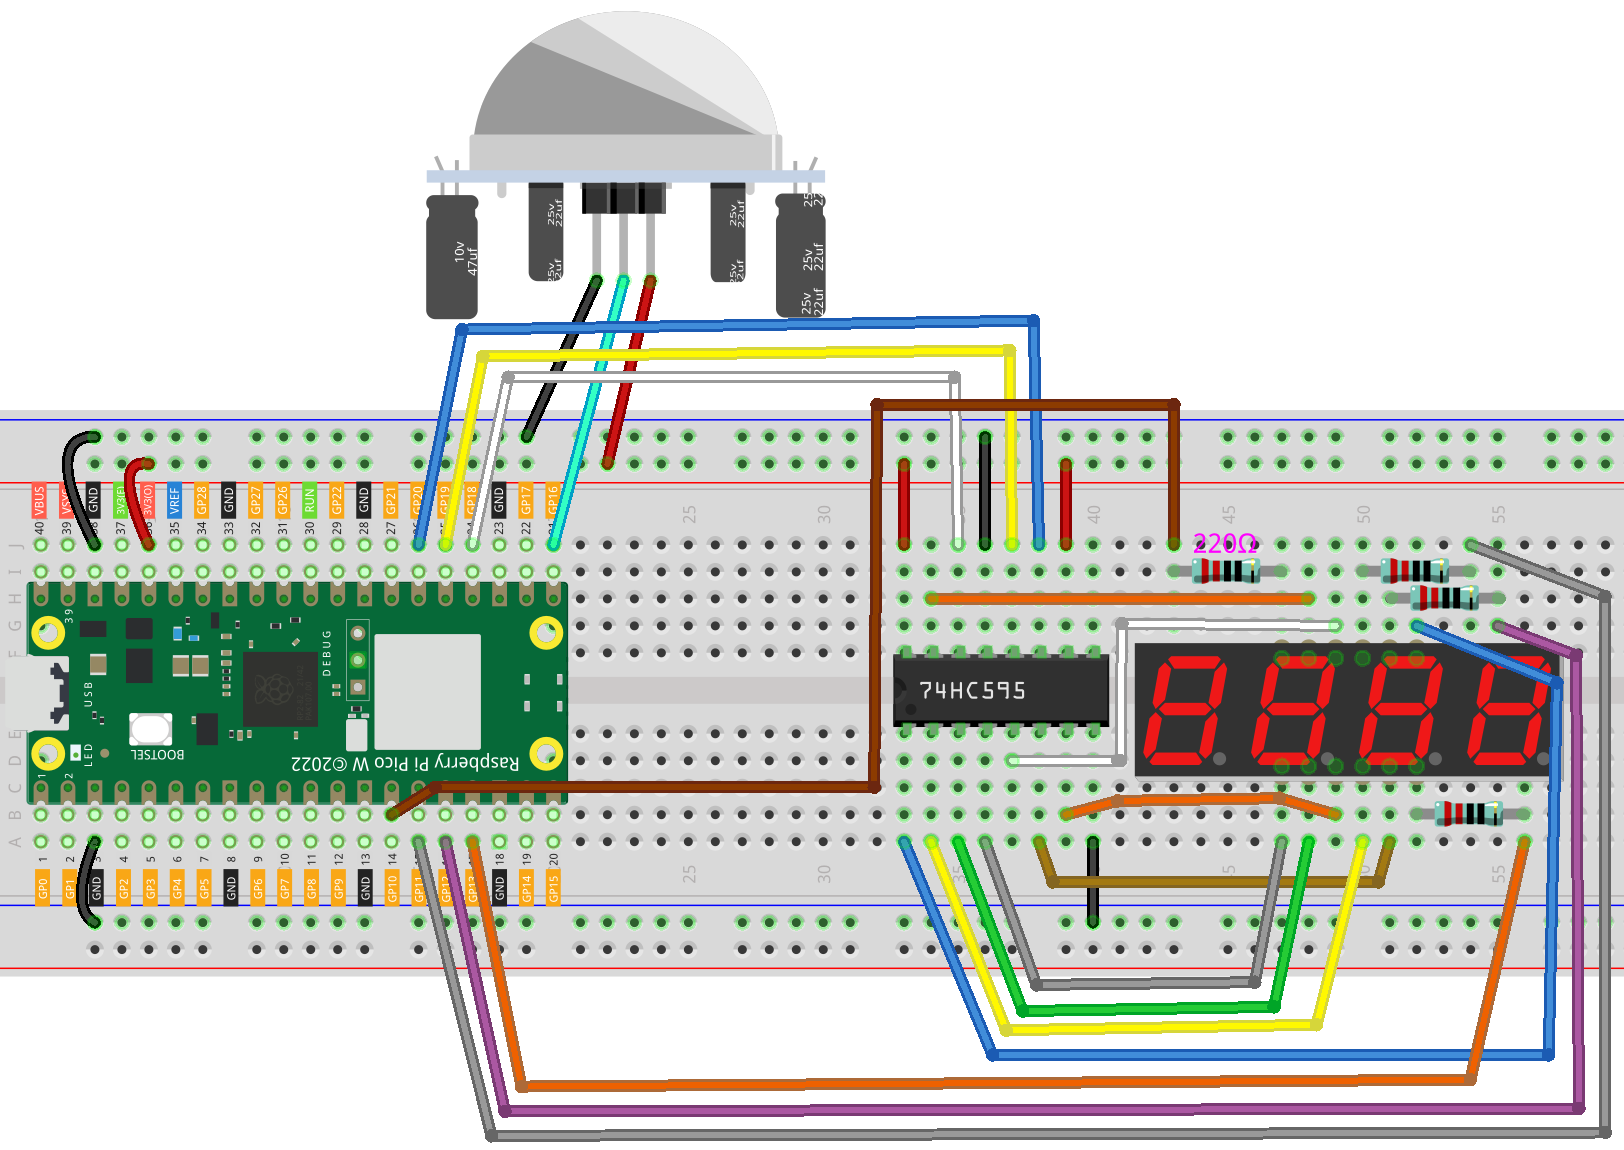
Collegamenti
Codice
Nota
Apri il file
7.4_passenger_counter.pynel percorsokepler-kit-main/micropythono copia questo codice in Thonny, poi clicca su «Esegui Script Corrente» o semplicemente premi F5 per eseguirlo.Non dimenticare di selezionare l’interprete «MicroPython (Raspberry Pi Pico)» nell’angolo in basso a destra.
Per tutorial dettagliati, fai riferimento a Aprire ed Eseguire Codice Direttamente.
import machine
import time

# Initialize PIR sensor on pin 16, configured as an input
pir_sensor = machine.Pin(16, machine.Pin.IN)

# 7-segment display codes for digits 0-9, using hexadecimal to represent LED segments
SEGCODE = [0x3f,0x06,0x5b,0x4f,0x66,0x6d,0x7d,0x07,0x7f,0x6f]

# Define pins for shift register communication (74HC595)
sdi = machine.Pin(18, machine.Pin.OUT)   # Serial Data Input
rclk = machine.Pin(19, machine.Pin.OUT)  # Register Clock (Latch)
srclk = machine.Pin(20, machine.Pin.OUT) # Shift Register Clock

# Initialize list to store 4 digit control pins
placePin = []

# Define control pins for each of the four digits (common anodes)
pin = [10,13,12,11] # Pin numbers for the 4-digit display
for i in range(4):
    placePin.append(None)  # Reserve space in list
    placePin[i] = machine.Pin(pin[i], machine.Pin.OUT)  # Initialize pin as output

# Initialize counter to keep track of detected motion events
count = 0

# Function to select which digit (0-3) to display by controlling the common anode pins
def pickDigit(digit):
    for i in range(4):
        placePin[i].value(1)  # Turn off all digits
    placePin[digit].value(0)  # Turn on the selected digit

# Function to clear the display by sending '0x00' to the shift register
def clearDisplay():
    hc595_shift(0x00)

# Function to send data to the shift register (74HC595)
def hc595_shift(dat):
    rclk.low()  # Pull latch low to prepare for data shifting
    time.sleep_us(200)  # Small delay for timing stability
    for bit in range(7, -1, -1):  # Loop through each bit (MSB first)
        srclk.low()  # Prepare to send the next bit
        time.sleep_us(200)
        value = 1 & (dat >> bit)  # Extract the current bit from the data
        sdi.value(value)  # Set the data line to the current bit value
        time.sleep_us(200)
        srclk.high()  # Pulse the shift clock to store the bit in the register
        time.sleep_us(200)
    time.sleep_us(200)
    rclk.high()  # Pulse the register clock to move the data to the output

# Interrupt handler for PIR sensor, triggered on motion detection (rising edge)
# Increments the motion count each time the sensor is triggered
def motion_detected(pin):
    global count
    count = count + 1  # Increment the count when motion is detected

# Set up an interrupt to detect motion using the PIR sensor
pir_sensor.irq(trigger=machine.Pin.IRQ_RISING, handler=motion_detected)

# Main loop to continuously update the 7-segment display with the current count
while True:
    # Update the first digit (units place)
    pickDigit(0)
    hc595_shift(SEGCODE[count % 10])

    # Update the second digit (tens place)
    pickDigit(1)
    hc595_shift(SEGCODE[count % 100 // 10])

    # Update the third digit (hundreds place)
    pickDigit(2)
    hc595_shift(SEGCODE[count % 1000 // 100])

    # Update the fourth digit (thousands place)
    pickDigit(3)
    hc595_shift(SEGCODE[count % 10000 // 1000])
Quando il codice viene eseguito, il numero sul display a 7 segmenti a 4 cifre aumenterà di uno ogni volta che qualcuno passa davanti al modulo PIR.