Nota
Ciao, benvenuto nella Community di Appassionati di Raspberry Pi & Arduino & ESP32 di SunFounder su Facebook! Approfondisci Raspberry Pi, Arduino ed ESP32 insieme ad altri appassionati.
Perché Unirsi?
Supporto da Esperti: Risolvi problemi post-vendita e sfide tecniche con l’aiuto della nostra community e del nostro team.
Impara e Condividi: Scambia suggerimenti e tutorial per migliorare le tue competenze.
Anteprime Esclusive: Ottieni accesso anticipato agli annunci dei nuovi prodotti e alle anteprime.
Sconti Speciali: Approfitta di sconti esclusivi sui nostri prodotti più recenti.
Promozioni e Giveaway Festivi: Partecipa ai giveaway e alle promozioni festive.
👉 Pronto a esplorare e creare con noi? Clicca [Qui] e unisciti oggi stesso!
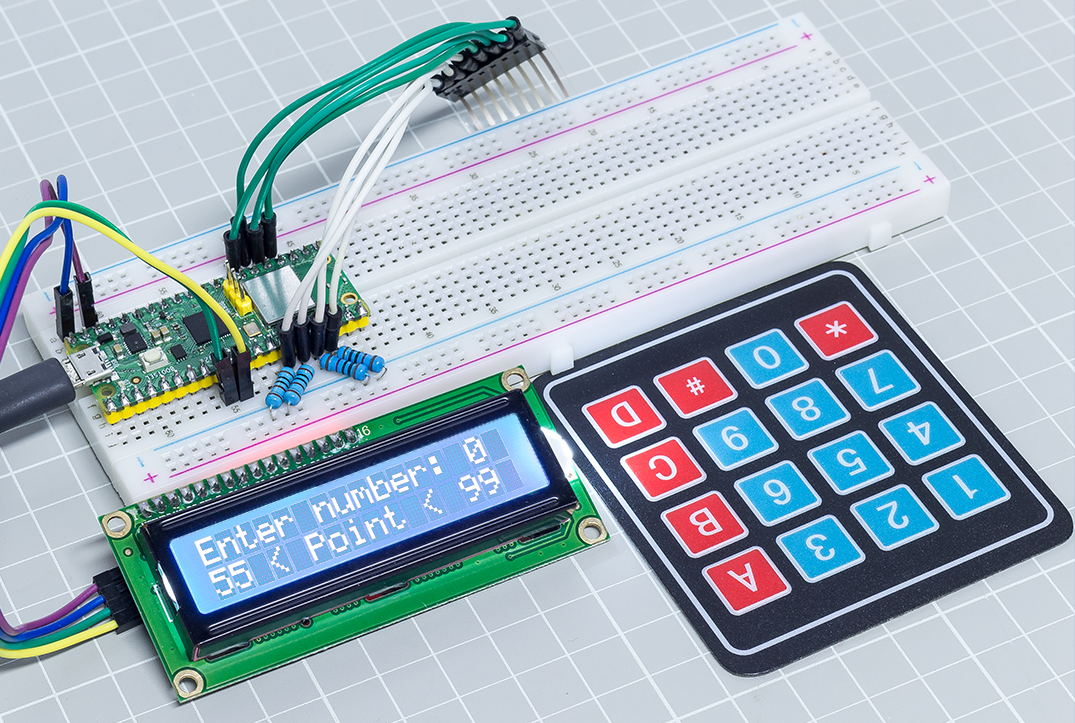
7.7 Indovina il Numero
«Indovina il Numero» è un divertente gioco di gruppo in cui tu e i tuoi amici inserite numeri (0-99). Con ogni numero inserito, l’intervallo si ridurrà fino a quando un giocatore risolve l’enigma correttamente. A quel punto, il giocatore perde e viene punito.
Per esempio, se il numero fortunato è 51, che i giocatori non possono vedere, e il giocatore 1 inserisce 50, l’intervallo diventa 50 - 99; se il giocatore 2 inserisce 70, l’intervallo diventa 50 - 70; se il giocatore 3 inserisce 51, il giocatore è sfortunato. In questo caso, i numeri vengono inseriti tramite la tastiera, e i risultati vengono visualizzati su uno schermo LCD.
Componenti Necessari
In questo progetto, abbiamo bisogno dei seguenti componenti.
È sicuramente conveniente acquistare un kit completo, ecco il link:
Nome |
ELEMENTI IN QUESTO KIT |
LINK |
|---|---|---|
Kepler Kit |
450+ |
Puoi anche acquistarli separatamente dai link sottostanti.
SN |
COMPONENTE |
QUANTITÀ |
LINK |
|---|---|---|---|
1 |
1 |
||
2 |
Cavo Micro USB |
1 |
|
3 |
1 |
||
4 |
Diversi |
||
5 |
4(10KΩ) |
||
6 |
1 |
||
7 |
1 |
Schema
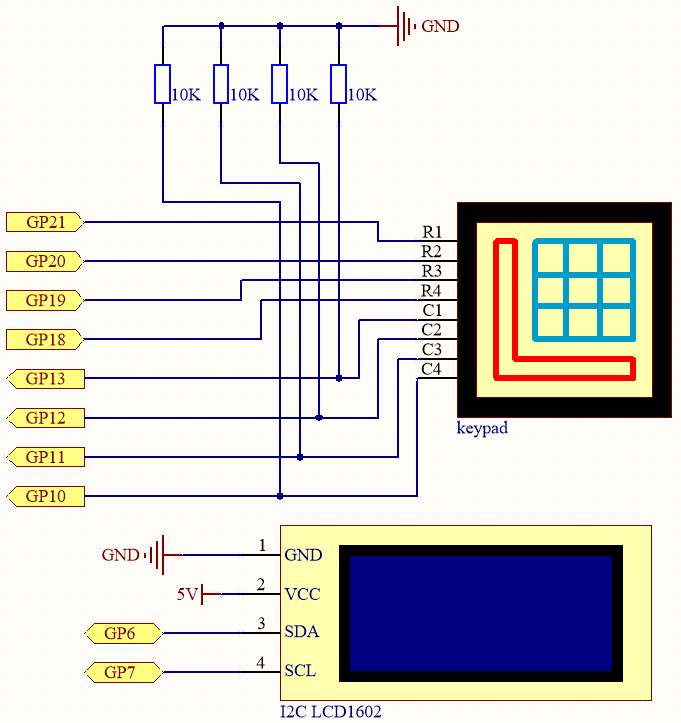
Questo circuito è basato su 4.2 Tastiera 4x4 con l’aggiunta di un I2C LCD1602 per visualizzare i tasti premuti.
Cablaggio

Per semplificare il cablaggio, nel diagramma sopra, la riga delle colonne della tastiera a matrice e le resistenze da 10K sono inserite nei fori in cui si trovano G10 ~ G13 contemporaneamente.
Codice
Nota
Apri il file
7.7_game_guess_number.pynel percorsokepler-kit-main/micropythonoppure copia questo codice in Thonny, quindi clicca su «Run Current Script» o semplicemente premi F5 per eseguirlo.Non dimenticare di selezionare l’interprete «MicroPython (Raspberry Pi Pico)» nell’angolo in basso a destra.
Per tutorial dettagliati, fai riferimento a Aprire ed Eseguire Codice Direttamente.
from lcd1602 import LCD
from machine import I2C, Pin
import time
import urandom

# Initialize I2C communication for the LCD1602 display
i2c = I2C(1, sda=Pin(6), scl=Pin(7), freq=400000)

# Create an LCD object for controlling the LCD1602 display
lcd = LCD(i2c)

# Keypad character mapping for a 4x4 matrix keypad
characters = [["1", "2", "3", "A"],
            ["4", "5", "6", "B"],
            ["7", "8", "9", "C"],
            ["*", "0", "#", "D"]]

# Define row pins for the keypad
pin = [21, 20, 19, 18]
row = []
for i in range(4):
    row.append(None)
    row[i] = machine.Pin(pin[i], machine.Pin.OUT)  # Set row pins as output

# Define column pins for the keypad
pin = [13, 12, 11, 10]
col = []
for i in range(4):
    col.append(None)
    col[i] = machine.Pin(pin[i], machine.Pin.IN)  # Set column pins as input

# Function to read a key from the keypad
def readKey():
    key = []
    for i in range(4):
        row[i].high()  # Set the row pin high
        for j in range(4):
            if col[j].value() == 1:  # Check if any column is pressed
                key.append(characters[i][j])  # Record the corresponding key
        row[i].low()  # Set the row pin low
    if key == []:
        return None  # Return None if no key is pressed
    else:
        return key  # Return the pressed key

# Initialize and reset the game variables (random pointValue, upper/lower limits)
def init_new_value():
    global pointValue, upper, count, lower
    pointValue = int(urandom.uniform(0, 99))  # Generate a random number between 0 and 99
    print(pointValue)  # Print the target number (for debugging)
    upper = 99  # Set initial upper bound
    lower = 0  # Set initial lower bound
    count = 0  # Reset the player's guess count
    return False  # Indicate that the game has not ended

# Function to display the game information on the LCD
# If the player has guessed correctly, show "GAME OVER"
# Otherwise, show the current guess and range
def lcd_show(result):
    lcd.clear()  # Clear the LCD display
    if result == True:  # If the player guessed correctly
        string = "GAME OVER!\n"
        string += "Point is " + str(pointValue)  # Display the correct number
    else:
        string = "Enter number: " + str(count) + "\n"  # Show the player's current guess
        string += str(lower) + " < Point < " + str(upper)  # Show the range of possible values
    lcd.message(string)  # Send the string to the LCD
    return

# Process the player's guess and update the upper or lower bound
# If the guess matches the pointValue, return True to indicate the game is over
# Otherwise, update the bounds and return False
def number_processing():
    global upper, count, lower
    if count > pointValue:
        if count < upper:
            upper = count  # Update the upper bound if the guess is too high
    elif count < pointValue:
        if count > lower:
            lower = count  # Update the lower bound if the guess is too low
    elif count == pointValue:
        return True  # Return True if the guess matches the pointValue
    count = 0  # Reset the guess count for the next attempt
    return False

## Main game setup and loop
# Display a welcome message and prompt the user to press 'A' to start
string = "Press A to Start!"
lcd.message(string)
result = init_new_value()  # Initialize game variables

# Main loop to handle keypad input and update the display
last_key = None
while True:
    current_key = readKey()  # Read the current key pressed
    if current_key == last_key:
        continue  # Skip processing if the same key is still pressed
    last_key = current_key  # Update the last pressed key

    if current_key != None:
        # If 'A' is pressed, restart the game with a new target number
        if current_key == ["A"]:
            result = init_new_value()
        # If 'D' is pressed, check if the current guess is correct
        elif current_key == ["D"]:
            result = number_processing()
        # If a number is pressed and the count is less than 10 digits
        elif current_key[0] in list("1234567890") and count < 10:
            count = count * 10 + int(current_key[0])  # Add the digit to the current guess
        lcd_show(result)  # Update the LCD with the current game state
    time.sleep(0.1)  # Small delay for key debounce
Dopo che il codice è stato eseguito, premi
Aper iniziare il gioco. Viene prodotto un numero casualepointma non viene visualizzato sul LCD, e ciò che devi fare è indovinarlo.Il numero che hai digitato appare alla fine della prima riga fino a quando il calcolo finale è terminato. (Premi
Dper iniziare la comparazione.)L’intervallo numerico di
pointè visualizzato sulla seconda riga. E devi digitare il numero entro l’intervallo.Quando digiti un numero, l’intervallo si restringe; se hai indovinato il numero fortunato fortunatamente o sfortunatamente, apparirà
GAME OVER!.
Nota
Se il codice e il cablaggio sono corretti, ma il display LCD non mostra ancora nulla, puoi regolare il potenziometro sul retro per aumentare il contrasto.