Note
Hello, welcome to the SunFounder Raspberry Pi & Arduino & ESP32 Enthusiasts Community on Facebook! Dive deeper into Raspberry Pi, Arduino, and ESP32 with fellow enthusiasts.
Why Join?
Expert Support: Solve post-sale issues and technical challenges with help from our community and team.
Learn & Share: Exchange tips and tutorials to enhance your skills.
Exclusive Previews: Get early access to new product announcements and sneak peeks.
Special Discounts: Enjoy exclusive discounts on our newest products.
Festive Promotions and Giveaways: Take part in giveaways and holiday promotions.
👉 Ready to explore and create with us? Click [here] and join today!
4.1.15 GAME - 10 Second
Introduction
Next, follow me to make a game device to challenge your concentration. Tie the tilt switch to a stick to make a magic wand. Shake the wand, the 4-digit segment display will start counting, shake again will let it stop counting. If you succeed in keeping the displayed count at 10.00, then you win. You can play the game with your friends to see who is the time wizard.
Required Components
In this project, we need the following components.

It’s definitely convenient to buy a whole kit, here’s the link:
Name |
ITEMS IN THIS KIT |
LINK |
|---|---|---|
Raphael Kit |
337 |
You can also buy them separately from the links below.
COMPONENT INTRODUCTION |
PURCHASE LINK |
|---|---|
- |
|
- |
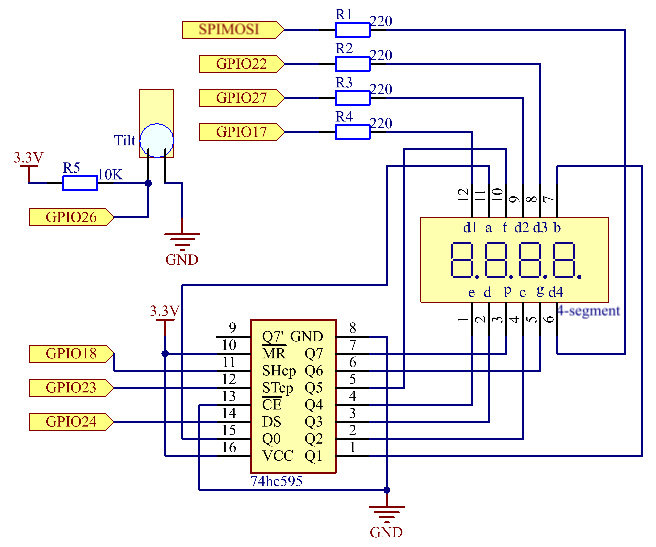
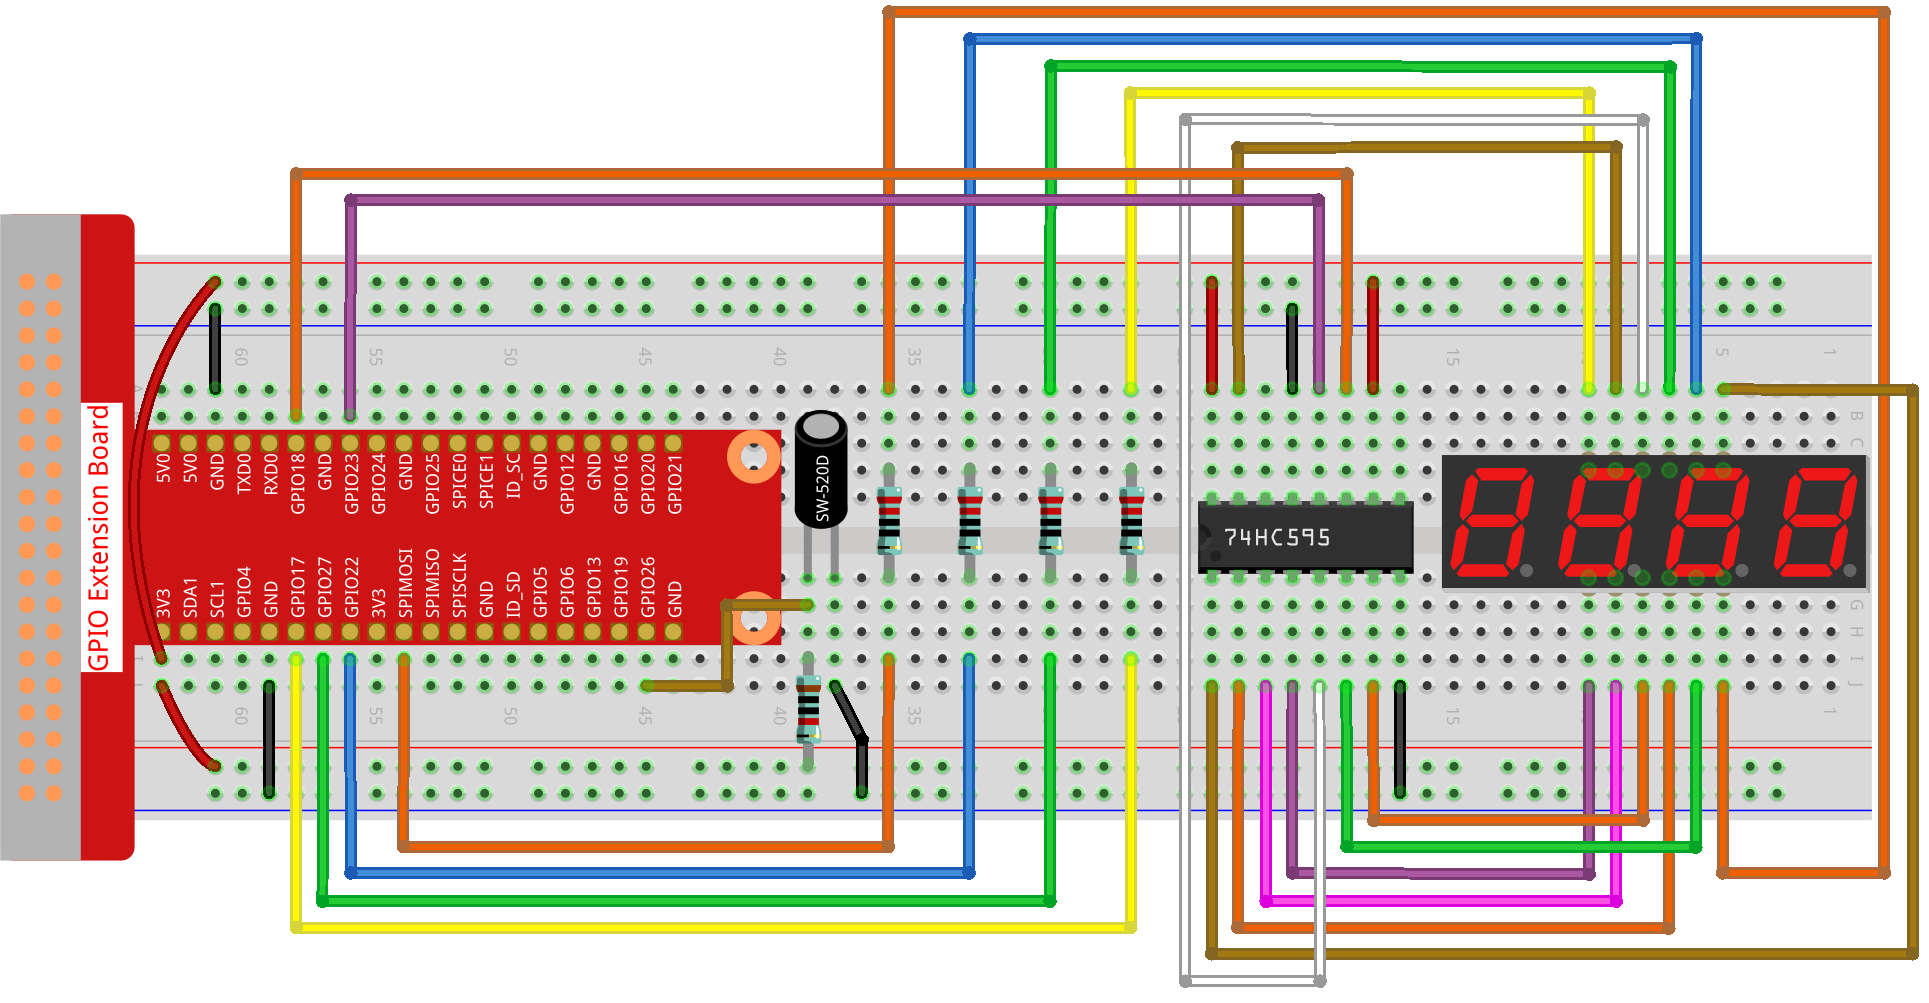
Schematic Diagram
T-Board Name |
physical |
wiringPi |
BCM |
GPIO17 |
Pin 11 |
0 |
17 |
GPIO27 |
Pin 13 |
2 |
27 |
GPIO22 |
Pin 15 |
3 |
22 |
SPIMOSI |
Pin 19 |
12 |
10 |
GPIO18 |
Pin 12 |
1 |
18 |
GPIO23 |
Pin 16 |
4 |
23 |
GPIO24 |
Pin 18 |
5 |
24 |
GPIO26 |
Pin 37 |
25 |
26 |
Experimental Procedures
Step 1: Build the circuit.
Step 2: Go to the folder of the code.
cd ~/raphael-kit/python-pi5
Step 3: Run the executable file.
sudo python3 4.1.18_GAME_10Second_zero.py
Shake the wand, the 4-digit segment display will start counting, shake again will let it stop counting. If you succeed in keeping the displayed count at 10.00, then you win. Shake it one more time to start the next round of the game.
Warning
If there is an error prompt RuntimeError: Cannot determine SOC peripheral base address, please refer to If gpiozero doesn’t work.
Code
Note
You can Modify/Reset/Copy/Run/Stop the code below. But before that, you need to go to source code path like raphael-kit/python-pi5. After modifying the code, you can run it directly to see the effect.
#!/usr/bin/env python3

from gpiozero import OutputDevice, Button
import time
import threading

# Initialize the button connected to GPIO 26
sensorPin = Button(26)

# Define GPIO pins connected to the 74HC595 shift register
SDI = OutputDevice(24)   # Serial Data Input
RCLK = OutputDevice(23)  # Register Clock
SRCLK = OutputDevice(18) # Shift Register Clock

# Define GPIO pins for digit selection on the 7-segment display
placePin = [OutputDevice(pin) for pin in (10, 22, 27, 17)]

# Define segment codes for numbers 0 to 9 on the 7-segment display
number = (0xc0, 0xf9, 0xa4, 0xb0, 0x99, 0x92, 0x82, 0xf8, 0x80, 0x90)

# Counter and timer variables
counter = 0
timer1 = None
gameState = 0

def clearDisplay():
    """ Clear all segments on the 7-segment display. """
    for _ in range(8):
        SDI.on()
        SRCLK.on()
        SRCLK.off()
    RCLK.on()
    RCLK.off()

def hc595_shift(data):
    """ Shift data to the 74HC595 shift register to display a digit. """
    for i in range(8):
        SDI.value = 0x80 & (data << i)
        SRCLK.on()
        SRCLK.off()
    RCLK.on()
    RCLK.off()

def pickDigit(digit):
    """ Select which digit to display on the 7-segment display. """
    for pin in placePin:
        pin.off()
    placePin[digit].on()

def display():
    """ Display the current counter value on the 7-segment display. """
    global counter
    clearDisplay()
    pickDigit(0)
    hc595_shift(number[counter % 10])

    clearDisplay()
    pickDigit(1)
    hc595_shift(number[counter % 100 // 10])

    clearDisplay()
    pickDigit(2)
    hc595_shift(number[counter % 1000 // 100] - 0x80)

    clearDisplay()
    pickDigit(3)
    hc595_shift(number[counter % 10000 // 1000])

def stateChange():
    """ Handle state changes for the counter based on button presses. """
    global gameState, counter, timer1
    if gameState == 0:
        counter = 0
        time.sleep(1)
        timer()
    elif gameState == 1 and timer1 is not None:
        timer1.cancel()
        time.sleep(1)
    gameState = (gameState + 1) % 2

def loop():
    """ Main loop to check for button presses and update the display. """
    global counter
    currentState = 0
    lastState = 0
    while True:
        display()
        currentState = sensorPin.value
        if (currentState == 0) and (lastState == 1):
            stateChange()
        lastState = currentState

def timer():
    """ Timer function that increments the counter every 0.01 second. """
    global counter, timer1
    timer1 = threading.Timer(0.01, timer)
    timer1.start()
    counter += 1

try:
    loop()
except KeyboardInterrupt:
    if timer1:
        timer1.cancel()
Code Explanation
The script begins by importing necessary modules. The
gpiozerolibrary is used for interfacing with GPIO devices like buttons, andtimeandthreadingmodules may be used for handling timing-related tasks or concurrent operations.#!/usr/bin/env python3 from gpiozero import OutputDevice, Button import time import threading
Initializes a
Buttonobject from the GPIO Zero library, connecting it to GPIO pin 26. This setup allows for the detection of button presses.# Initialize the button connected to GPIO 26 sensorPin = Button(26)
Initializes GPIO pins connected to the shift register’s Serial Data Input (SDI), Register Clock Input (RCLK), and Shift Register Clock Input (SRCLK).
# Define GPIO pins connected to the 74HC595 shift register
SDI = OutputDevice(24)   # Serial Data Input
RCLK = OutputDevice(23)  # Register Clock
SRCLK = OutputDevice(18) # Shift Register Clock
Initializes the pins for each digit of the 7-segment display and defines the binary codes for displaying numbers 0-9.
# Define GPIO pins for digit selection on the 7-segment display
placePin = [OutputDevice(pin) for pin in (10, 22, 27, 17)]

# Define segment codes for numbers 0 to 9 on the 7-segment display
number = (0xc0, 0xf9, 0xa4, 0xb0, 0x99, 0x92, 0x82, 0xf8, 0x80, 0x90)
Functions to control the 7-segment display.
clearDisplayturns off all segments,hc595_shiftshifts data into the shift register, andpickDigitactivates a specific digit on the display.def clearDisplay(): """ Clear all segments on the 7-segment display. """ for _ in range(8): SDI.on() SRCLK.on() SRCLK.off() RCLK.on() RCLK.off() def hc595_shift(data): """ Shift data to the 74HC595 shift register to display a digit. """ for i in range(8): SDI.value = 0x80 & (data << i) SRCLK.on() SRCLK.off() RCLK.on() RCLK.off() def pickDigit(digit): """ Select which digit to display on the 7-segment display. """ for pin in placePin: pin.off() placePin[digit].on()
Function to display the current value of the counter on the 7-segment display.
def display():
    """ Display the current counter value on the 7-segment display. """
    global counter
    clearDisplay()
    pickDigit(0)
    hc595_shift(number[counter % 10])

    clearDisplay()
    pickDigit(1)
    hc595_shift(number[counter % 100 // 10])

    clearDisplay()
    pickDigit(2)
    hc595_shift(number[counter % 1000 // 100] - 0x80)

    clearDisplay()
    pickDigit(3)
    hc595_shift(number[counter % 10000 // 1000])
Function to handle state changes (start/stop) of the counter based on button presses.
def stateChange():
    """ Handle state changes for the counter based on button presses. """
    global gameState, counter, timer1
    if gameState == 0:
        counter = 0
        time.sleep(1)
        timer()
    elif gameState == 1 and timer1 is not None:
        timer1.cancel()
        time.sleep(1)
    gameState = (gameState + 1) % 2
Main loop that continuously checks the button state and updates the display. It calls
stateChangewhen the button state changes.def loop(): """ Main loop to check for button presses and update the display. """ global counter currentState = 0 lastState = 0 while True: display() currentState = sensorPin.value if (currentState == 0) and (lastState == 1): stateChange() lastState = currentState
Timer function that increments the counter at a regular interval (every 0.01 second).
def timer():
    """ Timer function that increments the counter every 0.01 second. """
    global counter, timer1
    timer1 = threading.Timer(0.01, timer)
    timer1.start()
    counter += 1
Executes the main loop and allows for a clean exit from the program using a keyboard interrupt (Ctrl+C).
try:
    loop()
except KeyboardInterrupt:
    if timer1:
        timer1.cancel()