Note
Hello, welcome to the SunFounder Raspberry Pi & Arduino & ESP32 Enthusiasts Community on Facebook! Dive deeper into Raspberry Pi, Arduino, and ESP32 with fellow enthusiasts.
Why Join?
Expert Support: Solve post-sale issues and technical challenges with help from our community and team.
Learn & Share: Exchange tips and tutorials to enhance your skills.
Exclusive Previews: Get early access to new product announcements and sneak peeks.
Special Discounts: Enjoy exclusive discounts on our newest products.
Festive Promotions and Giveaways: Take part in giveaways and holiday promotions.
👉 Ready to explore and create with us? Click [here] and join today!
Lesson 12 Passive Buzzer
Introduction
In this lesson, we will learn how to make a passive buzzer to play music.
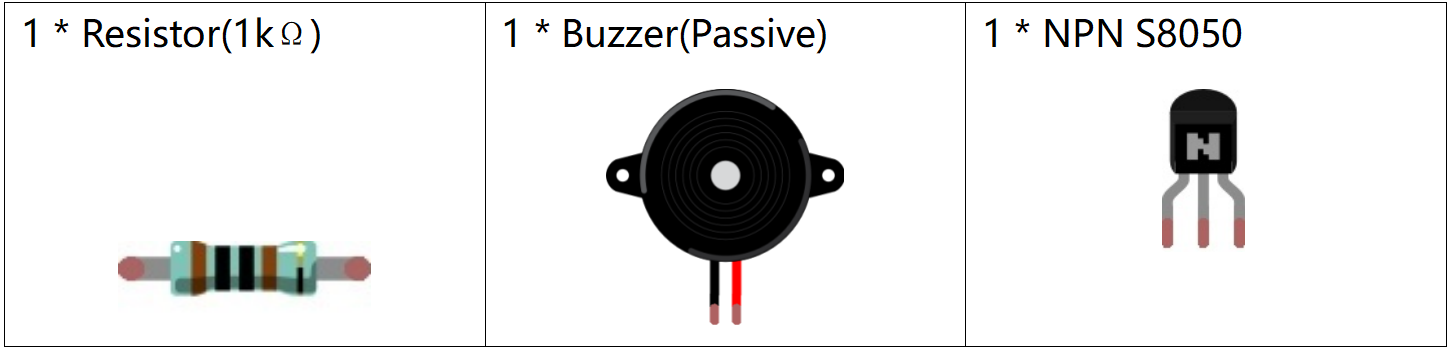
Newly Added Components
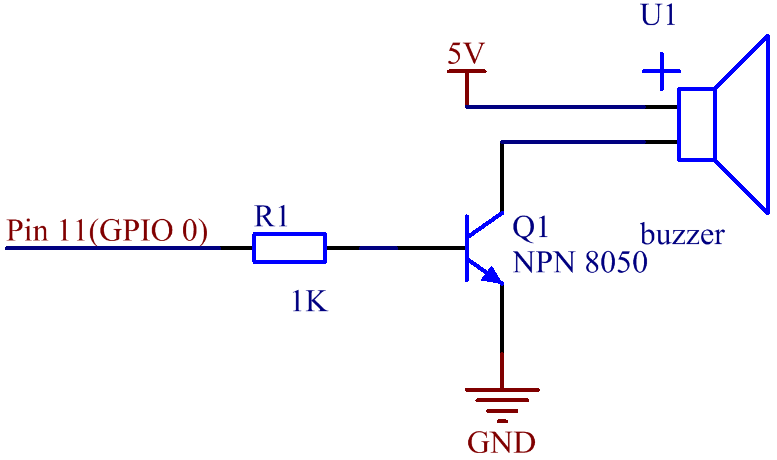
Schematic Diagram
The base pin(b pin) of the transistor is connected to pin11, the collector pin(c pin) to the cathode pin of the buzzer, and the emitter pin(e pin) to GND. The anode of the buzzer is connected to 5 v power supply. When pin11 inputs high voltage, the transistor will be switched on, and the collector will output low level. When there is a level difference between the two pins of the buzzer, the buzzer rings. When pin11 inputs low power level, the transistor is cut off, and the collector is at high level, and both ends of the buzzer are at high level, so the buzzer is silent.

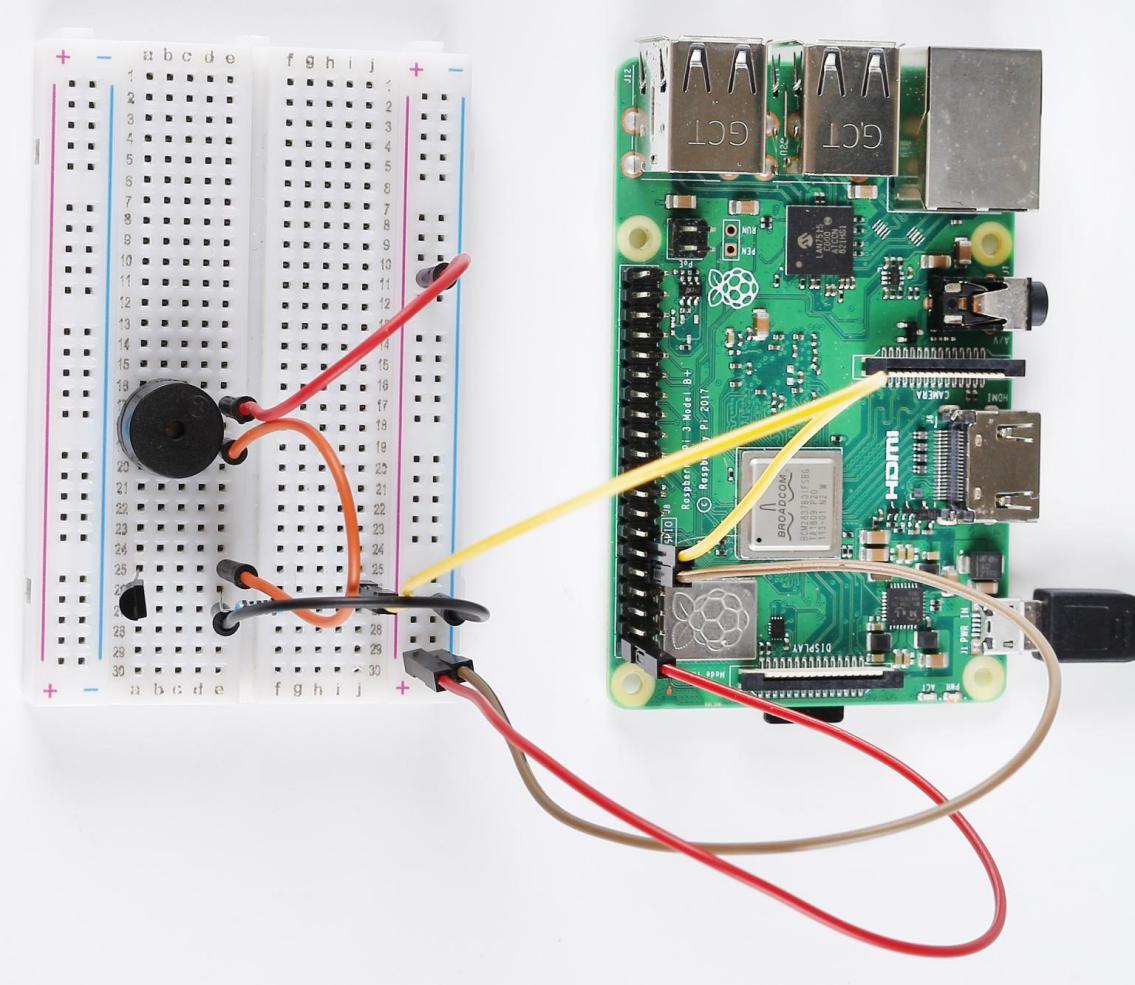
Build the Circuit

For C Language Users
Command
1. Go to the folder of the code.
cd /home/pi/electronic-kit/for-raspberry-pi/c/Lesson_12_PassiveBuzzer
2. Compile the code.
gcc 12_PassiveBuzzer.c -lwiringPi
3. Run the executable file.
sudo ./a.out
Now, the buzzer automatically plays music on a loop.
Note
If it does not work after running, or there is an error prompt: "wiringPi.h: No such file or directory", please refer to C code is not working?.
Code
#include <wiringPi.h>
#include <softTone.h>
#include <stdio.h>

#define BuzPin    0

#define  CM1  262
#define  CM2  294
#define  CM3  330
#define  CM4  350
#define  CM5  393
#define  CM6  441
#define  CM7  495

#define  CH1  525
#define  CH2  589
#define  CH3  661
#define  CH4  700
#define  CH5  786
#define  CH6  882
#define  CH7  990

int song[] = {CH5,CH2,CM6,CH2,CH3,CH6,0,CH3,CH5,CH3,CM6,CH2,0};
int beat[] = {1,1,1,1,1,1,2,1,1,1,1,1,3};

int main(void)
{
    int i, j;

    if(wiringPiSetup() == -1){ //when initialize wiring failed,print message to screen
        printf("setup wiringPi failed !");
        return 1;
    }

    if(softToneCreate(BuzPin) == -1){
        printf("setup softTone failed !");
        return 1;
    }

    while(1){
        printf("music is being played...\n");
        for(int i=0;i<sizeof(song)/4;i++){
            softToneWrite(BuzPin, song[i]);
            delay(beat[i] * 250);
        }
    }
    return 0;
}
Code Explanation
#include <softTone.h>
WiringPi includes a software-driven sound handler capable of outputting a simple tone/square wave signal on any of the Raspberry Pi’s GPIO pins. To maintain a low CPU usage, the minimum pulse width is 100μS. That gives a maximum frequency of 1/0.0002 = 5000Hz. Within these limitations, simple tones on a high impedance speaker or piezo sounder is possible.
#define  CM1  262
#define  CM2  294
#define  CM3  330
#define  CM4  350
#define  CM5  393
#define  CM6  441
#define  CM7  495
These frequencies of each note are as shown. CM refers to middle note, CH high note, 1-7 correspond to the notes C, D, E, F, G, A, B.
23.int song[] = {CH5,CH2,CM6,CH2,CH3,CH6,0,CH3,CH5,CH3,CM6,CH2,0};
24.int beat[] = {1,1,1,1,1,1,2,1,1,1,1,1,3};
Define a section of music and the corresponding beat. The number in beat[] refers to the beat of each note in the song (0.5s for each beat).
35. if(softToneCreate(BuzPin) == -1){
softToneCreate( ) creates a software controlled tone pin. You can use any GPIO pin and the pin numbering will be that of the wiringPiSetup() function you used. The return value is 0 for success. This is used to determine whether it is successful for the software to control tone pin; if it fails, it will not execute the program.
42.        for(int i=0;i<sizeof(song)/4;i++){
43.            softToneWrite(BuzPin, song[i]);
44.            delay(beat[i] * 250);
45.        }
Employ a for statement to play song_1.In the judgment condition, i<sizeof(song_1)/4,”devide by 4” is used because the array song_1[] is an array of the data type of integer, and each element takes up four bytes.
The number of elements in song (the number of musical notes) is gotten by deviding sizeof(song) by 4.
To enable each note to play for beat * 500ms, the function delay(beat_1[i] * 500) is called.
The prototype of softToneWrite(BuzPin, song_1[i]):
void softToneWrite (int pin, int freq);
This updates the tone frequency value on the given pin. The tone does not stop playing until you set the frequency to 0.
For Python Language Users
Command
1. Go to the folder of the code.
cd /home/pi/electronic-kit/for-raspberry-pi/python
2. Run the code.
sudo python3 12_PassiveBuzzer.py
Now, the buzzer automatically plays music on a loop.
Code
Note
You can Modify/Reset/Copy/Run/Stop the code below. But before that, you need to go to source code path like electronic-kit/for-raspberry-pi/python. After modifying the code, you can run it directly to see the effect.
import RPi.GPIO as GPIO
import time

Buzzer = 17

CL = [0, 131, 147, 165, 175, 196, 211, 248]        # Frequency of Low C notes
CM = [0, 262, 294, 330, 350, 393, 441, 495]        # Frequency of Middle C notes
CH = [1, 525, 589, 661, 700, 786, 882, 990]        # Frequency of High C notes

song = [    CH[5], CH[2], CM[6], CH[2], CH[3], CH[6],CH[0], CH[3], # Notes of song
            CH[5], CH[3], CM[6], CH[2],CH[0]]

beat = [    1,1,1,1,1,1,2,1,1,1,1,1,3    ]

def setup():
    GPIO.setmode(GPIO.BCM)
    GPIO.setup(Buzzer, GPIO.OUT)
    global Buzz


def loop():
    while True:
        print ('\n    Playing song...')
        for i in range(1, len(song)):
            if  song[i] == 1 :
                time.sleep(beat[i] *0.25)
            else:
                Buzz = GPIO.PWM(Buzzer, song[i])
                Buzz.start(50)
                time.sleep(beat[i] * 0.25)
                Buzz.stop()
        time.sleep(1)             # Wait a second for next song.

def destory():
    Buzz.stop()
    GPIO.output(Buzzer, LOW)
    GPIO.cleanup()

if __name__ == '__main__':        # Program start from here
    setup()
    try:
        loop()
    except KeyboardInterrupt:     # When 'Ctrl+C' is pressed, the child program destroy() will be  executed.
        destory()
Code Explanation
6.CL = [0, 131, 147, 165, 175, 196, 211, 248]
7.CM = [0, 262, 294, 330, 350, 393, 441, 495]
8.CH = [1, 525, 589, 661, 700, 786, 882, 990]
These are the frequencies of each note. The first 0 is to skip CL[0] so that the number CL[1]-CL[7] corresponds to the CDEFGAB of the note.
10.int song[] = {CH5,CH2,CM6,CH2,CH3,CH6,0,CH3,CH5,CH3,CM6,CH2,0};
13.int beat[] = {1,1,1,1,1,1,2,1,1,1,1,1,3};
Define a section of music and the corresponding beats. The number in beat[] refers to the beat of each note in the song (0.5s for each beat).
29.    Buzz = GPIO.PWM(Buzzer, song[i])
30.    Buzz.start(50)
Define pin Buzzer as PWM pin, then set its frequency to 786(song[0]) and Buzz.start(50) is used to run PWM. What’s more, set the duty cycle to 50%.
22. def loop():
23.    while True:
24.        print ('\n    Playing song...')
25.        for i in range(1, len(song)):
26.            if  song[i] == 1 :
27.                time.sleep(beat[i] *0.25)
28.            else:
29.                Buzz = GPIO.PWM(Buzzer, song[i])
30.                Buzz.start(50)
31.                time.sleep(beat[i] * 0.25)
32.                Buzz.stop()
33.   time.sleep(1)
Play music in the while loop. As i increases gradually, the buzzer plays following the note in song[].
Phenomenon Picture