Note
Hello, welcome to the SunFounder Raspberry Pi & Arduino & ESP32 Enthusiasts Community on Facebook! Dive deeper into Raspberry Pi, Arduino, and ESP32 with fellow enthusiasts.
Why Join?
Expert Support: Solve post-sale issues and technical challenges with help from our community and team.
Learn & Share: Exchange tips and tutorials to enhance your skills.
Exclusive Previews: Get early access to new product announcements and sneak peeks.
Special Discounts: Enjoy exclusive discounts on our newest products.
Festive Promotions and Giveaways: Take part in giveaways and holiday promotions.
👉 Ready to explore and create with us? Click [here] and join today!
Lesson 3 Breathing LED
Introduction
In this lesson, we will try something interesting - gradually increase or decrease the luminance of an LED with PWM, just like breathing. So we give it a magical name - Breathing LED.
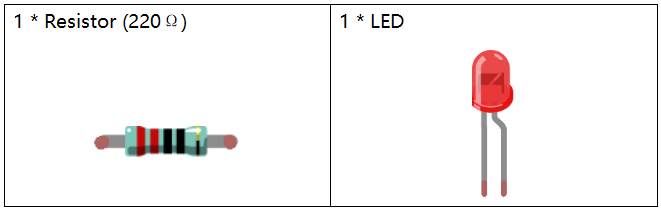
Newly Added Components
Principle
PWM
Pulse Width Modulation, or PWM, is a technique for getting analog results with digital means. Digital control is used to create a square wave, a signal switched between on and off. This on-off pattern can simulate voltages in between full on (5 Volts) and off (0 Volts) by changing the portion of the time the signal spends on versus the time that the signal spends off. The duration of “on time” is called pulse width. To get varying analog values, you can change or modulate this width. If you repeat this on-off pattern fast enough with some device, an LED for example, the result would be like this: the signal is a steady voltage between 0 and 5v controlling the brightness of the LED.
Duty Cycle
A duty cycle is the percentage of one period in which a signal is active. A period is the time it takes for a signal to complete an on-and-off cycle. As a formula, a duty cycle may be expressed as:
D=T/Px100%
Where is the duty cycle, is the time the signal is active, and is the total period of the signal. Thus, a 60% duty cycle means the signal is on 60% of the time but off 40% of the time. The “on time” for a 60% duty cycle could be a fraction of a second, a day, or even a week, depending on the length of the period.

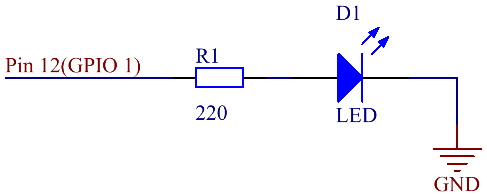
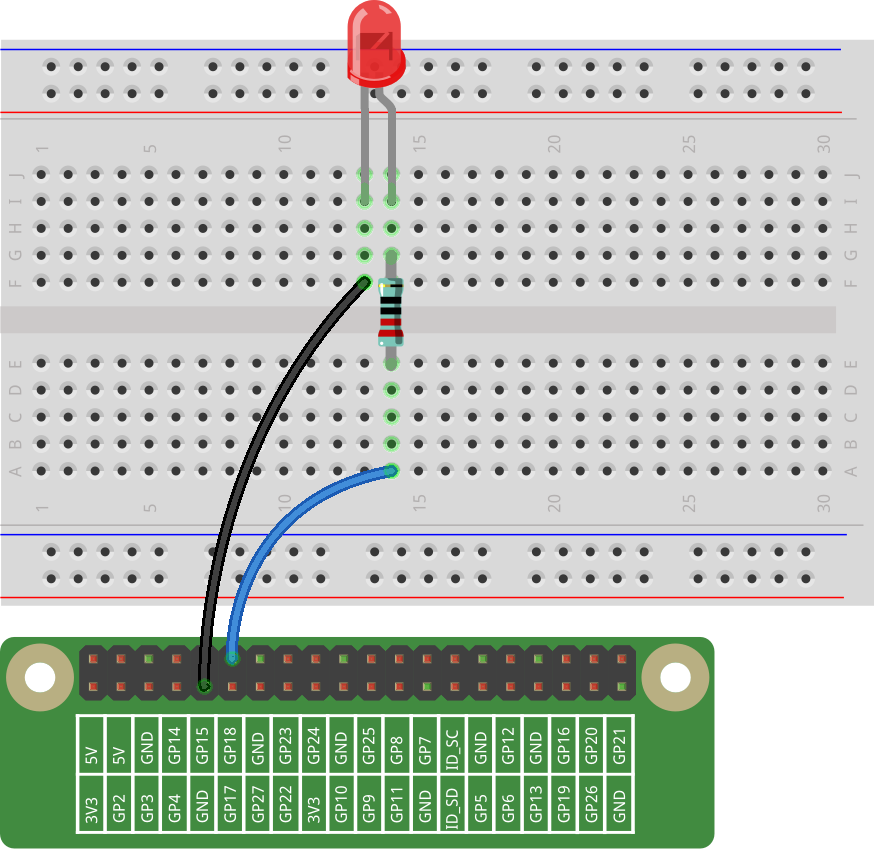
Schematic Diagram
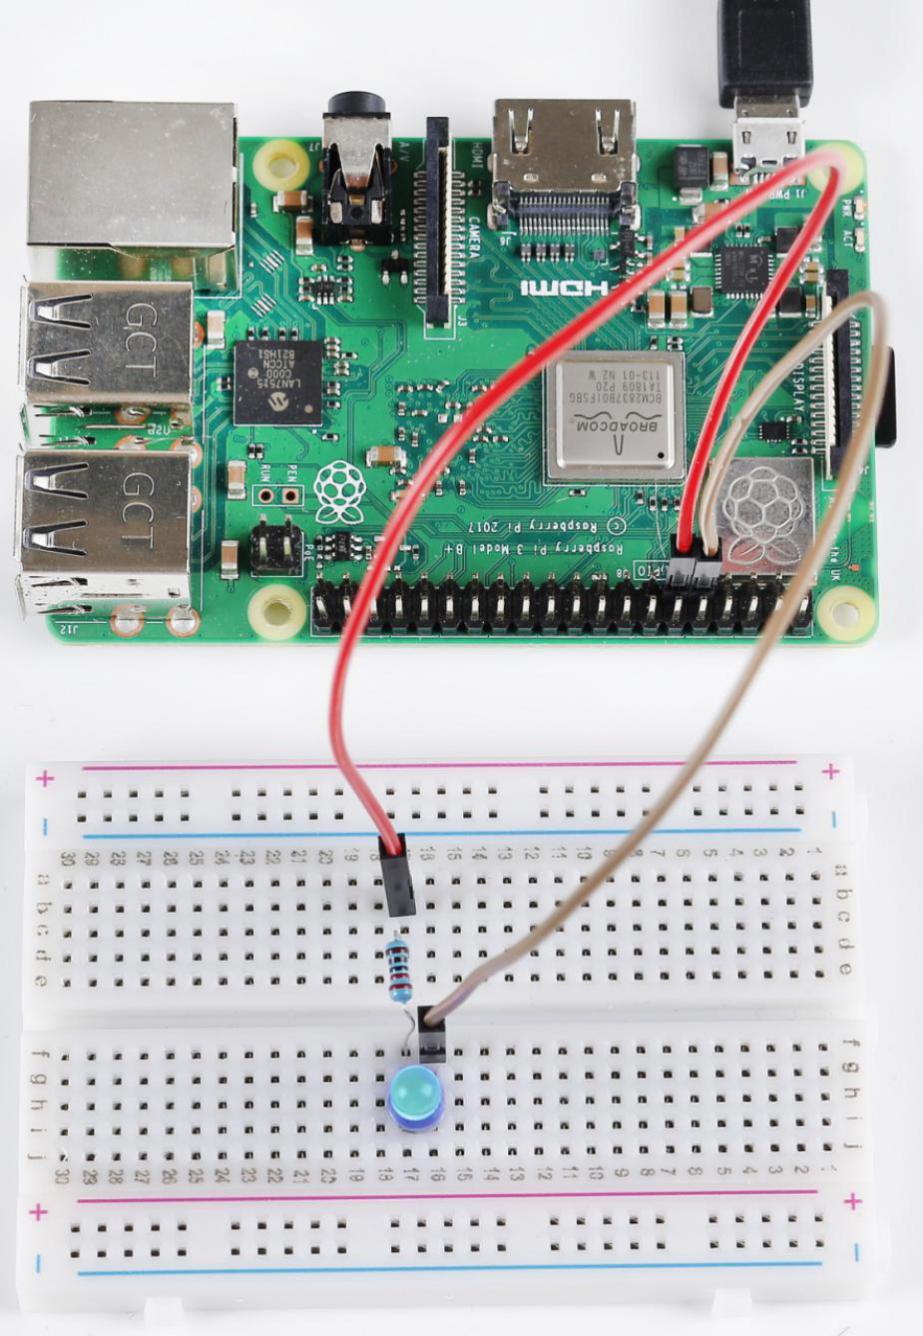
Build the Circuit
For C Language Users:
Command
1. Go to the folder of the code.
cd /home/pi/electronic-kit/for-raspberry-pi/c/Lesson_3_BreathingLed
2. Compile the code.
gcc 3_BreathingLed.c -lwiringPi
3. Run the executable file.
sudo ./a.out
As the code runs, you can see that the brightness of the LED becomes stronger or weaker.
Note
If it does not work after running, or there is an error prompt: "wiringPi.h: No such file or directory", please refer to C code is not working?.
Code
#include <stdio.h>
#include <wiringPi.h>
#include <softPwm.h>

#define LedPin 1

int main (void)
{
// When initialize wiring failed, print message to screen
    if(wiringPiSetup() == -1){
        printf("setup wiringPi failed !");
        return 1;
    }

    softPwmCreate(LedPin,  0, 100);

    int i;

    while(1) // loop forever
    {
        for(i=0;i<100;i++){  // i,as the value of pwm, increases progressively during 0-1024.
            softPwmWrite(LedPin, i);
            delay(10);
        }

        for(i=100;i>=0;i--){
            softPwmWrite(LedPin, i);
            delay(10);
        }
    }
    return 0 ;
}
Code Explanation
#include <softPwm.h>
WiringPi includes a software-driven PWM library of outputting a PWM signal on any of the Raspberry Pi’s GPIO pins. To maintain a low CPU usage, the minimum pulse width is 100μS. That combined with the default suggested range of 100 gives a PWM frequency of 100Hz. Within these limitations, control of a light/LED or a motor is very achievable.
15. softPwmCreate(LedPin, 0, 100);
The function is to use software library to create a PWM pin, set its period between 0x100us-100x100us. The prototype of the function softPwmCreate(LedPinRed, 0, 100) is as follows:
int softPwmCreate(int pin,int initialValue,int pwmRange);
pin: Any GPIO pin of Raspberry Pi can be set as a PWM pin.
initialValue: The initial pulse width is that initialValue times100us.
pwmRange: The period of PWM is that pwmRange times100us.
22. softPwmWrite(LedPin, i);
The function is used to write the PWM value i to the LedPin.
The prototype of the function softPwmWrite(LedPinBlue, b_val) is as follows:
void softPwmWrite (int pin, int value) ;
pin: Any GPIO pin of Raspberry Pi can be set as a PWM pin.
Value: The pulse width of PWM is value times 100us. Note that value can only be less than pwmRange defined previously, if it is larger than pwmRange, the value will be given a fixed value, pwmRange.
23. delay(10);
Wait for 10ms, interval time between the changes indicates the speed of breathing.
For Python Language Users
Command
1. Go to the folder of the code.
cd /home/pi/electronic-kit/for-raspberry-pi/python
2. Run the code.
sudo python3 3_BreathingLed.py
As the code runs, you can see that the brightness of the LED becomes stronger or weaker.
Code
Note
You can Modify/Reset/Copy/Run/Stop the code below. But before that, you need to go to source code path like electronic-kit/for-raspberry-pi/python. After modifying the code, you can run it directly to see the effect.
import RPi.GPIO as GPIO
import time
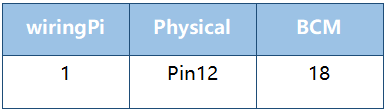
LedPin = 18
def setup():
global pLed
GPIO.setmode(GPIO.BCM)
GPIO.setup(LedPin, GPIO.OUT, initial=GPIO.LOW)
pLed = GPIO.PWM(LedPin, 1000)
pLed.start(0)
def main():
# Set increase/decrease step
step =2
delay = 0.05
while True:
# Increase duty cycle from 0 to 100
for dc in range(0, 101, step):
pLed.ChangeDutyCycle(dc)
print (' ++ Duty cycle: %s'%dc)
time.sleep(delay)
time.sleep(1)
# decrease duty cycle from 100 to 0
for dc in range(100, -1, -step):
# Change duty cycle to dc
pLed.ChangeDutyCycle(dc)
print (' -- Duty cycle: %s'%dc)
time.sleep(delay)
time.sleep(1)
def destroy():
# Stop pLed
pLed.stop()
# Turn off LED
GPIO.output(LedPin, GPIO.LOW)
# Release resource
GPIO.cleanup()
# If run this script directly, do:
if __name__ == '__main__':
setup()
try:
main()
# When 'Ctrl+C' is pressed, the child program
# destroy() will be executed.
except KeyboardInterrupt:
destroy()
Code Explanation
10. pLed = GPIO.PWM(LedPin, 1000)
To create a PWM instance. Set pLed as pwm output and frequence to 1K Hz.
11. pLed.start(0)
Set pLed begin with value 0.
19.        for dc in range(0, 101, step):
20.            # Change duty cycle to dc
21.            pLed.ChangeDutyCycle(dc)
22.            print (' ++ Duty cycle: %s'%dc)
23.            time.sleep(delay)
Increase the duty cycle by 2 at a time, from 0 to 101, and you’ll see the LED getting brighter and brighter.
26. for dc in range(100, -1, -step):
27.            pLed.ChangeDutyCycle(dc)
28.            print ('  -- Duty cycle: %s'%dc)
29.            time.sleep(delay)
Similarly, when the duty cycle is reduced by 2 from 100 to -1, the LED brightness will be dimmer and dimmer.
Phenomenon Picture