Lesson 10 Active Buzzer
Introduction
A buzzer is a great tool in your experiments whenever you want to make sounds.
Newly Added Components

Principle
As a type of electronic buzzer with an integrated structure, buzzers, which are supplied by DC power, are widely used in computers, printers, photocopiers, alarms, electronic toys, automotive electronic devices, telephones, timers and other electronic products or voice devices. Buzzers can be categorized as active and passive ones (see the following picture). Turn the buzzer so that its pins are facing up, and the buzzers with a green circuit board is a passive buzzer, while the one enclosed with a black tape is an active one.
The difference between an active buzzer and a passive buzzer:

An active buzzer has a built-in oscillating source, so it will make sounds when electrified. But a passive buzzer does not have such source, so it will not tweet if DC signals are used; instead, you need to use square waves whose frequency is between 2K and 5K to drive it. The active buzzer is often more expensive than the passive one because of multiple built-in oscillating circuits.
In this experiment, we use an active buzzer.
Schematic Diagram
When Pin11 is input into high voltage, the transistor will be switched on, and the collector will output low level. When there is a level difference between the two pins of the buzzer, the buzzer is ringing. When Pin11 inputs low power level, the transistor is cut off and the collector is at high level, here, both ends of the buzzer are at high level, the buzzer will be silent.

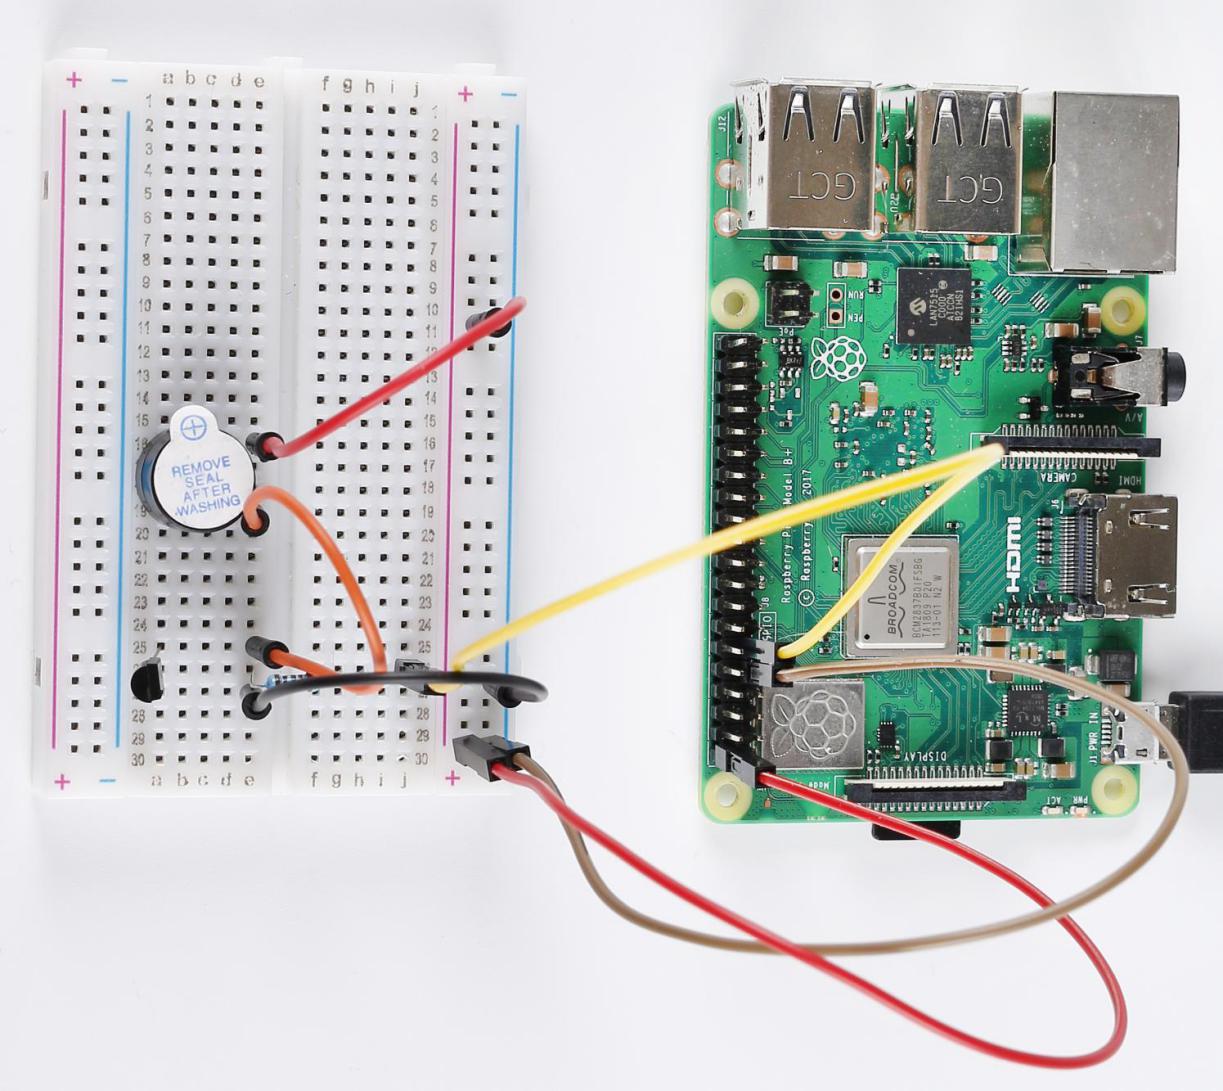
Build the Circuit

For C Language Users
Command
Go to the folder of the code.
cd /home/pi/electronic-kit/for-raspberry-pi/c/Lesson_10_ActiveBuzzer
Compile the code.
gcc 10_ActiveBuzzer.c -lwiringPi
Run the executable file.
sudo ./a.out
Now, you may hear the buzzer beep.
Note
If it does not work after running, or there is an error prompt: “wiringPi.h: No such file or directory”, please refer to C code is not working?.
Code
#include <wiringPi.h>
#include <stdio.h>

#define BeepPin 0

int main(void){
    if(wiringPiSetup() == -1){ //when initialize wiring failed, print message to screen
        printf("setup wiringPi failed !");
        return 1;
    }

    pinMode(BeepPin, OUTPUT);

    while(1){
        //beep on
        digitalWrite(BeepPin, HIGH);
        delay(100);
        //beep off
        digitalWrite(BeepPin, LOW);
        delay(100);
    }
    return 0;
}
Code Explanation
12. pinMode(BeepPin, OUTPUT);
Set the pin connected to the buzzer to OUTPUT mode.
16. digitalWrite(BeepPin, HIGH);
When BeepPin is at high level, the base pin(b pin) of the connected transistor inputs high level and the collector pin(c pin) output low level. That is, when the cathode of the buzzer is at low level and the anode of the buzzer is connected to a 5V high level, the buzzer sounds.
19. digitalWrite(BeepPin, LOW);
The BeepPin is connected to the transistor and then to the cathode of the buzzer. When BeepPin is low level, the base pin (b pin) of the connected transistor inputs low level, then the collector pin(c pin) outputs high level; that is, when the level at both ends of the connected buzzer is high, the buzzer is silent.
For Python Language Users
Command
1. Go to the folder of the code.
cd /home/pi/electronic-kit/for-raspberry-pi/python
2. Run the code.
sudo python3 10_ActiveBuzzer.py
Now, you should hear the buzzer beep.
Code
Note
You can Modify/Reset/Copy/Run/Stop the code below. But before that, you need to go to source code path like electronic-kit/for-raspberry-pi/python. After modifying the code, you can run it directly to see the effect.
import RPi.GPIO as GPIO
import time

BeepPin = 17

def setup():
    GPIO.setmode(GPIO.BCM)
    GPIO.setup(BeepPin, GPIO.OUT, initial=GPIO.LOW)

def main():
    while True:
        # Buzzer on (Beep)
        GPIO.output(BeepPin, GPIO.HIGH)
        time.sleep(0.1)
        # Buzzer off
        GPIO.output(BeepPin, GPIO.LOW)
        time.sleep(0.1)

def destroy():
    # Turn off buzzer
    GPIO.output(BeepPin, GPIO.LOW)
    # Release resource
    GPIO.cleanup()

# If run this script directly, do:
if __name__ == '__main__':
    setup()
    try:
        main()
    # When 'Ctrl+C' is pressed, the child program
    # destroy() will be  executed.
    except KeyboardInterrupt:
        destroy()
Code Explanation
1. GPIO.setup(BeepPin, GPIO.OUT, initial=GPIO.LOW)
Initialize the pin connected to the buzzer to output mode and set it to the default low level.
1. GPIO.output(BeepPin, GPIO.HIGH)
The BeepPin is connected to the transistor and then to the cathode of the buzzer. When BeepPin is at high level, the base pin(b pin) of the connected transistor inputs high level, then the collector pin(c pin) outputs low level; that is, when the cathode of the buzzer is at low level and the anode of the buzzer is connected to a 5V high level, the buzzer sounds.
1. GPIO.output(BeepPin, GPIO.LOW)
When BeepPin is at low level, the base pin(b pin) of the connected transistor inputs low level, then the collector pin(c pin) outputs high level; that is, when the level at both ends of the connected buzzer is high, the buzzer is silent.
Phenomenon Picture
