Note
Hello, welcome to the SunFounder Raspberry Pi & Arduino & ESP32 Enthusiasts Community on Facebook! Dive deeper into Raspberry Pi, Arduino, and ESP32 with fellow enthusiasts.
Why Join?
Expert Support: Solve post-sale issues and technical challenges with help from our community and team.
Learn & Share: Exchange tips and tutorials to enhance your skills.
Exclusive Previews: Get early access to new product announcements and sneak peeks.
Special Discounts: Enjoy exclusive discounts on our newest products.
Festive Promotions and Giveaways: Take part in giveaways and holiday promotions.
👉 Ready to explore and create with us? Click [here] and join today!
Lesson 14 Quiz Buzzer System
Introduction
In quiz shows, especially entertainment activities (e.g. competitive answering activities), organizers often apply a quiz buzzer system in order to accurately, fairly and visually determine the seat number of a responder. In this lesson, we will use some buttons, buzzers, and LEDs to make a quiz buzzer system.
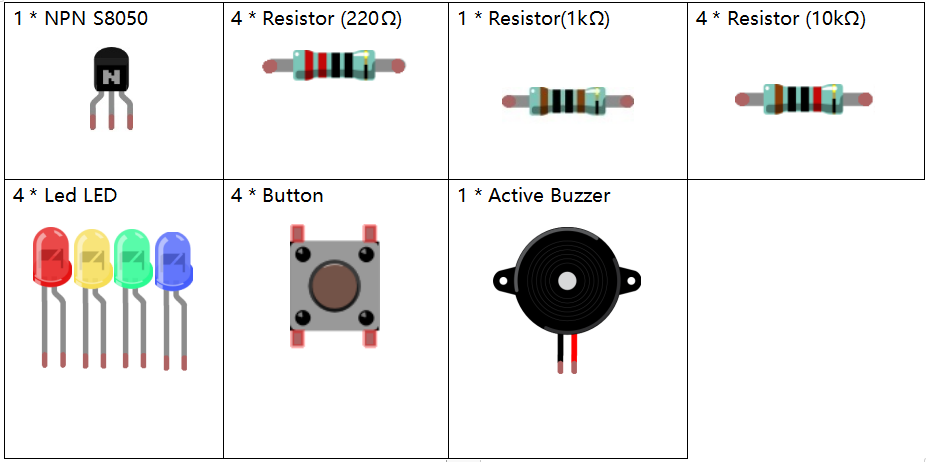
Newly Added Components
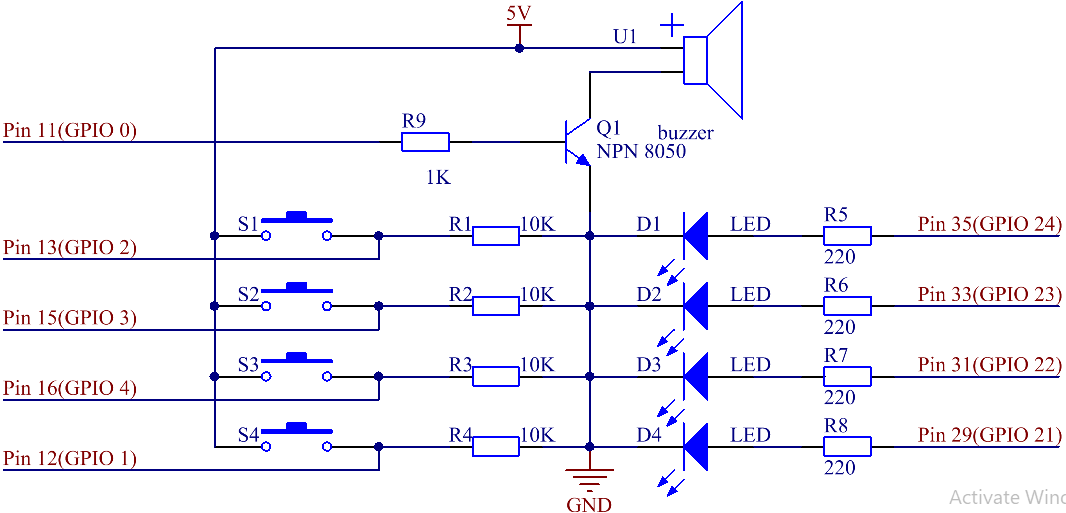
Schematic Diagram
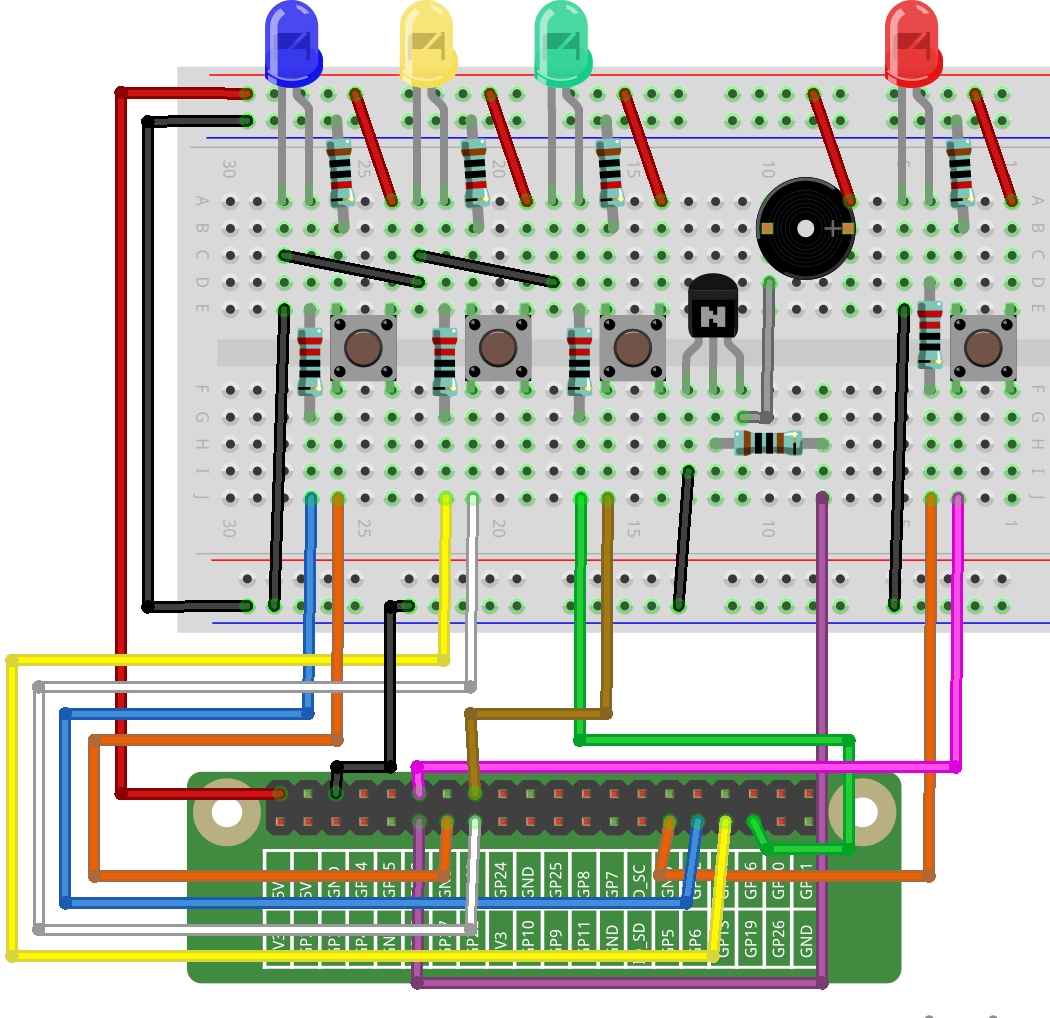
Button 2, 3 and 4 are answer buttons, and button 1 is the reset button. If button 2 is pressed first, the buzzer will beep, the corresponding LED will light up and all the other LEDs will go out. If you want to start another round, press button 1 to reset.
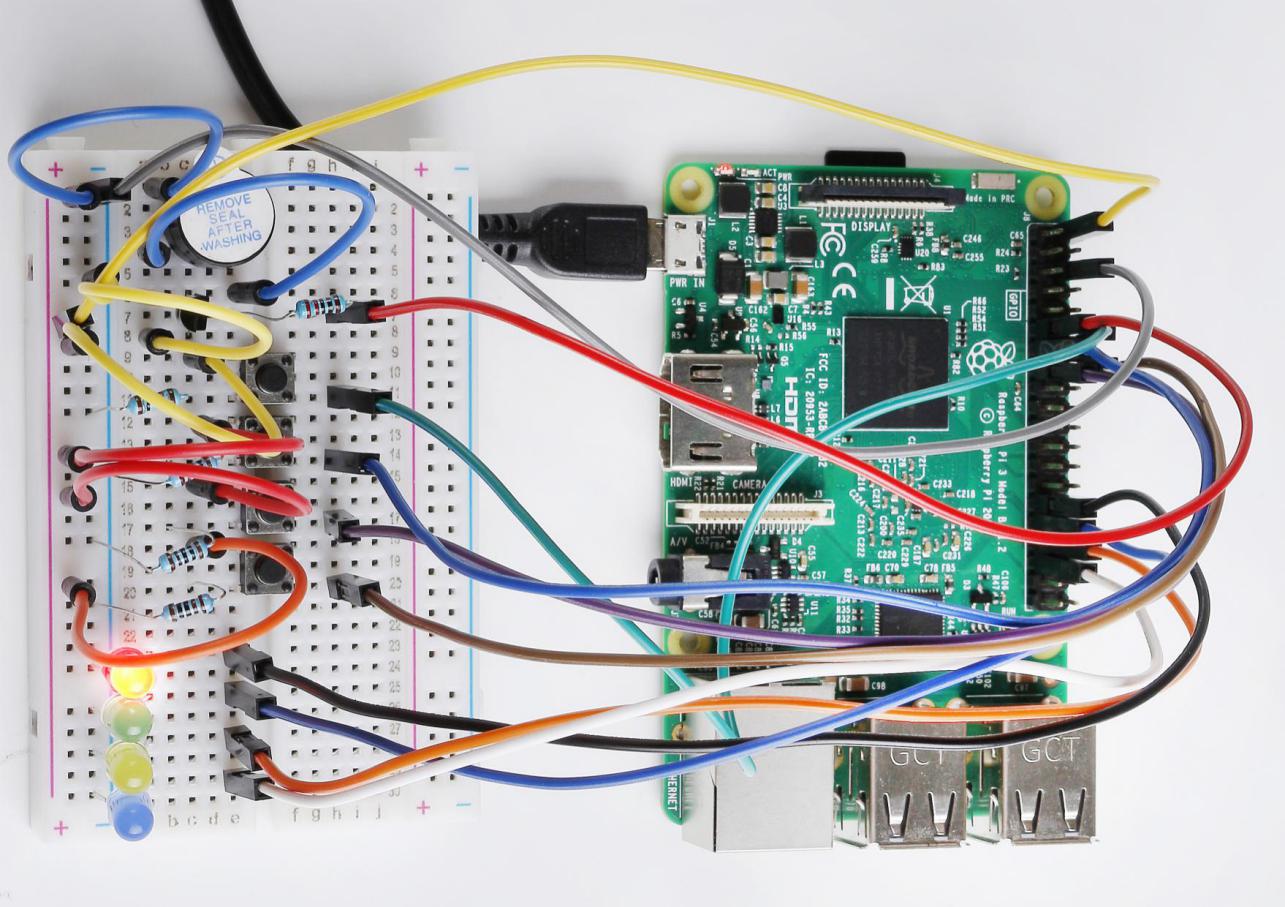
Build the Circuit
For C Language Users
Command
1. Go to the folder of the code.
cd /home/pi/electronic-kit/for-raspberry-pi/c/Lesson_14_AnswerMachine
2. Compile the code.
gcc 14_AnswerMachine.c -lwiringPi
3. Run the executable file.
sudo ./a.out
Now, first press button 4 to get started. If you press button 1 first, you will see the corresponding LED light up and the buzzer will beep. Then press button 4 again to reset before you press other buttons.
Note
If it does not work after running, or there is an error prompt: "wiringPi.h: No such file or directory", please refer to C code is not working?.
Code
#include <wiringPi.h>
#include <stdio.h>

#define BeepPin 0
#define ResetBtnPin 1
const int BtnPin[] = {2,3,4};
const int LedPin[] = {21,22,23,24};

void Alarm()
{
    for(int i=0;i<50;i++){
    digitalWrite(BeepPin,HIGH); //the buzzer sound
    delay(2); //delay 2ms
    digitalWrite(BeepPin,LOW);  //without sound
    delay(2);
  }
}

int main(void){
    if(wiringPiSetup() == -1){ //when initialize wiring failed, print message to screen
        printf("setup wiringPi failed !");
        return 1;
    }

    pinMode(BeepPin, OUTPUT);
    for(int j=1;j<4;j++)
    {
        pinMode(LedPin[j], OUTPUT);
        digitalWrite(LedPin[j],LOW);
    }
    pinMode(LedPin[0], OUTPUT);
    digitalWrite(LedPin[0],HIGH);
    for(int k;k<3;k++)
    {
        pinMode(BtnPin[k], INPUT);
    }

    int flag = 1;

    while(1){
        // if reset button is pressed
        if(digitalRead(ResetBtnPin) == 1)
        {
            flag = 1;
            digitalWrite(LedPin[0], HIGH);//Reset Led turns on
            digitalWrite(LedPin[1],LOW);
            digitalWrite(LedPin[2],LOW);
            digitalWrite(LedPin[3],LOW);
        }
        if(flag==1)
        {
            //If the button1 press the first
            if(digitalRead(BtnPin[0]) == 1)
            {
                flag = 0;
                digitalWrite(LedPin[0],LOW);
                Alarm();  //buzzer sound
                digitalWrite(LedPin[1],HIGH);//turn the LED1 on only
                digitalWrite(LedPin[2],LOW);
                digitalWrite(LedPin[3],LOW);
                while(digitalRead(ResetBtnPin));
            }
            if(digitalRead(BtnPin[1]) == 1)
            {
                flag = 0;
                digitalWrite(LedPin[0],LOW);
                Alarm();  //buzzer sound
                digitalWrite(LedPin[1],LOW);
                digitalWrite(LedPin[2],HIGH);//turn the LED2 on only
                digitalWrite(LedPin[3],LOW);
                while(digitalRead(ResetBtnPin));
            }
            if(digitalRead(BtnPin[2]) == 1)
            {
                flag = 0;
                digitalWrite(LedPin[0],LOW);
                Alarm();  //buzzer sound
                digitalWrite(LedPin[1],LOW);
                digitalWrite(LedPin[2],LOW);
                digitalWrite(LedPin[3],HIGH);//turn the LED3 on only
                while(digitalRead(ResetBtnPin));
            }
        }
    }
    return 0;
}
Code Explanation
9. void Alarm()
10.{
11.    for(int i=0;i<50;i++){
12.    digitalWrite(BeepPin,HIGH); //the buzzer sound
13.    delay(2);
14.    digitalWrite(BeepPin,LOW);  //without sound
15.    delay(2);
16.  }
17.}
Define a function to control the buzzer. The buzzer rings when this function is called in the main function.
38. int flag = 1;
Define a flag to judge whether the answer device is in the state of answering. When flag = 0, it indicates that someone is currently scrambling, and others cannot continue to answer first; when flag = 1, it means that the reset button has been pressed, and a new round of answer rush can be conducted.
42.        if(digitalRead(ResetBtnPin) == 1)
43.        {
44.            flag = 1;
45.            digitalWrite(LedPin[0], HIGH);//Reset Led turns on
46.            digitalWrite(LedPin[1],LOW);
47.            digitalWrite(LedPin[2],LOW);
48.            digitalWrite(LedPin[3],LOW);
49.        }
If the reset button is detected to have been pressed, it means that the answer begins. Now set flag to 1 and let the referee LED light up, the rest of the LED lights out.
53.            if(digitalRead(BtnPin[0]) == 1)
54.            {
55.                flag = 0;
56.                digitalWrite(LedPin[0],LOW);
57.                Alarm();  //buzzer sound
58.                digitalWrite(LedPin[1],HIGH);//turn the LED1 on only
59.                digitalWrite(LedPin[2],LOW);
60.                digitalWrite(LedPin[3],LOW);
61.                while(digitalRead(ResetBtnPin));
62.            }
In the process of quick answering, if the first button is recognized to have been pressed, the flag is set to 0, and then no other buttons are detected. At this time, the buzzer alarms, indicating that someone has successfully responsed, and the corresponding LED lights up. The identification codes of the remaining buttons are explained as above.
61. while(digitalRead(ResetBtnPin));
Having executed the instruction of successful quick answer, it enters the loop to judge whether the button reset is pressed. Here, if the button reset is pressed, then the next round of quickfire answering begins.
For Python Language Users
Command
1. Go to the folder of the code.
cd /home/pi/electronic-kit/for-raspberry-pi/python
2. Run the code.
sudo python3 14_AnswerMachine.py
Now, first press button 4 to get started. If you press button 1 first, you will see the corresponding LED light up and the buzzer will beep. Then press button 4 again to reset before you press other buttons.
Code
Note
You can Modify/Reset/Copy/Run/Stop the code below. But before that, you need to go to source code path like electronic-kit/for-raspberry-pi/python. After modifying the code, you can run it directly to see the effect.
import RPi.GPIO as GPIO
import time

BeepPin = 17
ResetBtnPin = 18
BtnPin =(27,22,23)
LedPin =(5,6,13,19)

def setup():
    GPIO.setmode(GPIO.BCM)
    GPIO.setup(BeepPin, GPIO.OUT, initial=GPIO.LOW)
    GPIO.setup(ResetBtnPin, GPIO.IN)
    GPIO.setup(LedPin[0], GPIO.OUT, initial=GPIO.HIGH)
    for i in range(1,4):
        GPIO.setup(LedPin[i], GPIO.OUT, initial=GPIO.LOW)
    for i in range(0,3):
        GPIO.setup(BtnPin[i], GPIO.IN)

def Alarm():
    for i in range(0,50):
        GPIO.output(BeepPin,GPIO.HIGH)
        time.sleep(0.003)
        GPIO.output(BeepPin,GPIO.LOW)
        time.sleep(0.003)

def loop():
    flag = 1
    while True:
        if GPIO.input(ResetBtnPin) == 1:
            flag = 1
            GPIO.output(LedPin[0],GPIO.HIGH)
            GPIO.output(LedPin[1],GPIO.LOW)
            GPIO.output(LedPin[2],GPIO.LOW)
            GPIO.output(LedPin[3],GPIO.LOW)
        if flag == 1:
            if GPIO.input(BtnPin[0]) == 1:
                flag = 0
                GPIO.output(LedPin[0],GPIO.LOW)
                Alarm()
                GPIO.output(LedPin[1],GPIO.HIGH)
                GPIO.output(LedPin[2],GPIO.LOW)
                GPIO.output(LedPin[3],GPIO.LOW)
            elif GPIO.input(BtnPin[1]) == 1:
                flag = 0
                GPIO.output(LedPin[0],GPIO.LOW)
                Alarm()
                GPIO.output(LedPin[1],GPIO.LOW)
                GPIO.output(LedPin[2],GPIO.HIGH)
                GPIO.output(LedPin[3],GPIO.LOW)
            elif GPIO.input(BtnPin[2]) == 1:
                flag = 0
                GPIO.output(LedPin[0],GPIO.LOW)
                Alarm()
                GPIO.output(LedPin[1],GPIO.LOW)
                GPIO.output(LedPin[2],GPIO.LOW)
                GPIO.output(LedPin[3],GPIO.HIGH)

def destroy():
    # Turn off buzzer
    GPIO.output(BeepPin, GPIO.LOW)
    GPIO.output(LedPin[0],GPIO.LOW)
    GPIO.output(LedPin[1],GPIO.LOW)
    GPIO.output(LedPin[2],GPIO.LOW)
    GPIO.output(LedPin[3],GPIO.HIGH)
    # Release resource
    GPIO.cleanup()

# If run this script directly, do:
if __name__ == '__main__':
    setup()
    try:
        loop()
    # When 'Ctrl+C' is pressed, the child program
    # destroy() will be  executed.
    except KeyboardInterrupt:
        destroy()
Code Explanation
19.def Alarm():
20.    for i in range(0,50):
21.        GPIO.output(BeepPin,GPIO.HIGH)
22.        time.sleep(0.003)
23.        GPIO.output(BeepPin,GPIO.LOW)
24.        time.sleep(0.003)
Define a function to control the buzzer. The buzzer rings when this function is called in the function main.
27. flag = 1
Define a flag bit to judge whether the responder is in the state of answering. When flag = 0, it indicates that someone is currently scrambling, and others cannot continue to answer first; when flag = 1, it means that the reset button has been pressed, and a new round of answer rush can be conducted.
29.        if GPIO.input(ResetBtnPin) == 1:
30.            flag = 1
31.            GPIO.output(LedPin[0],GPIO.HIGH)
32.            GPIO.output(LedPin[1],GPIO.LOW)
33.            GPIO.output(LedPin[2],GPIO.LOW)
34.            GPIO.output(LedPin[3],GPIO.LOW)
If the recognition that reset button has been pressed is done, it means that answer begins. Now, set flag to 1, and let the referee LED light up, other LEDs light out.
36.            if GPIO.input(BtnPin[0]) == 1:
37.                flag = 0
38.                GPIO.output(LedPin[0],GPIO.LOW)
39.                Alarm()
40.                GPIO.output(LedPin[1],GPIO.HIGH)
41.                GPIO.output(LedPin[2],GPIO.LOW)
42.                GPIO.output(LedPin[3],GPIO.LOW)
In the process of quick answering, if the first button is recognized to have been pressed, the flag is set to 0, and then no other buttons are detected. At this time, the buzzer alarms, indicating that there is a successful response, and the corresponding LED lights up. The identification codes of the remaining buttons are explained as above.
Phenomenon Picture