Note
Hello, welcome to the SunFounder Raspberry Pi & Arduino & ESP32 Enthusiasts Community on Facebook! Dive deeper into Raspberry Pi, Arduino, and ESP32 with fellow enthusiasts.
Why Join?
Expert Support: Solve post-sale issues and technical challenges with help from our community and team.
Learn & Share: Exchange tips and tutorials to enhance your skills.
Exclusive Previews: Get early access to new product announcements and sneak peeks.
Special Discounts: Enjoy exclusive discounts on our newest products.
Festive Promotions and Giveaways: Take part in giveaways and holiday promotions.
👉 Ready to explore and create with us? Click [here] and join today!
Lesson 13 Button Piano
Introduction
In our past lesson, we learned how to use PWM waves to drive a passive buzzer to ring. In this lesson, we make a simple keyboard by applying a passive buzzer. Let’s get started!
Newly Added Components

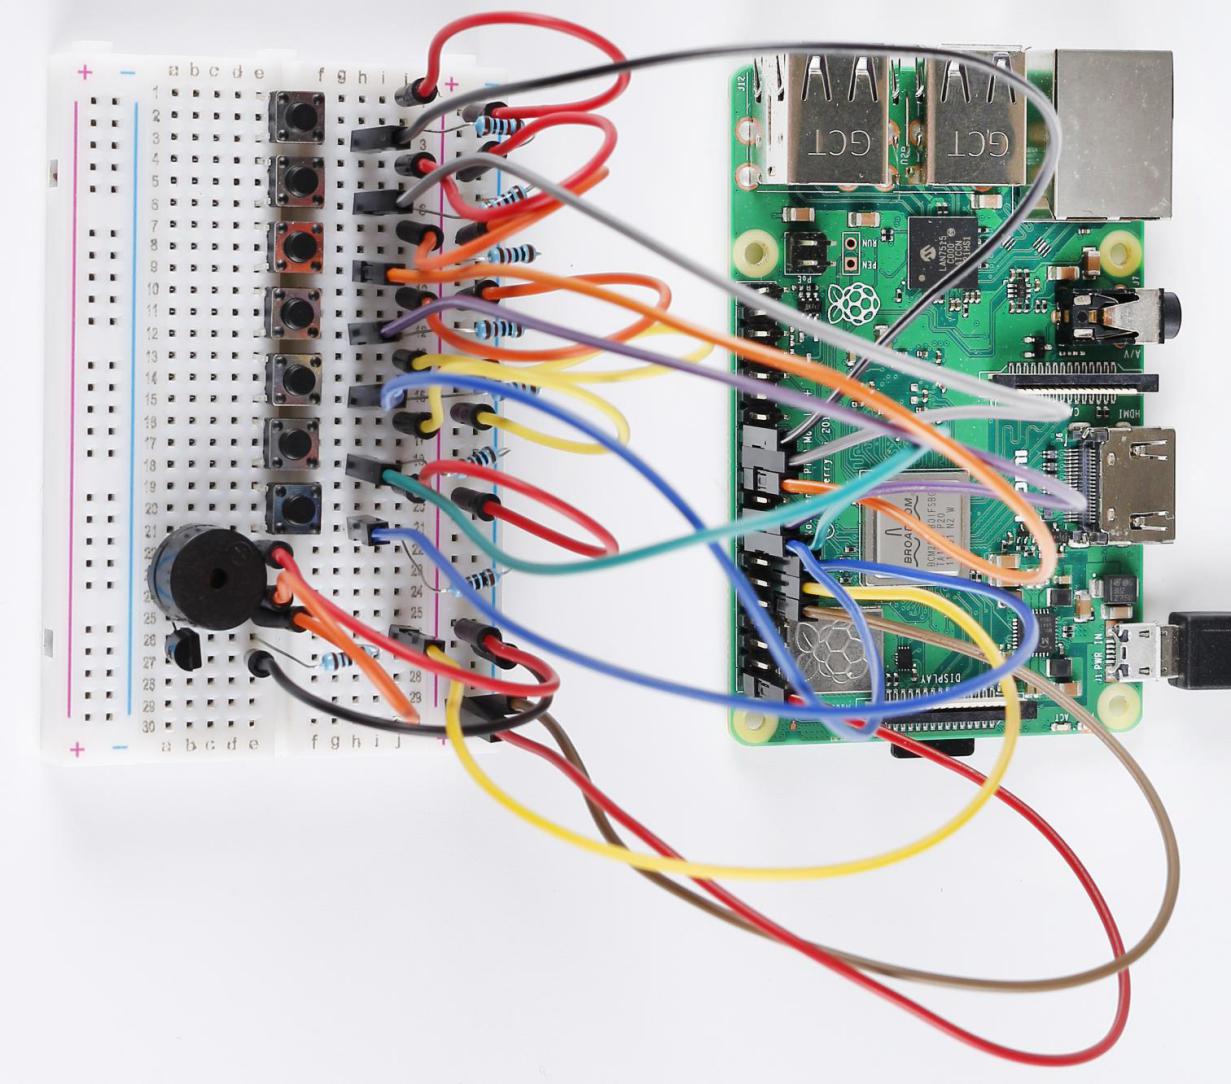
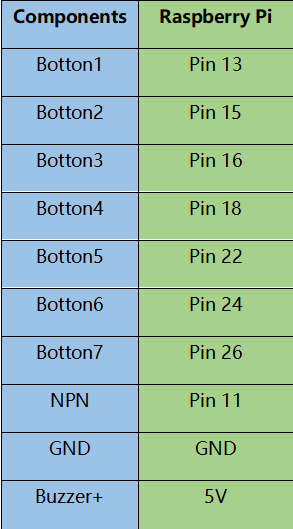
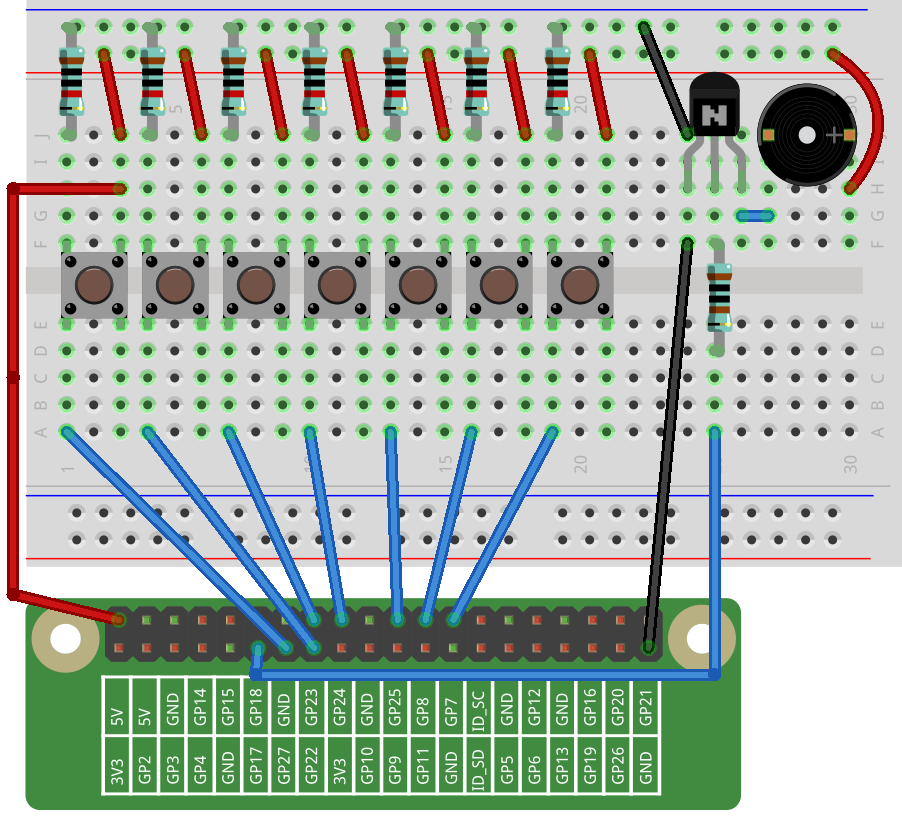
Schematic Diagram


Build the Circuit
For C Language Users
Command
1. Go to the folder of the code.
cd /home/pi/electronic-kit/for-raspberry-pi/c/Lesson_13_Button_Piano
2. Compile the code.
gcc 13_ButtonPiano.c -lwiringPi
3. Run the executable file.
sudo ./a.out
Now press the seven buttons, and the buzzer will emit the notes: DO, RE, MI, FA, SO, LA, TI. You can play a song with these seven buttons.
Note
If it does not work after running, or there is an error prompt: "wiringPi.h: No such file or directory", please refer to C code is not working?.
Code
#include <wiringPi.h>
#include <softTone.h>
#include <stdio.h>

#define BuzPin    0

const int Tone[] = {262,294,330,350,393,441,495};//define DO, RE, MI, FA, SO, LA, TI
int beat[] = {1,1,1,1,1,1,1};
const int Btn[] = {2,3,4,5,6,10,11};//define 7 buttons

int main(void)
{
    int i, j;

    if(wiringPiSetup() == -1){ //when initialize wiring failed,print message to screen
        printf("setup wiringPi failed !");
        return 1;
    }

    if(softToneCreate(BuzPin) == -1){
        printf("setup softTone failed !");
        return 1;
    }

    //set the buttons mode
    for(int j=0;j<7;j++)
    {
        pinMode(Btn[j], INPUT);
    }

    while(1){
        //printf("Please press button to play the piano\n");
        // Indicate that button has pressed down
        for(i=0;i<7;i++)
        {
            if(digitalRead(Btn[i])==1)
            {
                delay(10);//Prevent the button' s vibration
                if(digitalRead(Btn[i])==1)
                {
                    softToneWrite(BuzPin, Tone[i]);
                    delay(beat[i]*250);
                    printf("1");
                }
            }
            else
                softToneWrite(BuzPin, 0);
            if(i==7)
                i=0;
        }
    }
    return 0;
}
Code Explanation
7.  const int Tone[] = {262,294,330,350,393,441,495};
8.  int beat[] = {1,1,1,1,1,1,1};
In the array Tone[], define the frequencies of DO, RE, MI, FA, SO, LA, TI and the number in beat[] refers to the beat of each note in this song(0.5s for each beat).
26.    for(int j=0;j<7;j++)
27.    {
28.        pinMode(Btn[j], INPUT);
29.    }
Set the mode of all buttons to input mode in the for loop.
34.        for(i=0;i<7;i++)
35.        {
36.            if(digitalRead(Btn[i])==1)
37.            {
38.                delay(10);//Prevent the button' s vibration
39.                if(digitalRead(Btn[i])==1)
40.                {
41.                    softToneWrite(BuzPin, Tone[i]);
42.                    delay(beat[i]*250);
43.                    printf("1");
44.                }
45.            }
Use a for loop to check all the buttons. When one button in array Btn[i] is detected to be pressed, the buzzer will respond to the corresponding note in array Tone[i].
46.            else
47.                softToneWrite(BuzPin, 0);
48.            if(i==7)
49.                i=0;
50.        }
If no button is pressed, turn off the buzzer.
For Python Language Users
Command
1. Go to the folder of the code.
cd /home/pi/electronic-kit/for-raspberry-pi/python
2. Run the code.
sudo python3 13_ButtonPiano.py
Now press the seven buttons, and the buzzer will emit the notes: DO, RE, MI, FA, SO, LA, TI. You can play a song with these seven buttons.
Code
Note
You can Modify/Reset/Copy/Run/Stop the code below. But before that, you need to go to source code path like electronic-kit/for-raspberry-pi/python. After modifying the code, you can run it directly to see the effect.
import RPi.GPIO as GPIO
import time

Buzzer = 17
BtnPin = [18,27,22,23,24,25,8,7]

CL = [0, 131, 147, 165, 175, 196, 211, 248]        # Frequency of Low C notes
CM = [0, 262, 294, 330, 350, 393, 441, 495]        # Frequency of Middle C notes
CH = [1, 525, 589, 661, 700, 786, 882, 990]        # Frequency of High C notes

song = [     0,CM[1],CM[2],CM[3],CM[4],CM[5],CM[6],CM[7]    ]
beat = [    1,1, 1, 1, 1, 1, 1,  1]

def setup():
    GPIO.setmode(GPIO.BCM)
    for i in range(1, len(BtnPin)):
        GPIO.setup(BtnPin[i],GPIO.IN)
    GPIO.setup(Buzzer, GPIO.OUT)

def loop():
    global Buzz
    while True:
        #print ('\n    Please playing piano...')
        for i in range(1, len(BtnPin)):
            if GPIO.input(BtnPin[i]) == 1:
                Buzz = GPIO.PWM(Buzzer, song[i])
                Buzz.start(50)
                time.sleep(beat[i] * 0.25)
                Buzz.stop()

def destory():
    Buzz.stop()
    GPIO.output(Buzzer, 0)
    GPIO.cleanup()

if __name__ == '__main__':        # Program start from here
    setup()
    try:
        loop()
    except KeyboardInterrupt:      # When 'Ctrl+C' is pressed, the child program destroy() will be  executed.
        destory()
Code Explanation
7.CL = [0, 131, 147, 165, 175, 196, 211, 248]        # Frequency of Low C notes
8.CM = [0, 262, 294, 330, 350, 393, 441, 495]        # Frequency of Middle C notes
9.CH = [1, 525, 589, 661, 700, 786, 882, 990]        # Frequency of High C notes
These are the frequencies of each note. The first 0 is to skip CL[0] so that the number CL[1]-CL[7] corresponds to the CDEFGAB of the note.
10.song = [     0,CM[1],CM[2],CM[3],CM[4],CM[5],CM[6],CM[7]    ]
11.beat = [    1,1, 1, 1, 1, 1, 1,  1]
Define a section of music and the corresponding beats. The number in beat[] refers to the beat of each note in the song(0.5s for each beat).
16.   for i in range(1, len(BtnPin)):
17.        GPIO.setup(BtnPin[i],GPIO.IN)
Set the mode of all buttons to input mode in the for loop.
24.        for i in range(1, len(BtnPin)):
25.            if GPIO.input(BtnPin[i]) == 1:
26.                Buzz = GPIO.PWM(Buzzer, song[i])
27.                Buzz.start(50)
28.                time.sleep(beat[i] * 0.25)
29.                Buzz.stop()
Use a for loop to check all the buttons. When one button in array button[i] is detected to be pressed, the buzzer will respond to the corresponding note in array song[i].
Phenomenon Picture