注釈
こんにちは、SunFounder Raspberry Pi & Arduino & ESP32 Enthusiast Community on Facebookへようこそ!他の愛好家と一緒に、Raspberry Pi、Arduino、ESP32の世界により深く入り込みましょう。
参加する理由
専門家サポート: 購入後の問題や技術的な課題を、コミュニティと私たちのチームの助けを借りて解決します。
学習と共有: ヒントやチュートリアルを交換して、スキルを向上させましょう。
限定プレビュー: 新製品の発表や先行プレビューに早期アクセスできます。
特別割引: 最新製品を特別割引でお楽しみいただけます。
季節限定キャンペーンとプレゼント: プレゼント企画やホリデーキャンペーンに参加しましょう。
👉 一緒に発見し、創造する準備はできましたか? [こちら] をクリックして、今すぐ参加しましょう!
(Example) ブックエキスパート
はじめに
このプロジェクトでは、コンピュータビジョンと自然言語処理を組み合わせ、表紙画像から書籍を判別する AI搭載のブックカバー解析ツール を作成します。Raspberry Pi カメラで本の表紙を撮影し、LLM(ここでは OpenAI の GPT-4o ビジョンモデル)に送って解析を行い、書名・著者・要約・評価/評判を text-to-speech で音声フィードバックします。
本プロジェクトは複数の技術を統合しています:
Picamera2 によるカメラ撮影
GPT-4o のビジョン機能による画像解析
音声応答のための text-to-speech 変換
状態表示のための RGB LED
直感的に操作できる物理ボタン
他の LLM モデルを使用する場合は 5. オンラインLLMへの接続 を参照してください。
必要なもの
このプロジェクトに必要な部品は以下の通りです:
COMPONENT |
PURCHASE LINK |
|---|---|
Raspberry Pi Camera Module |
|
- |
|
Book (for testing) |
- |
配線図
カメラモジュールを便利に使うために、パン・チルトの組み立て(カメラ用) を推奨します。
注釈
パンチルトを組み立てると一部のピンが隠れる場合があります。そのため、カメラを使用する場合のみ組み立てるか、組み立て後に外側へ配置することを推奨します。

以下のように部品を Fusion HAT+ に接続します:

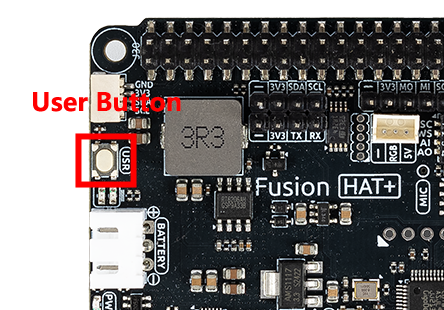
User Button は Fusion HAT+ に統合されているため、追加配線は不要です。BATTERY ポートの近くにあります。*
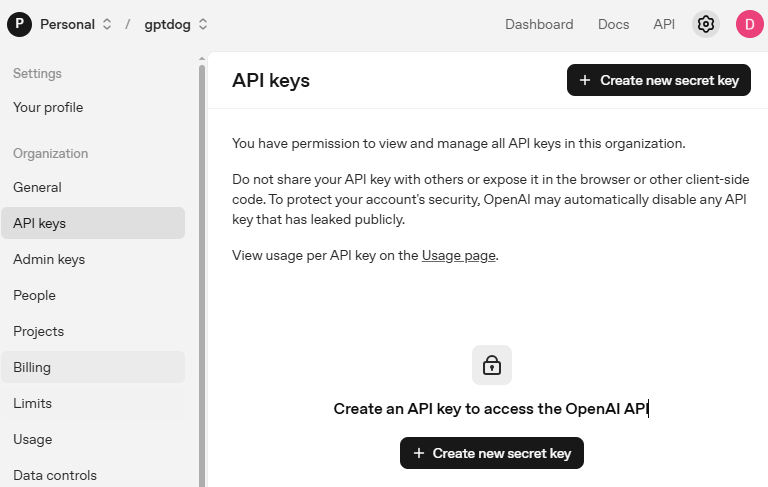
APIキーの取得と保存
OpenAI Platform にアクセスしてログインします。 API keys ページで Create new secret key をクリックします。
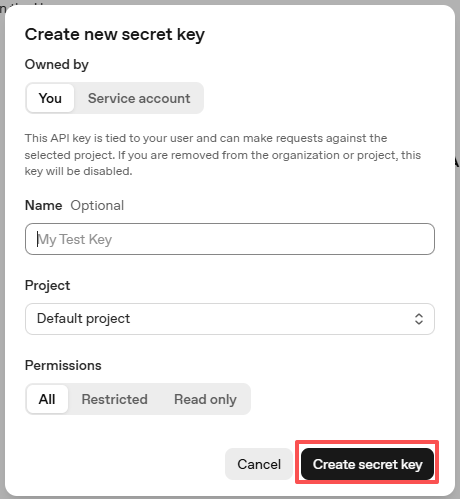
必要事項(Owner、Name、Project、必要に応じて権限)を入力し、 Create secret key をクリックします。
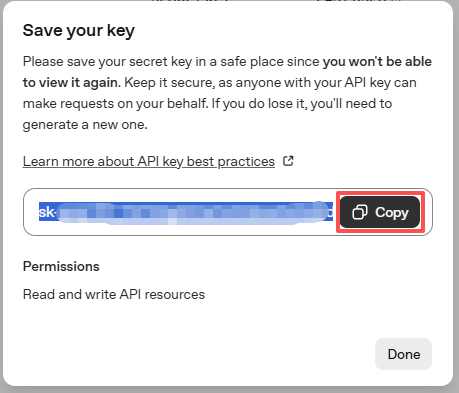
キーが作成されたら、すぐにコピーしてください。後から再表示できません。紛失した場合は新しく作成し直す必要があります。
プロジェクトフォルダ(例:
/)内にsecret.pyというファイルを作成します:cd ~/ai-lab-kit/llm sudo nano secret.py
ファイルにキーを次のように貼り付けます:
# secret.py
# Store secrets here. Never commit this file to Git.
OPENAI_API_KEY = "sk-xxx"
請求設定の有効化と利用可能モデルの確認
キーを使用する前に、OpenAI アカウントの Billing ページで支払い情報を追加し、少額のクレジットをチャージしてください。
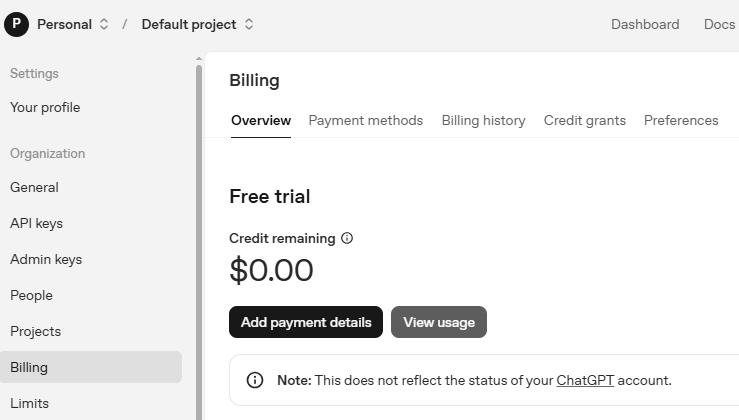
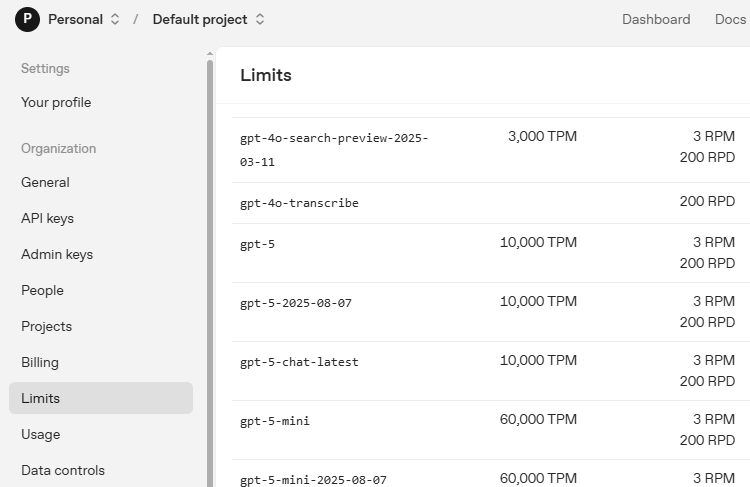
続いて Limits ページで、アカウントで利用可能なモデルを確認し、コードで使用する正確なモデルIDをコピーします。
サンプルの実行
Raspberry Pi のデスクトップにアクセスします:
リモートデスクトップ: VNC を使ってフルデスクトップ環境に接続します。
Raspberry Pi Connect: Raspberry Pi Connect を使い、任意のブラウザから安全に Pi へアクセスします。
ターミナルを開き、コードフォルダへ移動します:
cd ~/ai-lab-kit/llm
sudo python3 llm_openai_bookexpert.py
スクリプトを実行すると:
カメラのプレビューウィンドウが開きます
RGB LED が青く点灯し、待機状態であることを示します
本の表紙をカメラの前に置きます
Fusion HAT+ の USR ボタン(BATTERY ポートの近く)を押します
システムは次の処理を行います:
写真を撮影(LED が黄色 🟡)
AI で解析(LED が紫 🟣)
解析結果を読み上げ(LED が緑 🟢)
待機状態へ戻る(LED が青 🔵)
エラー発生時は LED が赤 🔴
写真は ~/Pictures/book_covers/ に保存されます
Ctrl+C で終了します
Code
Here is the full Python script for the AI Book Cover Analyzer:
#!/usr/bin/env python3
import os
import time
import re
import base64
import threading
from pathlib import Path
from picamera2 import Picamera2, Preview
from fusion_hat.user_button import UserButton
from fusion_hat.modules import RGB_LED
from fusion_hat.pwm import PWM
from fusion_hat.llm import OpenAI
from fusion_hat.tts import OpenAI_TTS
from secret import OPENAI_API_KEY

class BookCoverAnalyzer:
    def __init__(self):
        # Initialize LED for status feedback
        self.rgb_led = RGB_LED(PWM(0), PWM(1), PWM(2), common=RGB_LED.CATHODE)
        self.set_led_color("blue")  # Ready state

        # Initialize OpenAI LLM for image analysis
        self.llm = OpenAI(
            api_key=OPENAI_API_KEY,
            model="gpt-4o",  # GPT-4o supports image input
        )

        # Initialize TTS for audio responses
        self.tts = OpenAI_TTS(api_key=OPENAI_API_KEY)
        self.tts.set_voice(self.tts.Voice.ALLOY)

        # Initialize camera
        self.camera = Picamera2()
        self.camera.configure(self.camera.create_preview_configuration(main={"size": (800, 600)}))

        # Initialize button
        self.btn = UserButton()

        # Set up directories
        self.real_user = os.getenv("SUDO_USER") or os.getlogin()
        self.user_home = f"/home/{self.real_user}"
        self.pictures_dir = Path(self.user_home) / "Pictures" / "book_covers"
        self.pictures_dir.mkdir(parents=True, exist_ok=True)

        # Threading locks
        self.photo_lock = threading.Lock()
        self.photo_index = 1

        # Set LLM instructions
        self.instructions = """You are a book expert. Analyze book covers that are sent to you.

        When you receive a book cover image, provide:
        1. Book title (if identifiable from cover)
        2. Author (if identifiable from cover)
        3. Brief summary of what the book is about (50 words)
        4. Overall rating/reception (e.g., "Highly acclaimed", "Classic", "Popular", etc.)

        Keep your response under 100 words total.
        Speak in a friendly, informative tone suitable for an audio response.

        If the image is not a book cover or is unclear, politely say you can't identify it and ask for another photo."""

        self.llm.set_max_messages(10)
        self.llm.set_instructions(self.instructions)

    def set_led_color(self, color_name):
        """Set RGB LED color for status feedback"""
        color_map = {
            "red": (255, 0, 0),
            "green": (0, 255, 0),
            "blue": (0, 0, 255),
            "yellow": (255, 255, 0),
            "purple": (255, 0, 255),
            "white": (255, 255, 255),
            "off": (0, 0, 0),
        }

        if color_name in color_map:
            self.rgb_led.color(color_map[color_name])

    def capture_photo(self):
        """Capture a photo and return the filepath"""
        with self.photo_lock:
            filepath = self.pictures_dir / f"book_cover_{self.photo_index:03d}.jpg"
            print(f"\n📸 Capturing photo: {filepath}")

            # LED feedback: yellow for capturing
            self.set_led_color("yellow")

            # Capture image
            self.camera.capture_file(str(filepath))

            # Increment counter for next photo
            self.photo_index += 1

            print("Photo captured successfully")
            return str(filepath)

    def analyze_book_cover(self, image_path):
        """Send book cover image to OpenAI for analysis"""
        print("\n Analyzing book cover...")

        # LED feedback: purple for processing
        self.set_led_color("purple")

        try:
            # use fusion_hat.llm's prompt method to process the image
            prompt_text = "Please analyze this book cover and tell me about the book. Provide: 1) Book title if identifiable, 2) Author if identifiable, 3) Brief summary, 4) Overall rating/reception. Keep under 100 words."

            print("Sending to AI for analysis...")

            # method1: non-streaming response
            response = self.llm.prompt(prompt_text, image_path=image_path)

            # if the response is a string, use it directly
            if isinstance(response, str):
                analysis = response
            else:
                # if response is not a string, try to convert it to a string
                analysis = str(response)

            print(f"\n Analysis:\n{analysis}")

            # LED feedback: green for success
            self.set_led_color("green")

            return analysis

        except Exception as e:
            print(f"Error analyzing image: {e}")
            print(f"Error type: {type(e)}")

            # method2: streaming response
            try:
                print("Trying stream method...")
                stream_response = self.llm.prompt(prompt_text, stream=True, image_path=image_path)

                # receive the stream response
                analysis_parts = []
                for next_word in stream_response:
                    if next_word:
                        analysis_parts.append(next_word)

                analysis = ''.join(analysis_parts)
                print(f"\n Analysis (stream):\n{analysis}")

                # LED feedback: green for success
                self.set_led_color("green")
                return analysis

            except Exception as e2:
                print(f"Stream method also failed: {e2}")

                # LED feedback: red for error
                self.set_led_color("red")
                return "Sorry, I couldn't analyze the book cover. Please make sure the book cover is clearly visible and try again."

    def speak_response(self, text):
        """Convert text to speech"""
        print("\nSpeaking response...")

        # Clean up text for TTS (remove markdown, etc.)
        clean_text = re.sub(r'[*_\[\]()#]', '', text)

        # Speak with friendly instructions
        self.tts.say(clean_text, instructions="speak clearly and warmly")
        print("Response spoken")

        # Return to ready state
        self.set_led_color("blue")

    def button_handler(self):
        """Handle button press: capture photo, analyze, and speak"""
        print("\n" + "="*50)
        print("Processing request...")

        # Step 1: Capture photo
        try:
            image_path = self.capture_photo()
        except Exception as e:
            print(f"Failed to capture photo: {e}")
            self.set_led_color("red")
            self.tts.say("Sorry, I couldn't take a photo. Please try again.")
            self.set_led_color("blue")
            return

        # Step 2: Analyze with AI
        analysis = self.analyze_book_cover(image_path)

        # Step 3: Speak the analysis
        self.speak_response(analysis)

        print(f"Complete! Photo saved at: {image_path}")
        print("="*50 + "\n")

    def run(self):
        """Main program loop"""
        # Set button callback
        self.btn.set_on_click(self.button_handler)

        # Start camera preview
        print("Starting camera preview...")
        self.camera.start_preview(Preview.QT)
        self.camera.start()

        # LED feedback: blue for ready
        self.set_led_color("blue")

        print("\n" + "="*50)
        print("BOOK COVER ANALYZER")
        print("="*50)
        print("\nReady to analyze book covers!")
        print("Press the USR button to capture and analyze a book cover")
        print("I will speak the analysis aloud")
        print("LED colors:")
        print("   Blue: Ready")
        print("   Yellow: Capturing photo")
        print("   Purple: Analyzing with AI")
        print("   Green: Analysis successful")
        print("   Red: Error occurred")
        print(f"Photos saved to: {self.pictures_dir}")
        print("Press Ctrl+C to exit")
        print("="*50 + "\n")

        try:
            # Keep program running
            while True:
                time.sleep(0.1)

        except KeyboardInterrupt:
            print("\nExiting...")

        finally:
            # Cleanup
            self.camera.stop_preview()
            self.camera.close()
            self.set_led_color("off")
            print("Cleanup complete")

if __name__ == "__main__":
    analyzer = BookCoverAnalyzer()
    analyzer.run()
コードの理解
カメラの初期化
Picamera2 ライブラリは Raspberry Pi カメラ制御のための最新インターフェースで、撮影とプレビューの両方に対応します。
self.camera = Picamera2()
self.camera.configure(self.camera.create_preview_configuration(main={"size": (800, 600)}))

# Start preview and camera
self.camera.start_preview(Preview.QT)
self.camera.start()
スレッドセーフな画像撮影
capture_photo メソッドは threading のロックを使い、同時撮影を防ぎつつ、ファイル名を確実に連番で管理します。
def capture_photo(self):
    with self.photo_lock:
        filepath = self.pictures_dir / f"book_cover_{self.photo_index:03d}.jpg"
        self.camera.capture_file(str(filepath))
        self.photo_index += 1
        return str(filepath)
Vision AI による解析
システムは GPT-4o のビジョン機能で表紙を解析します。堅牢性のため、非ストリーミングとストリーミングの 2 方式を用意しています。
def analyze_book_cover(self, image_path):
    prompt_text = "Please analyze this book cover..."

    # Method 1: Non-streaming response
    response = self.llm.prompt(prompt_text, image_path=image_path)

    # Method 2: Fallback to streaming if needed
    stream_response = self.llm.prompt(prompt_text, stream=True, image_path=image_path)
Text-to-Speech 変換
OpenAI の TTS API により、解析結果を自然な音声に変換します。音声(voice)も設定可能です。
self.tts = OpenAI_TTS(api_key=OPENAI_API_KEY)
self.tts.set_voice(self.tts.Voice.ALLOY)

def speak_response(self, text):
    clean_text = re.sub(r'[*_\[\]()#]', '', text)  # Remove markdown
    self.tts.say(clean_text, instructions="speak clearly and warmly")
状態フィードバック機構
RGB LED は処理の状態を色で示します:
def set_led_color(self, color_name):
    color_map = {
        "red": (255, 0, 0),      # Error
        "green": (0, 255, 0),    # Success
        "blue": (0, 0, 255),     # Ready
        "yellow": (255, 255, 0), # Capturing
        "purple": (255, 0, 255), # Processing
    }
    self.rgb_led.color(color_map[color_name])
ボタンイベント処理
User Button はイベントコールバックで解析の一連の処理を起動します。
def button_handler(self):
    # 1. Capture photo
    image_path = self.capture_photo()
    # 2. Analyze with AI
    analysis = self.analyze_book_cover(image_path)
    # 3. Speak the analysis
    self.speak_response(analysis)

# Set callback
self.btn.set_on_click(self.button_handler)
ファイル管理
写真は自動的に保存フォルダへ整理され、連番で命名されます。
self.real_user = os.getenv("SUDO_USER") or os.getlogin()
self.user_home = f"/home/{self.real_user}"
self.pictures_dir = Path(self.user_home) / "Pictures" / "book_covers"
self.pictures_dir.mkdir(parents=True, exist_ok=True)
トラブルシューティング
"Camera not detected" error
カメラのリボンケーブルが正しく挿さっているか確認してください(金色の接点の向きに注意)
sudo raspi-configを実行してカメラインターフェースを有効化してください有効化後は再起動してください
"No preview window appears"
デスクトップ環境のある Raspberry Pi で実行していることを確認してください
ヘッドレス運用の場合は、プレビュー関連コードを削除または変更してください
GPU メモリが十分に割り当てられているか確認してください
"OpenAI API error"
secret.pyの API キーが正しく、十分なクレジットがあることを確認してくださいネットワーク接続を確認:
ping 8.8.8.8アカウントが GPT-4o と TTS API にアクセス可能であることを確認してください
"TTS audio not playing"
音声出力設定を確認:
sudo raspi-config→ System Options → Audio音声テスト:
speaker-test -t sine -f 440スピーカー/ヘッドホンが正しいオーディオ端子に接続されているか確認してください
"Button press not detected"
押下時に User Button の LED が点灯するか確認してください
Fusion HAT+ が GPIO ピンに正しく装着されているか確認してください
ボタンコールバックが正しく設定されているか確認してください
"Image analysis returns generic responses"
撮影時の照明を十分に確保してください
表紙が正面からフレーム内に収まるように配置してください
認識しやすい有名な本から試すと精度が上がります
画像がぼやける場合はレンズを清掃してください
このプロジェクトは、コンピュータビジョン、自然言語処理、そしてフィジカルコンピューティングを組み合わせることで、知的な書籍解析システムを構築できることを示しています。AI によって本のような身近な物体とのインタラクションがより分かりやすく、より魅力的になることを体験できます!