注釈
こんにちは、SunFounder Raspberry Pi & Arduino & ESP32 Enthusiast Community on Facebookへようこそ!他の愛好家と一緒に、Raspberry Pi、Arduino、ESP32の世界により深く入り込みましょう。
参加する理由
専門家サポート: 購入後の問題や技術的な課題を、コミュニティと私たちのチームの助けを借りて解決します。
学習と共有: ヒントやチュートリアルを交換して、スキルを向上させましょう。
限定プレビュー: 新製品の発表や先行プレビューに早期アクセスできます。
特別割引: 最新製品を特別割引でお楽しみいただけます。
季節限定キャンペーンとプレゼント: プレゼント企画やホリデーキャンペーンに参加しましょう。
👉 一緒に発見し、創造する準備はできましたか? [こちら] をクリックして、今すぐ参加しましょう!
(Example) AI 搭載 LED コントローラー
はじめに
このプロジェクトでは、LLM モデル(ここでは OpenAI の GPT-4o 言語モデルを使用)と RGB LED を組み合わせた AI 搭載 LED コントローラー を作成します。 システムは自然言語の指示を解釈して LED の色を制御し、色名、HEX 値、RGB タプルを使って色を指定できます。これは、自然言語処理を通じて人工知能と物理ハードウェアを統合する例です。
「turn on red light」や「show warm yellow light」のように話しかけると、AI が指示内容を解析し、それに応じた制御信号を生成して LED の色を変更します。
他の LLM モデルを使用する場合は、5. オンラインLLMへの接続 を参照してください。
必要なもの
このプロジェクトに必要な部品は以下の通りです:
COMPONENT |
PURCHASE LINK |
|---|---|
- |
|
Raspberry Pi |
- |
配線図
以下のように RGB LED を Fusion HAT+ に接続します:

APIキーの取得と保存
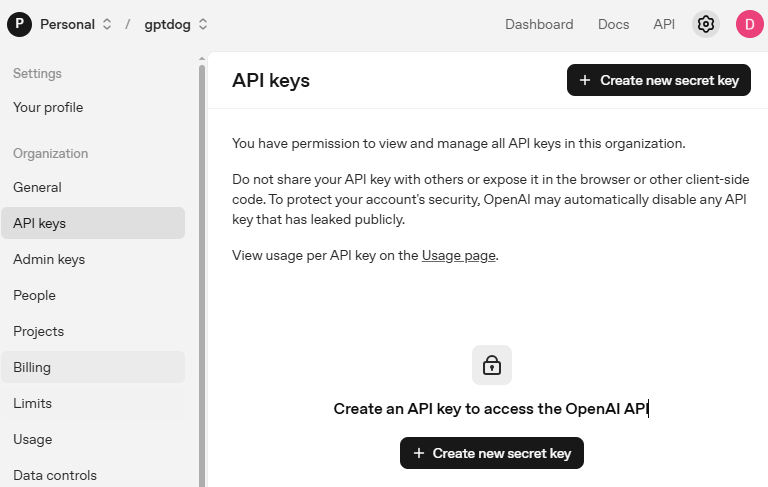
OpenAI Platform にアクセスしてログインします。 API keys ページで Create new secret key をクリックします。
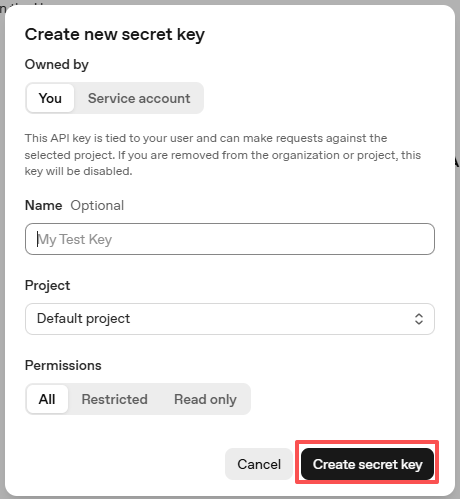
必要事項(Owner、Name、Project、必要に応じて権限)を入力し、 Create secret key をクリックします。
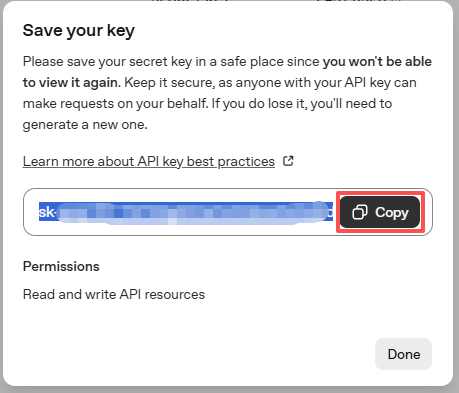
キーが作成されたら、すぐにコピーしてください。後から再表示できません。紛失した場合は新しく作成し直す必要があります。
プロジェクトフォルダ(例:
/)内にsecret.pyというファイルを作成します:cd ~/ai-lab-kit/llm sudo nano secret.py
ファイルにキーを次のように貼り付けます:
# secret.py
# Store secrets here. Never commit this file to Git.
OPENAI_API_KEY = "sk-xxx"
請求設定の有効化と利用可能モデルの確認
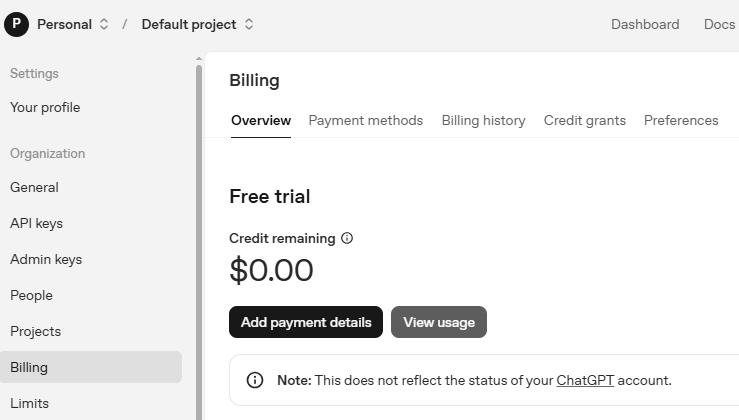
キーを使用する前に、OpenAI アカウントの Billing ページで支払い情報を追加し、少額のクレジットをチャージしてください。
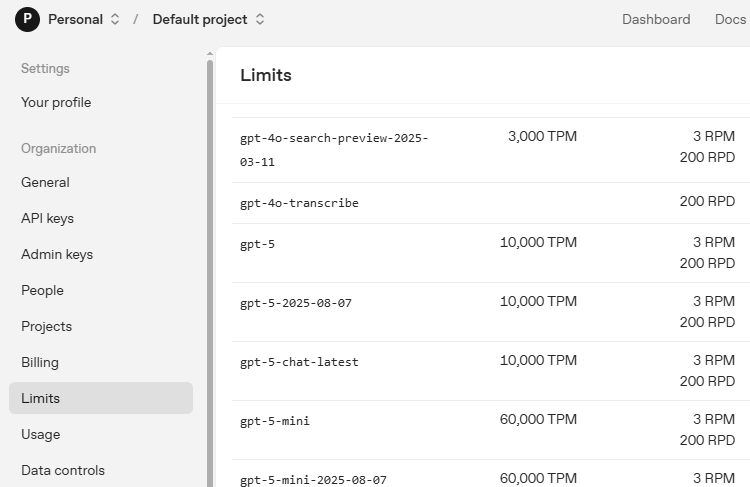
続いて Limits ページで、アカウントで利用可能なモデルを確認し、コードで使用する正確なモデルIDをコピーします。
コードの実行
AI LED コントローラーを実行します:
cd ~/ai-lab-kit/llm
sudo python3 llm_openai_lamp.py
スクリプトを実行すると:
「Smart Lighting Assistant started!」というウェルカムメッセージが表示されます
次のような自然言語コマンドを入力できます:
"turn on red light"
"show blue color"
"set to warm white"
"turn off the light"
AI が応答し、それに応じて LED を制御します
プログラムを終了するには 'quit' または 'exit' と入力します
コード
以下は AI LED コントローラーの Python スクリプト全体です:
#!/usr/bin/env python3
import re
from fusion_hat.llm import OpenAI
from fusion_hat.modules import RGB_LED
from fusion_hat.pwm import PWM
from secret import OPENAI_API_KEY

class AILEDController:
    def __init__(self):
        # Initialize LED
        self.rgb_led = RGB_LED(PWM(0), PWM(1), PWM(2), common=RGB_LED.CATHODE)

        # Initialize AI assistant
        self.llm = OpenAI(
            api_key=OPENAI_API_KEY,
            model="gpt-4o",
        )

        # Enhanced instructions for LED control
        self.instructions = """You are an AI assistant that can control an RGB LED.
        When the user mentions colors, you need to respond with a specific format to control the LED.

        Response format:
        1. Normal conversation part
        2. End with [LED:color] where color can be:
           - Color names: red, green, blue, yellow, purple, etc.
           - HEX values: #FF0000, #00FF00, etc.
           - RGB tuples: (255,0,0), (0,255,0), etc.
           - Numbers: 0xFF0000, etc.

        Examples:
        User: Turn the light red
        You: OK, set to red. [LED:red]

        User: Show warm yellow light
        You: Set to warm yellow light. [LED:#FFD700]

        User: Turn off the light
        You: Light turned off. [LED:black] or [LED:(0,0,0)]

        If the user doesn't mention anything color-related, don't include the [LED:...] tag."""

        # Color name to RGB mapping
        self.color_map = {
            'red': (255, 0, 0),
            'green': (0, 255, 0),
            'blue': (0, 0, 255),
            'yellow': (255, 255, 0),
            'purple': (255, 0, 255),
            'cyan': (0, 255, 255),
            'white': (255, 255, 255),
            'black': (0, 0, 0),
            'orange': (255, 165, 0),
            'pink': (255, 192, 203),
            'brown': (165, 42, 42),
            'grey': (128, 128, 128),
            'warmwhite': (255, 197, 143),
        }

        self.llm.set_max_messages(20)
        self.llm.set_instructions(self.instructions)
        self.llm.set_welcome("Hello! I'm your smart lighting assistant. I can control RGB LED colors.")

        # Initial state: light off
        self.rgb_led.color((0, 0, 0))

    def parse_led_command(self, text):
        """Parse LED control command from AI response"""
        pattern = r'\[LED:(.*?)\]'
        match = re.search(pattern, text)

        if not match:
            return None, text

        led_command = match.group(1).strip()
        display_text = re.sub(pattern, '', text).strip()

        return led_command, display_text

    def apply_color(self, color_spec):
        """Convert color specification to RGB and apply to LED"""
        color_spec = color_spec.lower().strip()

        try:
            # 1. Process color names
            if color_spec in self.color_map:
                rgb = self.color_map[color_spec]
                self.rgb_led.color(rgb)
                return True

            # 2. Process hex strings (e.g., #FF0000)
            elif color_spec.startswith('#'):
                hex_color = color_spec.lstrip('#')
                if len(hex_color) == 6:
                    rgb = tuple(int(hex_color[i:i+2], 16) for i in (0, 2, 4))
                    self.rgb_led.color(rgb)
                    return True

            # 3. Process RGB tuple strings (e.g., (255,0,0))
            elif color_spec.startswith('(') and color_spec.endswith(')'):
                numbers = color_spec[1:-1].split(',')
                if len(numbers) == 3:
                    rgb = tuple(int(num.strip()) for num in numbers)
                    if all(0 <= val <= 255 for val in rgb):
                        self.rgb_led.color(rgb)
                        return True

            # 4. Process hex number strings (e.g., 0xFF0000)
            elif color_spec.startswith('0x'):
                hex_num = int(color_spec, 16)
                self.rgb_led.color(hex_num)
                return True

            # 5. Try direct integer conversion
            else:
                try:
                    num = int(color_spec)
                    if 0 <= num <= 0xFFFFFF:
                        self.rgb_led.color(num)
                        return True
                except ValueError:
                    pass

            return False

        except Exception as e:
            print(f"Color setting error: {e}")
            return False

    def run(self):
        """Main run loop"""
        print("Smart Lighting Assistant started!")
        print("You can say: 'turn on red light', 'show blue', 'set to purple', 'turn off light', etc.")
        print("Type 'quit' or 'exit' to end the program\n")

        while True:
            try:
                user_input = input(">>> ").strip()

                if user_input.lower() in ['quit', 'exit', 'bye']:
                    print("Goodbye!")
                    self.rgb_led.color((0, 0, 0))
                    break

                response = self.llm.prompt(user_input, stream=True)

                full_response = ""
                for word in response:
                    if word:
                        print(word, end="", flush=True)
                        full_response += word
                print()

                led_command, display_only = self.parse_led_command(full_response)

                if led_command:
                    print(f"Detected LED command: {led_command}")
                    if self.apply_color(led_command):
                        print(f"✓ Applied color: {led_command}")
                    else:
                        print(f"✗ Unrecognized color format: {led_command}")

            except KeyboardInterrupt:
                print("\nProgram interrupted")
                self.rgb_led.color((0, 0, 0))
                break
            except Exception as e:
                print(f"Error: {e}")
                continue

# Enhanced version with direct command support
class AILEDControllerPro(AILEDController):
    def __init__(self):
        super().__init__()

        self.instructions = """You control an RGB LED light. When user mentions colors, add [LED:color_value] at the end.

        Color values can be:
        1. English color names: red, green, blue, yellow, purple, cyan, white, black, orange, pink
        2. HEX values: #FF0000
        3. RGB tuples: (255,0,0)

        Examples:
        User: Turn on red light
        Response: Red light activated. [LED:red]

        User: Turn off the light
        Response: Light turned off. [LED:black]

        User: How is the weather today?
        Response: I can't check real-time weather, but I can adjust your lighting! [LED:#FFFFFF]"""

        self.llm.set_instructions(self.instructions)

    def process_user_input(self, text):
        """Preprocess user input for direct commands"""
        text_lower = text.lower()

        direct_commands = {
            'turn on light': 'white',
            'turn off light': 'black',
            'red light': 'red',
            'green light': 'green',
            'blue light': 'blue',
            'yellow light': 'yellow',
            'purple light': 'purple',
            'white light': 'white',
        }

        for cmd, color in direct_commands.items():
            if cmd in text_lower:
                self.apply_color(color)
                return f"Set to {color}. [LED:{color}]"

        return None


if __name__ == "__main__":
    # Create an instance of the controller
    controller = AILEDControllerPro()
    controller.run()
コードの理解
AI アシスタントの初期化
このシステムでは OpenAI の GPT-4o モデルを使用し、特定の形式で LED 制御コマンドを生成するようカスタム instructions を設定しています。
self.llm = OpenAI(
    api_key=OPENAI_API_KEY,
    model="gpt-4o",
)

self.instructions = """You are an AI assistant that can control an RGB LED...
   ...End with [LED:color] where color can be:...
"""

self.llm.set_instructions(self.instructions)
RGB LED の制御
fusion_hat.modules の RGB_LED クラスを使用して、PWM 経由で 3 つの色チャンネルを制御します。
self.rgb_led = RGB_LED(PWM(0), PWM(1), PWM(2), common=RGB_LED.CATHODE)

# Set color using RGB tuple
self.rgb_led.color((255, 0, 0))  # Red

# Set color using hex value
self.rgb_led.color(0xFF0000)  # Also red
正規表現によるコマンド解析
AI の応答から LED 制御コマンドを抽出するために、正規表現を使用しています。
def parse_led_command(self, text):
    """Parse LED control command from AI response"""
    pattern = r'\[LED:(.*?)\]'
    match = re.search(pattern, text)

    if not match:
        return None, text

    led_command = match.group(1).strip()
    display_text = re.sub(pattern, '', text).strip()

    return led_command, display_text
複数の色指定形式に対応
コントローラーは柔軟性を高めるため、複数の色指定形式を受け付けます。
def apply_color(self, color_spec):
    """Convert color specification to RGB and apply to LED"""
    color_spec = color_spec.lower().strip()

    # 1. Color names (red, green, blue, etc.)
    # 2. HEX strings (#FF0000)
    # 3. RGB tuples ((255,0,0))
    # 4. Hex numbers (0xFF0000)
    # 5. Direct integers (16711680)
ストリーミング応答
より自然な会話体験のために、AI の応答を単語ごとにストリーミング表示します。
response = self.llm.prompt(user_input, stream=True)

full_response = ""
for word in response:
    if word:
        print(word, end="", flush=True)
        full_response += word
拡張版 Pro バージョン
AILEDControllerPro クラスでは、よく使う指示にすばやく応答するための直接コマンド前処理を追加しています。
direct_commands = {
    'turn on light': 'white',
    'turn off light': 'black',
    'red light': 'red',
    'green light': 'green',
    # ... etc
}
トラブルシューティング
No module named 'openai'" error**
fusion-hat パッケージがインストールされていることを確認してください:
curl -sSL https://raw.githubusercontent.com/sunfounder/sunfounder-installer-scripts/main/install-fusion-hat.sh | sudo bash
“Invalid API key" error
secret.py内の API キーが正しく、有効期限切れになっていないことを確認してください。 また、OpenAI アカウントで有効な API キーが存在するか確認してください。LED が点灯しない
配線を確認してください(RGB ピンが正しい PWM ポートに接続されているか)
common cathode が GND に接続されているか確認してください
電流制限抵抗が正しく入っているか確認してください
簡単なテストコードで各色チャンネルを個別に確認してください
AI が [LED:...] タグ付きで応答しない
system instructions が正しく設定されているか確認してください
より明確な色指定コマンドで試してください
AI モデル(gpt-4o)がアカウントで利用可能か確認してください
ストリーミング応答が途切れがちに見える
ネットワーク接続が安定しているか確認してください
ネットワークタイムアウトを調整して遅延を減らしてください
テスト時は非ストリーミングモードの使用も検討してください
このプロジェクトは、AI が自然言語理解と物理ハードウェア制御を橋渡しし、より直感的なヒューマンマシンインターフェースを実現できることを示しています。