Note
Hello, welcome to the SunFounder Raspberry Pi & Arduino & ESP32 Enthusiasts Community on Facebook! Dive deeper into Raspberry Pi, Arduino, and ESP32 with fellow enthusiasts.
Why Join?
Expert Support: Solve post-sale issues and technical challenges with help from our community and team.
Learn & Share: Exchange tips and tutorials to enhance your skills.
Exclusive Previews: Get early access to new product announcements and sneak peeks.
Special Discounts: Enjoy exclusive discounts on our newest products.
Festive Promotions and Giveaways: Take part in giveaways and holiday promotions.
👉 Ready to explore and create with us? Click [here] and join today!
10. Ultrasonic
In this project, you will learn how to read the distance detected by the ultrasonic module.
How to do?
The ESP32-CAM and the Arduino board share the same RX (receive) and TX (transmit) pins. So, when you’re uploading code, you’ll need to first disconnect the ESP32-CAM to avoid any conflicts or potential issues.

Open the
10_ultrasonic.inofile under the path ofzeus-car-main\examples\10_ultrasonic.After the code is uploaded successfully, slide the power switch to ON to start the Zeus Car.
Note
Do not unplug the USB in this step, because you need to check the data of the Ultrasonic module on your computer.
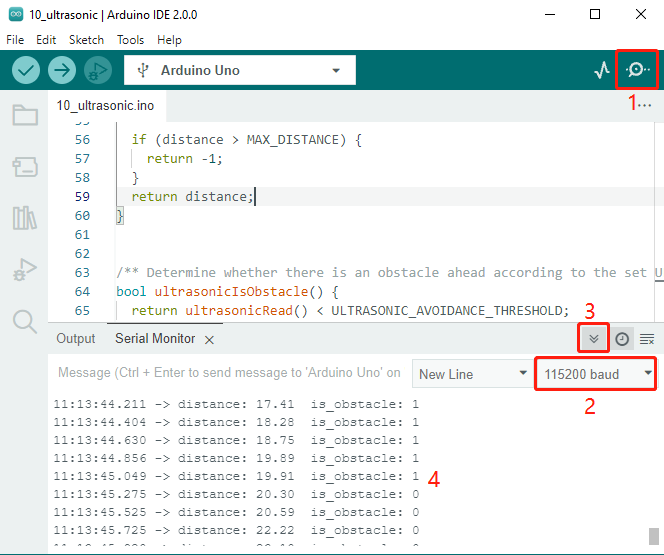
Open the serial monitor and make sure the current baud rate is set to 115200. It is recommended to click on the Toggle Autoscroll icon so that you can see the latest printed data.
You can view the printed data like
distance: 21.11 is_obstacle: 0.If the distance of the obstacle ahead is within 20cm,
is_obstacle: 0will becomeis_obstacle: 1.