注釈
こんにちは、SunFounderのRaspberry Pi & Arduino & ESP32愛好家コミュニティへようこそ!Facebook上でRaspberry Pi、Arduino、ESP32についてもっと深く掘り下げ、他の愛好家と交流しましょう。
参加する理由は?
エキスパートサポート:コミュニティやチームの助けを借りて、販売後の問題や技術的な課題を解決します。
学び&共有:ヒントやチュートリアルを交換してスキルを向上させましょう。
独占的なプレビュー:新製品の発表や先行プレビューに早期アクセスしましょう。
特別割引:最新製品の独占割引をお楽しみください。
祭りのプロモーションとギフト:ギフトや祝日のプロモーションに参加しましょう。
👉 私たちと一緒に探索し、創造する準備はできていますか?[ここ]をクリックして今すぐ参加しましょう!
2.2.4 リードスイッチモジュール
はじめに
このプロジェクトでは、磁場を適用することで動作する電気スイッチであるリードスイッチについて学びます。
必要な部品
このプロジェクトには、次のコンポーネントが必要です。
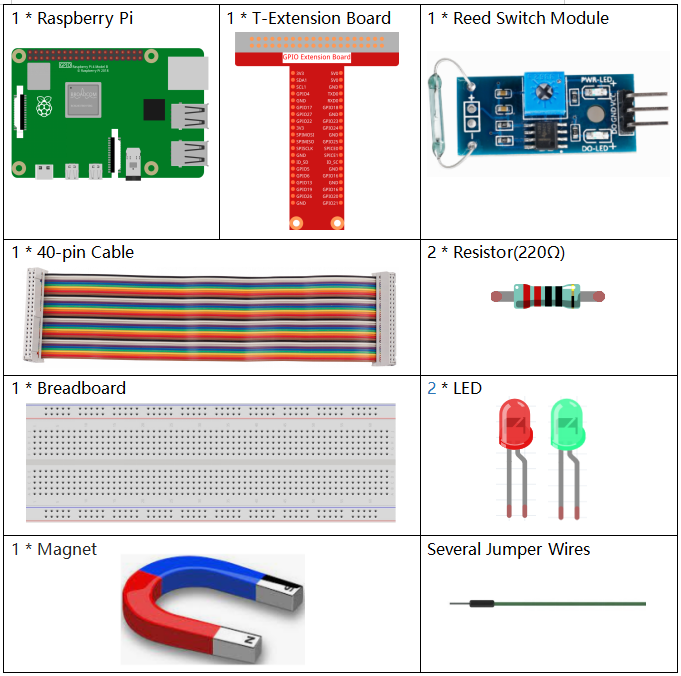
一式を購入するのが便利です、こちらがリンクです:
名前 |
このキットのアイテム |
リンク |
|---|---|---|
Raphael Kit |
337 |
以下のリンクから別々に購入することもできます。
コンポーネントの紹介 |
購入リンク |
|---|---|
回路図
T-Board Name |
physical |
wiringPi |
BCM |
GPIO17 |
Pin 11 |
0 |
17 |
GPIO27 |
Pin 13 |
2 |
27 |
GPIO22 |
Pin 15 |
3 |
22 |


実験手順
ステップ 1: 回路を組み立てる。

ステップ 2: ディレクトリを変更する。
cd ~/raphael-kit/python-pi5
ステップ 3: 実行する。
sudo python3 2.2.4_ReedSwitch_zero.py
コードを実行すると、緑色のLEDが点灯します。リードスイッチモジュールに磁石を近づけると、赤色のLEDが点灯し、磁石を離すと再び緑色のLEDが点灯します。
警告
エラー メッセージ RuntimeError: Cannot determine SOC peripheral base address が表示された場合は、 「gpiozero」が動作しない場合。 を参照してください。
コード
注釈
下記のコードを 変更/リセット/コピー/実行/停止 することができます。しかし、その前に raphael-kit/python-pi5 のようなソースコードのパスに移動する必要があります。コードを変更した後、直接実行して効果を見ることができます。
#!/usr/bin/env python3
from gpiozero import LED, Button

# Initialize the reed switch and LEDs using GPIO Zero
reed_switch = Button(17, pull_up=True)  # Reed switch on GPIO 17, using an internal pull-up resistor
green_led = LED(27)                     # Green LED connected to GPIO pin 27
red_led = LED(22)                       # Red LED connected to GPIO pin 22

def update_leds():
    """
    Update the state of the LEDs based on the reed switch.
    Turns the red LED on and green LED off when the reed switch is pressed, and vice versa.
    """
    if reed_switch.is_pressed:
        green_led.off()          # Turn off the green LED
        red_led.on()             # Turn on the red LED
    else:
        green_led.on()           # Turn on the green LED
        red_led.off()            # Turn off the red LED

try:
    green_led.on()               # Turn on the green LED at the start
    while True:
        # Set the callback functions for reed switch state changes
        reed_switch.when_pressed = update_leds   # Callback when the switch is pressed
        reed_switch.when_released = update_leds  # Callback when the switch is released

except KeyboardInterrupt:
    # Clean up resources and exit on Ctrl+C
    green_led.off()
    red_led.off()
    pass
コード説明
この行は、スクリプトがPython 3を使用して実行されることを指定します。gpiozeroライブラリから
LEDとButton(リードスイッチ用)をインポートします。#!/usr/bin/env python3 from gpiozero import LED, Button
GPIOピン17に内部プルアップ抵抗を使用してリードスイッチを、GPIOピン27と22に二つのLEDを初期化します。
# Initialize the reed switch and LEDs using GPIO Zero
reed_switch = Button(17, pull_up=True)  # Reed switch on GPIO 17, using an internal pull-up resistor
green_led = LED(27)                     # Green LED connected to GPIO pin 27
red_led = LED(22)                       # Red LED connected to GPIO pin 22
リードスイッチの状態に基づいてLEDの状態を更新する
update_leds関数を定義します。スイッチが押された時は赤色LEDを点灯し緑色LEDを消灯し、その逆の状態で逆にします。def update_leds(): if reed_switch.is_pressed: green_led.off() # Turn off the green LED red_led.on() # Turn on the red LED else: green_led.on() # Turn on the green LED red_led.off() # Turn off the red LED
開始時に緑色LEDを点灯状態にします。メインループではリードスイッチの
when_pressedおよびwhen_releasedイベントにupdate_leds関数をコールバックとして割り当てます。KeyboardInterruptの例外処理を含み、プログラムを優雅に終了させます。try: green_led.on() # Turn on the green LED at the start while True: # Set the callback functions for reed switch state changes reed_switch.when_pressed = update_leds # Callback when the switch is pressed reed_switch.when_released = update_leds # Callback when the switch is released except KeyboardInterrupt: # Clean up resources and exit on Ctrl+C green_led.off() red_led.off() pass