注釈
こんにちは、SunFounderのRaspberry Pi & Arduino & ESP32愛好家コミュニティへようこそ!Facebook上でRaspberry Pi、Arduino、ESP32についてもっと深く掘り下げ、他の愛好家と交流しましょう。
参加する理由は?
エキスパートサポート:コミュニティやチームの助けを借りて、販売後の問題や技術的な課題を解決します。
学び&共有:ヒントやチュートリアルを交換してスキルを向上させましょう。
独占的なプレビュー:新製品の発表や先行プレビューに早期アクセスしましょう。
特別割引:最新製品の独占割引をお楽しみください。
祭りのプロモーションとギフト:ギフトや祝日のプロモーションに参加しましょう。
👉 私たちと一緒に探索し、創造する準備はできていますか?[ここ]をクリックして今すぐ参加しましょう!
2.2.2 サーミスタ
注釈

キットのバージョンによって、 ADC0834 または MCP3008 が含まれています。 該当するセクションを選択してください。
はじめに
フォトレジスタが光を感知するように、サーミスタは温度に感応する電子デバイスで、温度制御などの機能を実現するために使用できます。たとえば、ヒートアラームを作成することができます。
必要な部品
このプロジェクトには、次のコンポーネントが必要です。
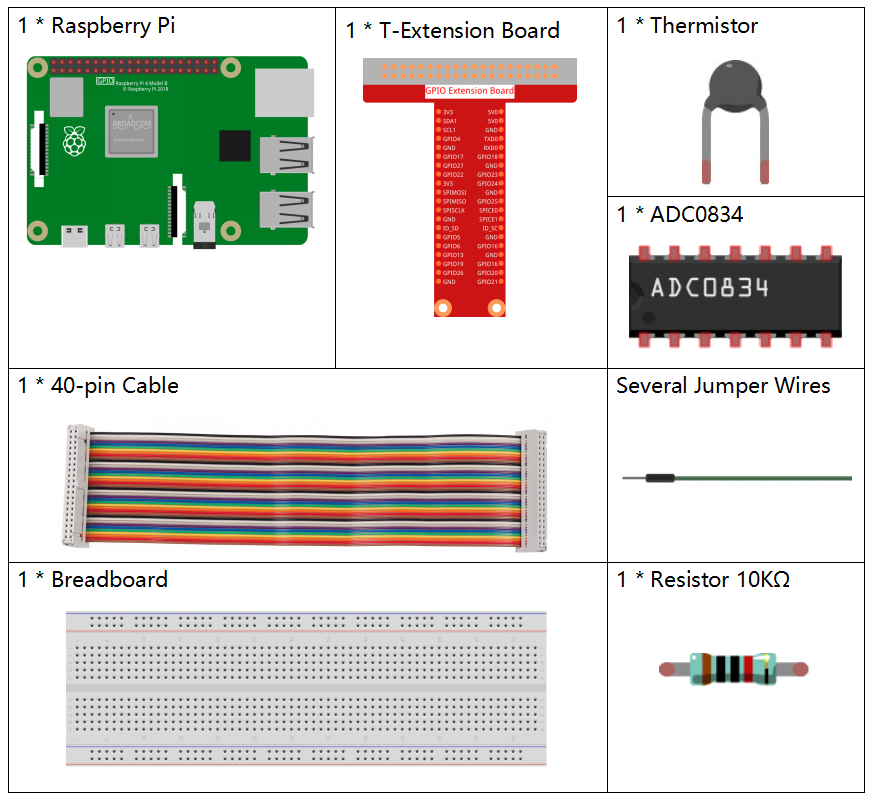
一式を購入するのが便利です、こちらがリンクです:
名前 |
このキットのアイテム |
リンク |
|---|---|---|
Raphael Kit |
337 |
以下のリンクから別々に購入することもできます。
コンポーネントの紹介 |
購入リンク |
|---|---|
- |
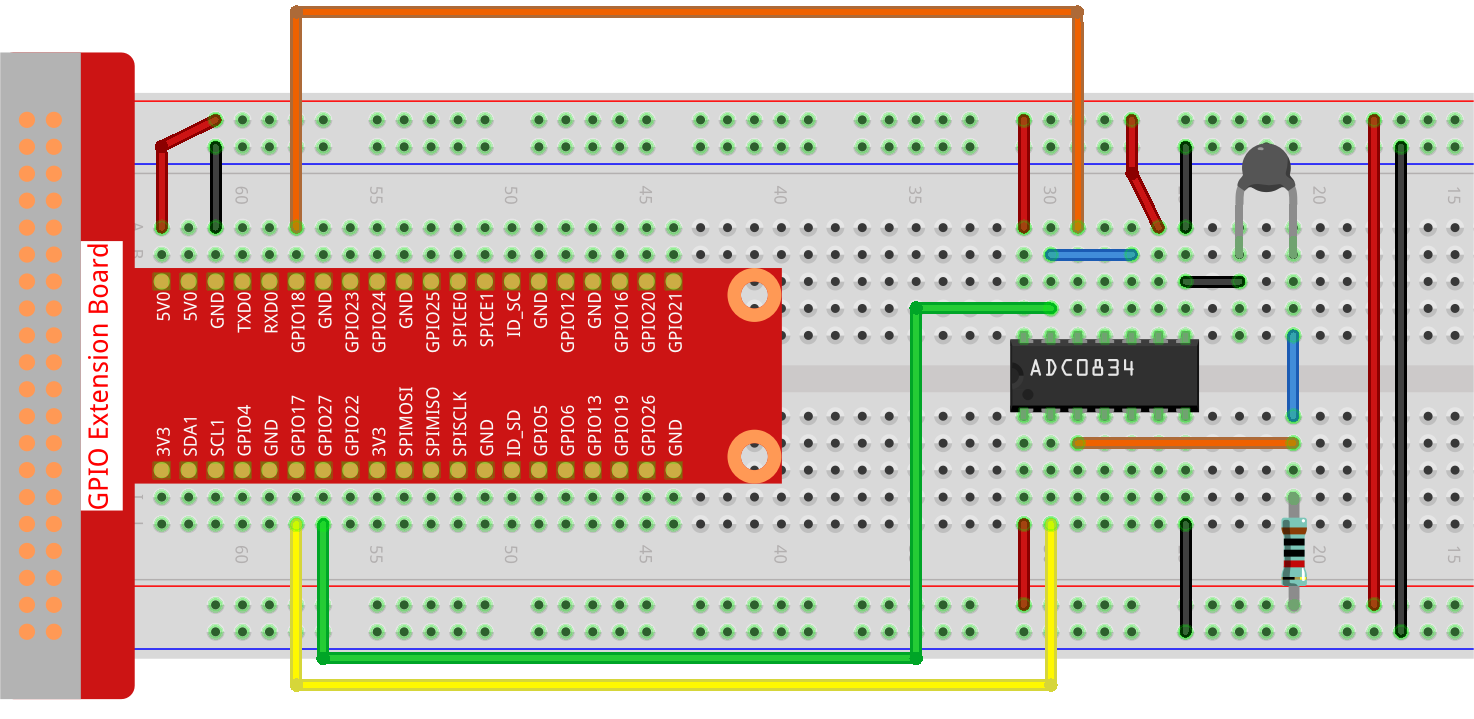
回路図


実験手順
ステップ 1: 回路を組み立てます。
ステップ 2: コードのフォルダに移動します。
cd ~/raphael-kit/python-pi5
ステップ 3: 実行可能ファイルを実行します。
sudo python3 2.2.2_Thermistor_zero.py
コードを実行すると、サーミスタが周囲の温度を検出し、プログラムの計算が終了すると温度が画面に表示されます。
警告
エラー メッセージ RuntimeError: Cannot determine SOC peripheral base address が表示された場合は、 「gpiozero」が動作しない場合。 を参照してください。
コード
注釈
以下のコードを 変更/リセット/コピー/実行/停止 することができます。ただし、その前に raphael-kit/python-pi5 のソースコードパスに移動する必要があります。コードを変更した後、効果を確認するために直接実行できます。
#!/usr/bin/env python3
# -*- coding: utf-8 -*-

import ADC0834
import time
import math

# Initialize the ADC0834 module
ADC0834.setup()

# Run the process in a try-except block
try:
    while True:
        # Read the analog value from the sensor
        analogVal = ADC0834.getResult()

        # Convert the analog value to a voltage
        Vr = 5 * float(analogVal) / 255

        # Calculate the resistance of the thermistor
        Rt = 10000 * Vr / (5 - Vr)

        # Calculate the temperature in Kelvin
        temp = 1 / (((math.log(Rt / 10000)) / 3950) + (1 / (273.15 + 25)))

        # Convert Kelvin to Celsius
        Cel = temp - 273.15

        # Convert Celsius to Fahrenheit
        Fah = Cel * 1.8 + 32

        # Print the temperature in both Celsius and Fahrenheit
        print('Celsius: %.2f C  Fahrenheit: %.2f F' % (Cel, Fah))

        # Wait for 0.2 seconds before the next read
        time.sleep(0.2)

# Handle KeyboardInterrupt for graceful termination
except KeyboardInterrupt:
    # Clean up ADC0834 resources
    ADC0834.destroy()
コードの説明
このセクションでは、アナログ-デジタル変換用のADC0834ライブラリ、遅延を実装するためのtimeライブラリ、数学的操作を行うためのmathライブラリをインポートしています。
#!/usr/bin/env python3
# -*- coding: utf-8 -*-

import ADC0834
import time
import math
アナログ値の読み取りを可能にするためにADC0834モジュールを初期化します。
# Initialize the ADC0834 module
ADC0834.setup()
無限ループを実装してデータの連続読み取りを行います。ループはサーミスタからアナログ値を読み取り、この値を電圧に変換し、サーミスタの抵抗を計算し、その抵抗をケルビン、摂氏、華氏の温度測定に変換します。温度の読み取りを摂氏と華氏の両方で出力し、各読み取りの間に0.2秒の待機を挿入します。
# Run the process in a try-except block
try:
    while True:
        # Read the analog value from the sensor
        analogVal = ADC0834.getResult()

        # Convert the analog value to a voltage
        Vr = 5 * float(analogVal) / 255

        # Calculate the resistance of the thermistor
        Rt = 10000 * Vr / (5 - Vr)

        # Calculate the temperature in Kelvin
        temp = 1 / (((math.log(Rt / 10000)) / 3950) + (1 / (273.15 + 25)))

        # Convert Kelvin to Celsius
        Cel = temp - 273.15

        # Convert Celsius to Fahrenheit
        Fah = Cel * 1.8 + 32

        # Print the temperature in both Celsius and Fahrenheit
        print('Celsius: %.2f C  Fahrenheit: %.2f F' % (Cel, Fah))

        # Wait for 0.2 seconds before the next read
        time.sleep(0.2)
プログラムを正常に終了するためのKeyboardInterrupt例外をキャッチし、終了時にADC0834のリソースをクリーンアップする命令を含めています。
# Handle KeyboardInterrupt for graceful termination
except KeyboardInterrupt:
    # Clean up ADC0834 resources
    ADC0834.destroy()