Note
Hello, welcome to the SunFounder Raspberry Pi & Arduino & ESP32 Enthusiasts Community on Facebook! Dive deeper into Raspberry Pi, Arduino, and ESP32 with fellow enthusiasts.
Why Join?
Expert Support: Solve post-sale issues and technical challenges with help from our community and team.
Learn & Share: Exchange tips and tutorials to enhance your skills.
Exclusive Previews: Get early access to new product announcements and sneak peeks.
Special Discounts: Enjoy exclusive discounts on our newest products.
Festive Promotions and Giveaways: Take part in giveaways and holiday promotions.
👉 Ready to explore and create with us? Click [here] and join today!
3.1.14 GAME– Not Not
Introduction
In this lesson, we will make an interesting game device, and we call it "Not Not".
During the game, the dot matrix will refresh an arrow randomly. What you need to do is to press the button in the opposite direction of the arrow within a limited time. If the time is up, or if the button in the same direction as the arrow is pressed, you are out.
This game can really practice your reverse thinking, and now shall we have a try?
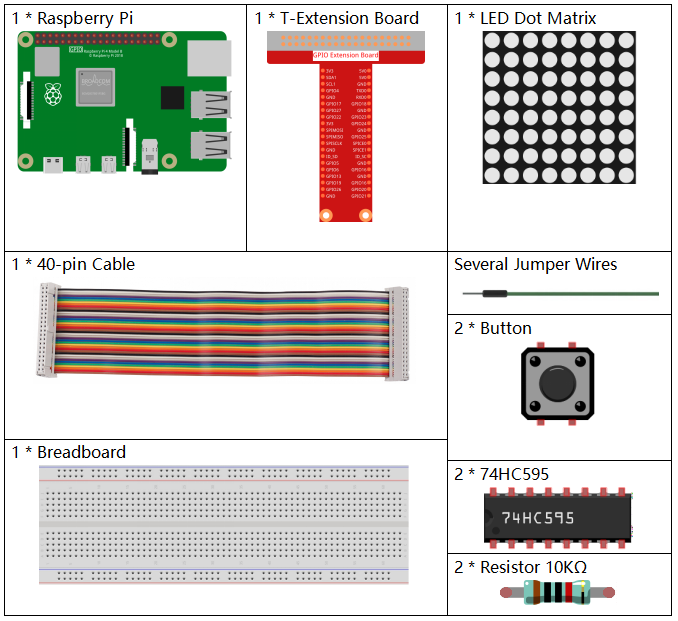
Components
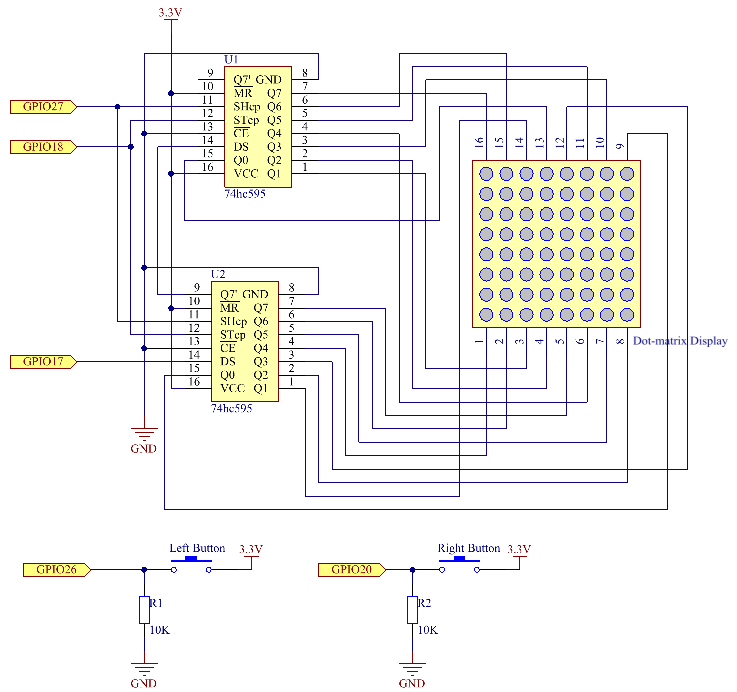
Schematic Diagram
T-Board Name |
physical |
wiringPi |
BCM |
GPIO17 |
Pin 11 |
0 |
17 |
GPIO18 |
Pin 12 |
1 |
18 |
GPIO27 |
Pin 13 |
2 |
27 |
GPIO20 |
Pin 38 |
28 |
20 |
GPIO26 |
Pin 37 |
25 |
26 |
Experimental Procedures
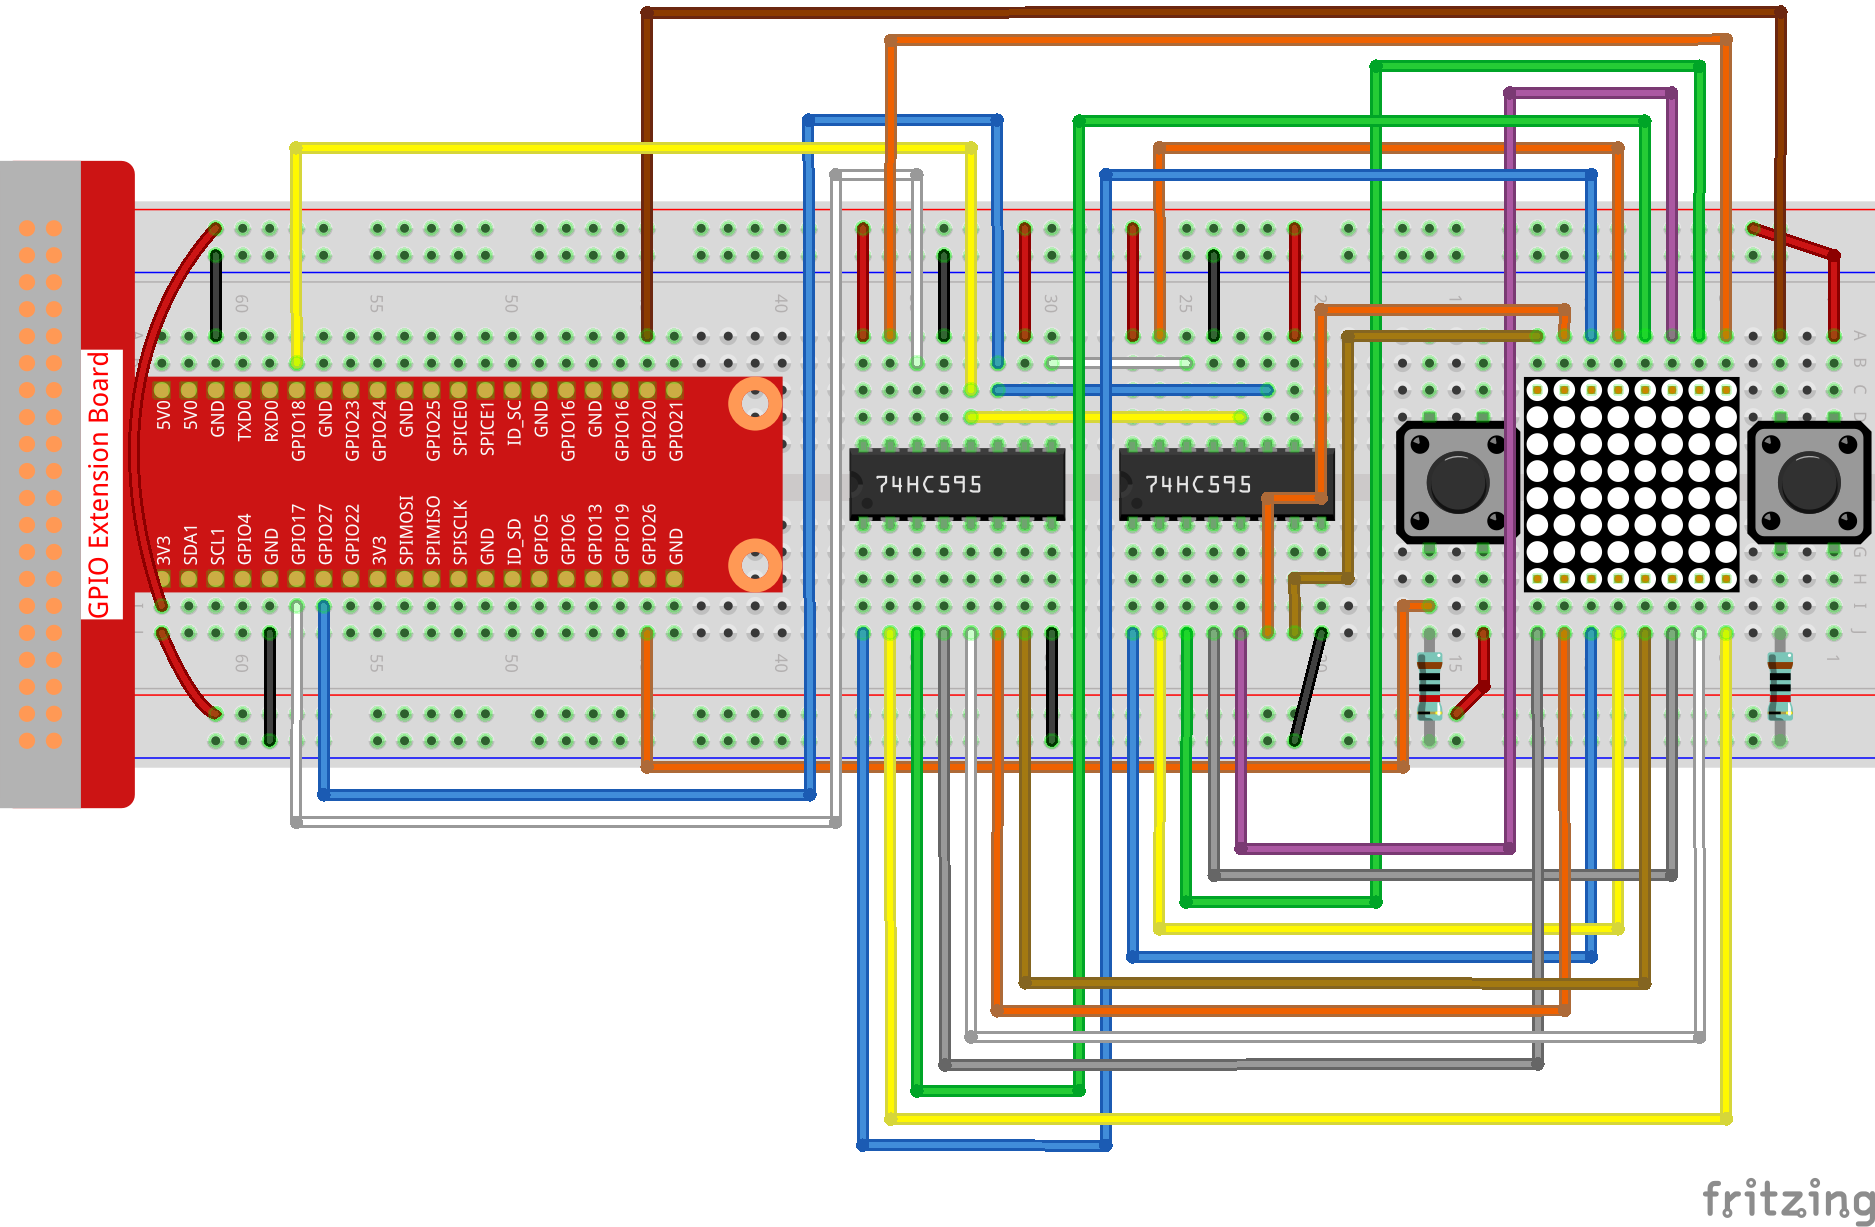
Step 1: Build the circuit.
Step 2: Go to the folder of code.
cd ~/davinci-kit-for-raspberry-pi/c/3.1.14/
Step 3: Compile.
gcc 3.1.14_GAME_NotNot.c -lwiringPi
Step 4: Run.
sudo ./a.out
After the program starts, a left or right arrow will be refreshed at random on the dot matrix. What you need to do is to press the button in the opposite direction of the arrow within a limited time. Then "√" appears on the dot matrix. If the time is up, or if the button in the same direction as the arrow is pressed, you are out and the dot matrix displays "x". You can also add 2 new buttons or replace them with Joystick keys for up, down, left and right— 4 directions to increase the difficulty of the game.
Note
If it does not work after running, or there is an error prompt: "wiringPi.h: No such file or directory", please refer to Install and Check the WiringPi.
Code Explanation
Based on 1.1.6 LED Dot Matrix, this lesson adds 2 buttons to make an amusing game device.
The whole program process is as below:
Randomly select an arrow direction and generate timer 1.
Display the arrow image on the dot matrix.
Judge the button input. If the button is pressed or timer 1 reminds time’s up, judgement starts.
Display the image on the basis of a judging result; meanwhile, generate timer 2.
Rerun step 1 when timer 2 reminds time’s up.
struct GLYPH{
    char *word;
    unsigned char code[8];
};

struct GLYPH arrow[2]=
{
    {"right",{0xFF,0xEF,0xDF,0x81,0xDF,0xEF,0xFF,0xFF}},
    // {"down",{0xFF,0xEF,0xC7,0xAB,0xEF,0xEF,0xEF,0xFF}},
    // {"up",{0xFF,0xEF,0xEF,0xEF,0xAB,0xC7,0xEF,0xFF}},
    {"left",{0xFF,0xF7,0xFB,0x81,0xFB,0xF7,0xFF,0xFF}}
};

struct GLYPH check[2]=
{
    {"wrong",{0xFF,0xBB,0xD7,0xEF,0xD7,0xBB,0xFF,0xFF}},
    {"right",{0xFF,0xFF,0xF7,0xEB,0xDF,0xBF,0xFF,0xFF}}
};
GLYPH structure works like a dictionary: the word attribute corresponds to the key on the dictionary; the code attribute corresponds to the value.
Here, code is used to store an array for dot matrix to display images (an 8x8 bit array).
Here, the array arrow can be used to display the arrow pattern in up, down, left and right directions on the LED dot matrix.
Now down and up are commented and uncomment them if needed.
The array check is used to display these two images: "×" and "√".
char *lookup(char *key,struct GLYPH *glyph,int length){
    for (int i=0;i<length;i++)
    {
        if(strcmp(glyph[i].word,key)==0){
            return glyph[i].code;
        }
    }
}
The function lookup() works by "checking the dictionary". Define a key, search the same words as key in the structure GLYPH *glyph and return the corresponding information— "code" of the certain word.
The function Strcmp() is used to compare the identity of two character strings glyph[i].word and key; if the identity is judged, return glyph[i].code ( as shown).
void display(char *glyphCode){
    for(int i;i<8;i++){
        hc595_in(glyphCode[i]);
        hc595_in(0x80>>i);
        hc595_out();
    }
}
Display the specified pattern on the dot matrix.
void createGlyph(){
    srand(time(NULL));
    int i=rand()%(sizeof(arrow)/sizeof(arrow[0]));
    waypoint=arrow[i].word;
    stage="PLAY";
    alarm(2);
}
The function createGlyph() is used to randomly select a direction (the word attribute of an element in the array arrow[]: "left", "right"… ). Set the stage as "PLAY" and start a 2-second alarm clock function.
srand(time(NULL)): Initializes random seeds that are from the system clock.
(sizeof(arrow)/sizeof(arrow[0])): Get the length of the array, the outcome is 2.
rand()%2: The remainder is 0 or 1, gotten from dividing a generated random number by 2.
waypoint=arrow[i].word: The outcome should be "right" or "left".
void checkPoint(char *inputKey){
    alarm(0)==0;
    if(inputKey==waypoint||inputKey=="empty")
    {
        waypoint="wrong";
    }
    else{
        waypoint="right";
    }
    stage="CHECK";
    alarm(1);
}
checkPoint() is used to check the button input; if the button is not pressed or the button in the same direction as the arrow is pressed, the outcome of the waypoint is wrong and "x" appears on the dot matrix. Otherwise, the waypoint is right and dot matrix displays "√". Here the stage is CHECK, and there can be set a 1-second alarm clock function.
alarm() is also called "alarm clock", in which a timer can be set, and it sends SIGALRM signals to the progress when the defined time is up.
void getKey(){
    if (digitalRead(AButtonPin)==1&&digitalRead(BButtonPin)==0)
    {checkPoint("right");}
    else if (digitalRead(AButtonPin)==0&&digitalRead(BButtonPin)==1)
    {checkPoint("left");}
}
getKey() reads the states of the these two buttons; if the right button is pressed, the parameter of the function checkPoint() is right and if the left button is pressed, the parameter is left.
void timer(){
    if (stage=="PLAY"){
        checkPoint("empty");
    }
    else if(stage=="CHECK"){
        createGlyph();
    }
}
Previously, timer() was called when set as the alarm() time’s up. Then under the "PLAY" mode, checkPoint() is to be called to judge the outcome. If the program is set to "CHECK" mode, the function createGlyph() should be called to select new patterns.
void main(){
    setup();
    signal(SIGALRM,timer);
    createGlyph();
    char *code = NULL;
    while(1){
        if (stage == "PLAY")
        {
            code=lookup(waypoint,arrow,sizeof(arrow)/sizeof(arrow[0]));
            display(code);
            getKey();
        }
        else if(stage == "CHECK")
        {
            code = lookup(waypoint,check,sizeof(check)/sizeof(check[0]));
            display(code);
        }
    }
}
The working of the function signal(SIGALRM,timer): calling the timer() function when a SIGALRM signal (generated by the alarm clock function alarm()) is received.
When the program starts, call createGlyph() one time at first and then start the loop.
In the loop: under PLAY mode, the dot matrix displays arrow patterns and check the button state; if under CHECK mode, what is displayed is "x" or "√".