Note
Hello, welcome to the SunFounder Raspberry Pi & Arduino & ESP32 Enthusiasts Community on Facebook! Dive deeper into Raspberry Pi, Arduino, and ESP32 with fellow enthusiasts.
Why Join?
Expert Support: Solve post-sale issues and technical challenges with help from our community and team.
Learn & Share: Exchange tips and tutorials to enhance your skills.
Exclusive Previews: Get early access to new product announcements and sneak peeks.
Special Discounts: Enjoy exclusive discounts on our newest products.
Festive Promotions and Giveaways: Take part in giveaways and holiday promotions.
👉 Ready to explore and create with us? Click [here] and join today!
Smart Fan
This Arduino project automatically adjusts the fan’s speed to maintain the temperature within a suitable range. Additionally, users can enter manual mode through a button to operate the fan at maximum speed.
Required Components
In this project, we need the following components.
It’s definitely convenient to buy a whole kit, here’s the link:
Name |
ITEMS IN THIS KIT |
LINK |
|---|---|---|
Elite Explorer Kit |
300+ |
You can also buy them separately from the links below.
COMPONENT INTRODUCTION |
PURCHASE LINK |
|---|---|
- |
|
- |
|
- |
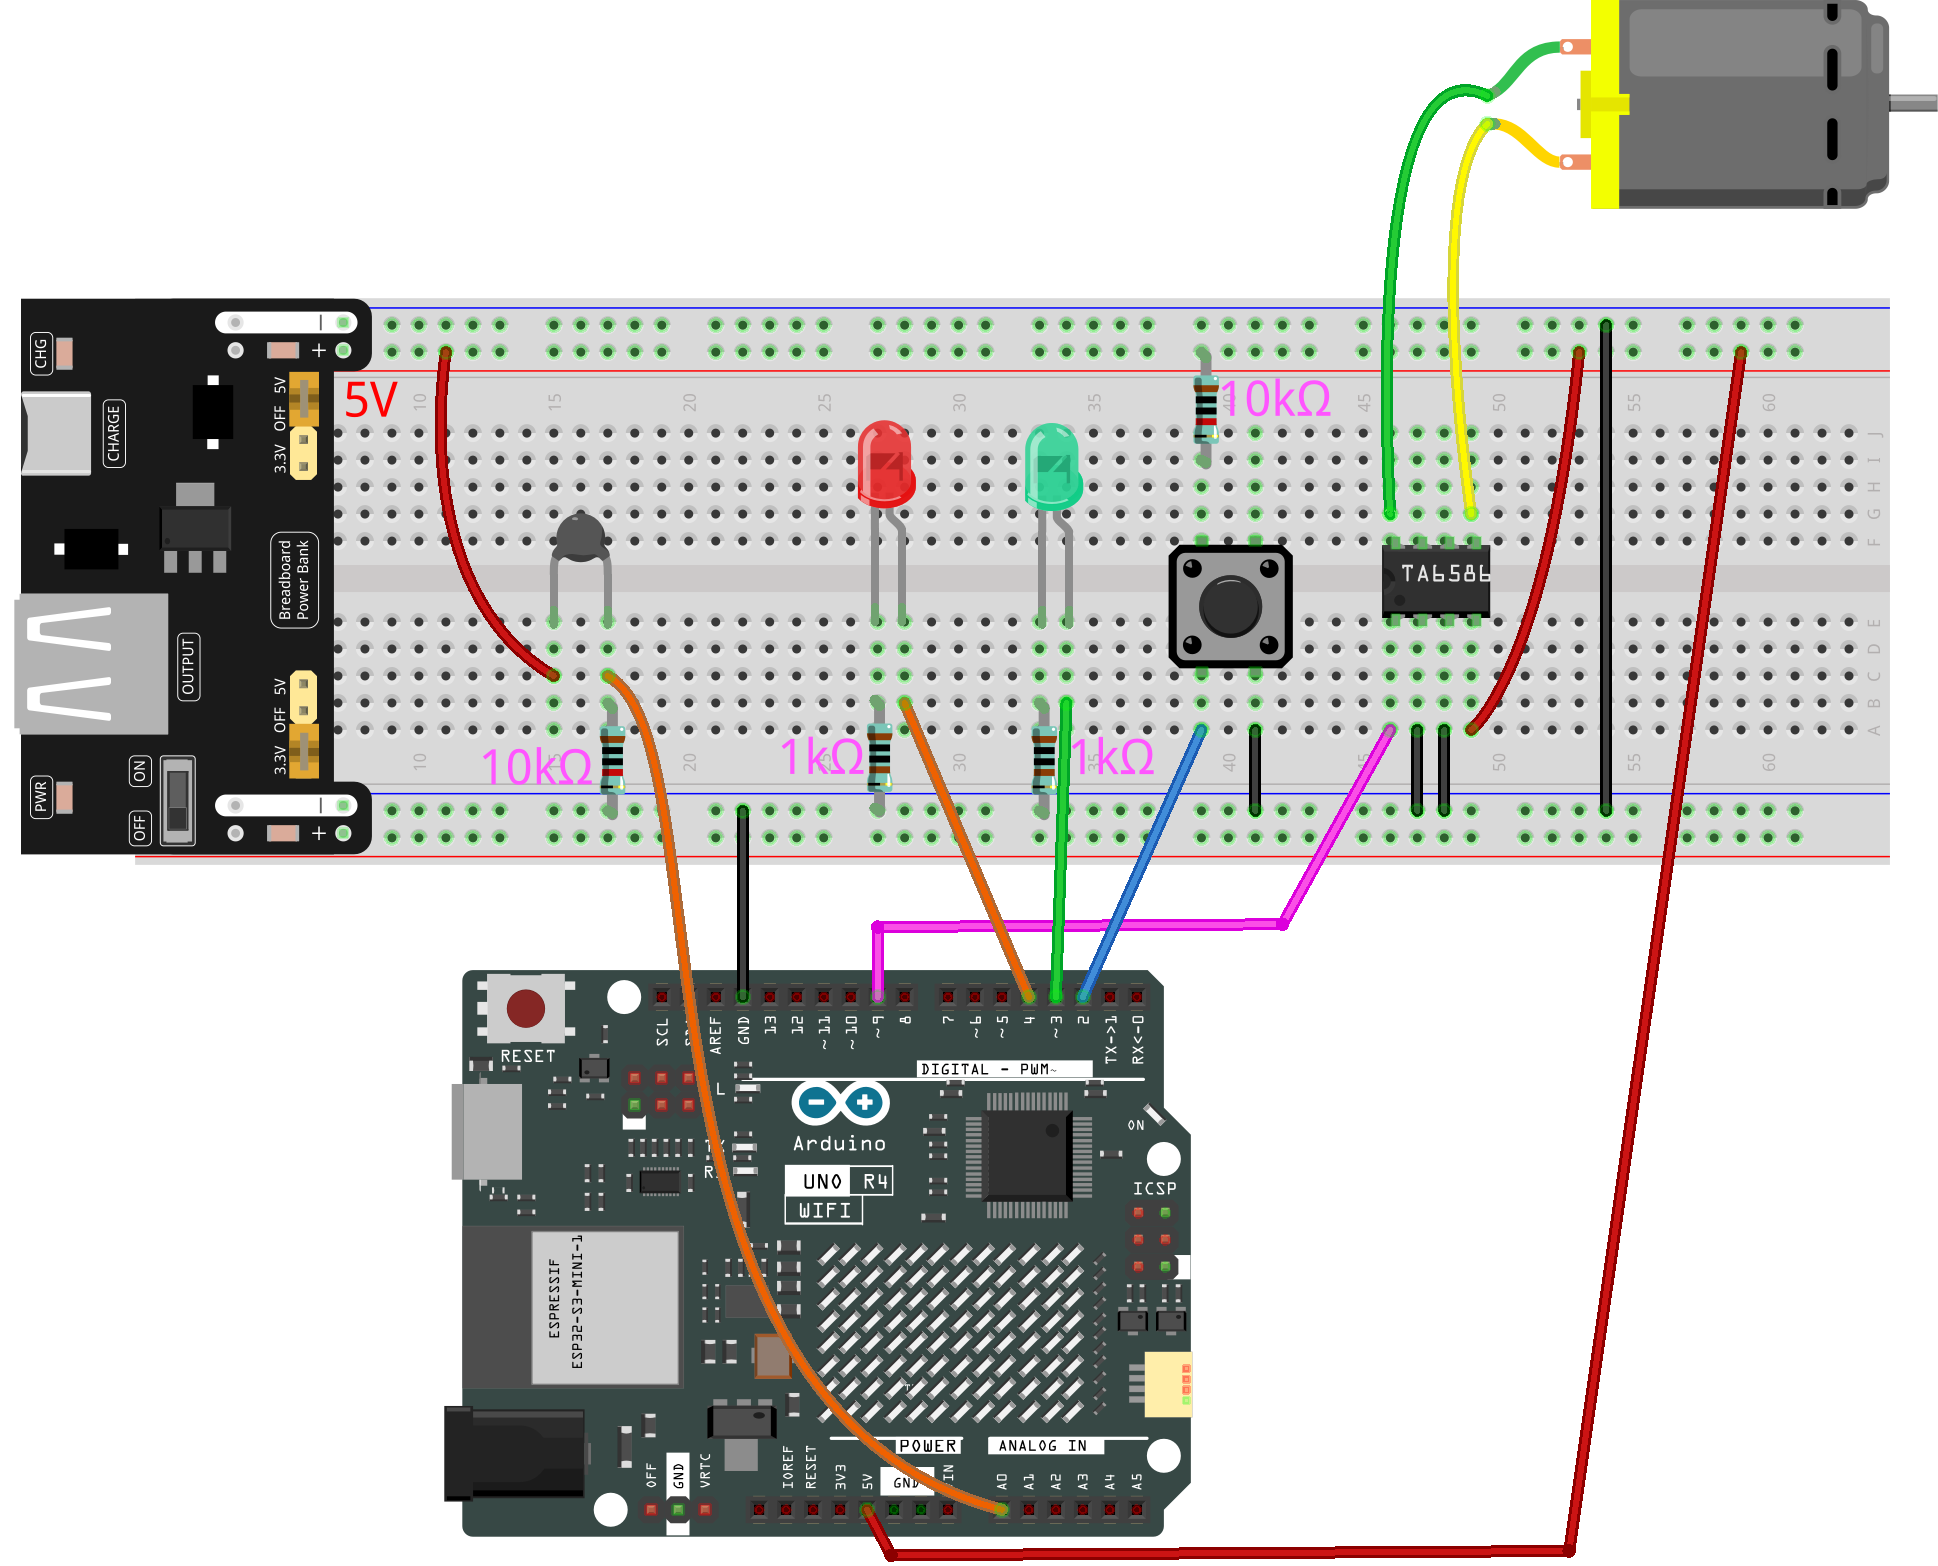
Wiring
Note
The motor requires more power during operation, so please keep the power module connected to a charging cable when in use.
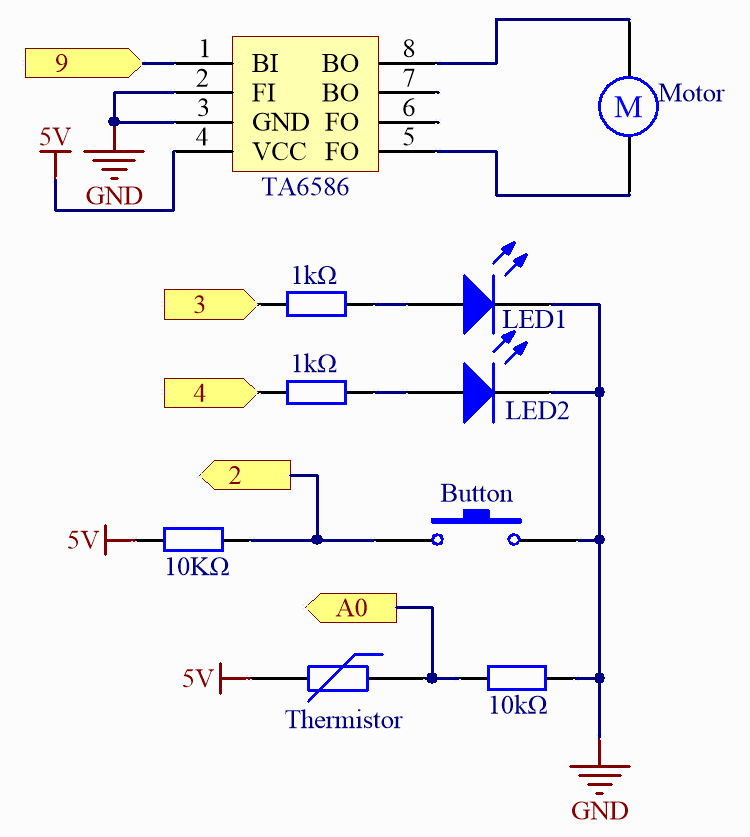
Schematic
Code
Note
You can open the file
06_smart_fan.inounder the path ofelite-explorer-kit-main\fun_project\06_smart_fandirectly.Or copy this code into Arduino IDE.
 1/*
 2  This code controls a DC motor fan based on temperature readings from a thermistor.
 3  It includes a manual override feature using a button. In automatic mode, the fan speed
 4  is controlled according to the temperature. In manual mode, the fan runs at full speed.
 5  LEDs are used to indicate the current mode (auto or manual).
 6
 7  Board: Arduino Uno R4
 8  Component: LED, button, thermistor, and DC motor.
 9*/
10
11// Pin assignments
12#define MOTOR_PIN 9         // PWM compatible pin for DC motor
13#define TEMP_SENSOR_PIN A0  // Analog pin for thermistor
14#define BUTTON_PIN 2        // Digital pin for button
15#define LED_AUTO 3          // Digital pin for AUTO mode LED
16#define LED_MANUAL 4        // Digital pin for MANUAL mode LED
17
18#define TEMP_THRESHOLD 25  // Temperature threshold for fan activation in Celsius
19
20bool manualMode = false;
21
22void setup() {
23
24  Serial.begin(9600);
25
26  // Set pin modes
27  pinMode(MOTOR_PIN, OUTPUT);
28  pinMode(TEMP_SENSOR_PIN, INPUT);
29  pinMode(BUTTON_PIN, INPUT_PULLUP);
30  pinMode(LED_AUTO, OUTPUT);
31  pinMode(LED_MANUAL, OUTPUT);
32
33  // Initialize LEDs
34  digitalWrite(LED_AUTO, HIGH);  // Auto mode is the default
35  digitalWrite(LED_MANUAL, LOW);
36}
37
38void loop() {
39  static bool lastButtonState = HIGH;  // Last state of the button
40
41  // Check for button press
42  bool currentButtonState = digitalRead(BUTTON_PIN);
43  if (currentButtonState == LOW && lastButtonState == HIGH) {
44    manualMode = !manualMode;  // Toggle mode
45    // Update LEDs based on mode
46    if (manualMode) {
47      digitalWrite(LED_AUTO, LOW);
48      digitalWrite(LED_MANUAL, HIGH);
49    } else {
50      digitalWrite(LED_AUTO, HIGH);
51      digitalWrite(LED_MANUAL, LOW);
52    }
53    delay(200);  // Debounce delay
54  }
55  lastButtonState = currentButtonState;
56
57  // Fan control logic
58  if (manualMode) {
59    analogWrite(MOTOR_PIN, 255);  // Full speed in manual mode
60  } else {
61    float voltage = analogRead(TEMP_SENSOR_PIN) * 5.0 / 1023.0;
62    float temperature = voltageToTemperature(voltage);  // Convert voltage to temperature
63    if (temperature > TEMP_THRESHOLD) {
64      // Scale fan speed based on temperature
65      analogWrite(MOTOR_PIN, map(temperature, TEMP_THRESHOLD, 40, 100, 255));
66    } else {
67      analogWrite(MOTOR_PIN, 0);  // Turn off the fan
68    }
69  }
70}
71
72
73// Convert voltage reading from thermistor to temperature in Celsius
74float voltageToTemperature(float voltage) {
75  // Define constants
76  const float referenceResistor = 10000;  // the 'other' resistor
77  const float beta = 3950;                // Beta value (Typical Value)
78  const float nominalTemperature = 25;    // Nominal temperature for calculating the temperature coefficient
79  const float nominalResistance = 10000;  // Resistance value at nominal temperature
80
81  // Convert the reading to resistance
82  float Rt = referenceResistor * (5.0 - voltage) / voltage;
83
84  // Use the Beta parameter equation to calculate temperature in Kelvin
85  float tempK = 1 / (((log(Rt / nominalResistance)) / beta) + (1 / (nominalTemperature + 273.15)));
86
87  // Convert to Celsius
88  float tempC = tempK - 273.15;
89
90  // Print temperature in Celsius to the Serial Monitor
91  Serial.print("Temp: ");
92  Serial.print(tempC);
93  Serial.println(" degree Celsius");
94
95  // Convert to Fahrenheit
96  // float tempF = tempC * 1.8 + 32;
97
98  return tempC;
99}
How it works?
Here is a step-by-step explanation of the code:
Constants and Variable Definitions:
Use
#defineto define the pins for various hardware connections.TEMP_THRESHOLDis defined as 25°C, which is the temperature threshold to start the fan.manualMode: A boolean variable that indicates whether it is in manual mode.setup():Set the mode for relevant pins (output, input, input with pull-up). Initially set to automatic mode, so
LED_AUTOis lit whileLED_MANUALis off.loop():Monitor the button’s state. When the button is pressed, it toggles the mode and changes the LED’s status. In manual mode, the fan operates at maximum speed. In automatic mode, the code first reads the voltage value from the temperature sensor and converts it to a temperature value. If the temperature exceeds the threshold, the fan’s speed is adjusted based on the temperature.
voltageToTemperature():This is an auxiliary function used to convert the voltage value from the temperature sensor into a temperature value (in Celsius). The function uses the standard formula for a thermistor to estimate the temperature. The return value is in degrees Celsius.