Note
Hello, welcome to the SunFounder Raspberry Pi & Arduino & ESP32 Enthusiasts Community on Facebook! Dive deeper into Raspberry Pi, Arduino, and ESP32 with fellow enthusiasts.
Why Join?
Expert Support: Solve post-sale issues and technical challenges with help from our community and team.
Learn & Share: Exchange tips and tutorials to enhance your skills.
Exclusive Previews: Get early access to new product announcements and sneak peeks.
Special Discounts: Enjoy exclusive discounts on our newest products.
Festive Promotions and Giveaways: Take part in giveaways and holiday promotions.
👉 Ready to explore and create with us? Click [here] and join today!
Access Control System
The primary function of this code is to perform user authentication using an RFID module. If the authentication is successful, it controls a stepper motor to open the door and emits a sound through a buzzer to indicate the authentication result. If the authentication fails, the door will not open.
You can open the serial monitor to view the ID of your RFID card and re-config the password in this code.
Required Components
In this project, we need the following components.
It’s definitely convenient to buy a whole kit, here’s the link:
Name |
ITEMS IN THIS KIT |
LINK |
|---|---|---|
Elite Explorer Kit |
300+ |
You can also buy them separately from the links below.
COMPONENT INTRODUCTION |
PURCHASE LINK |
|---|---|
- |
|
- |
|
- |
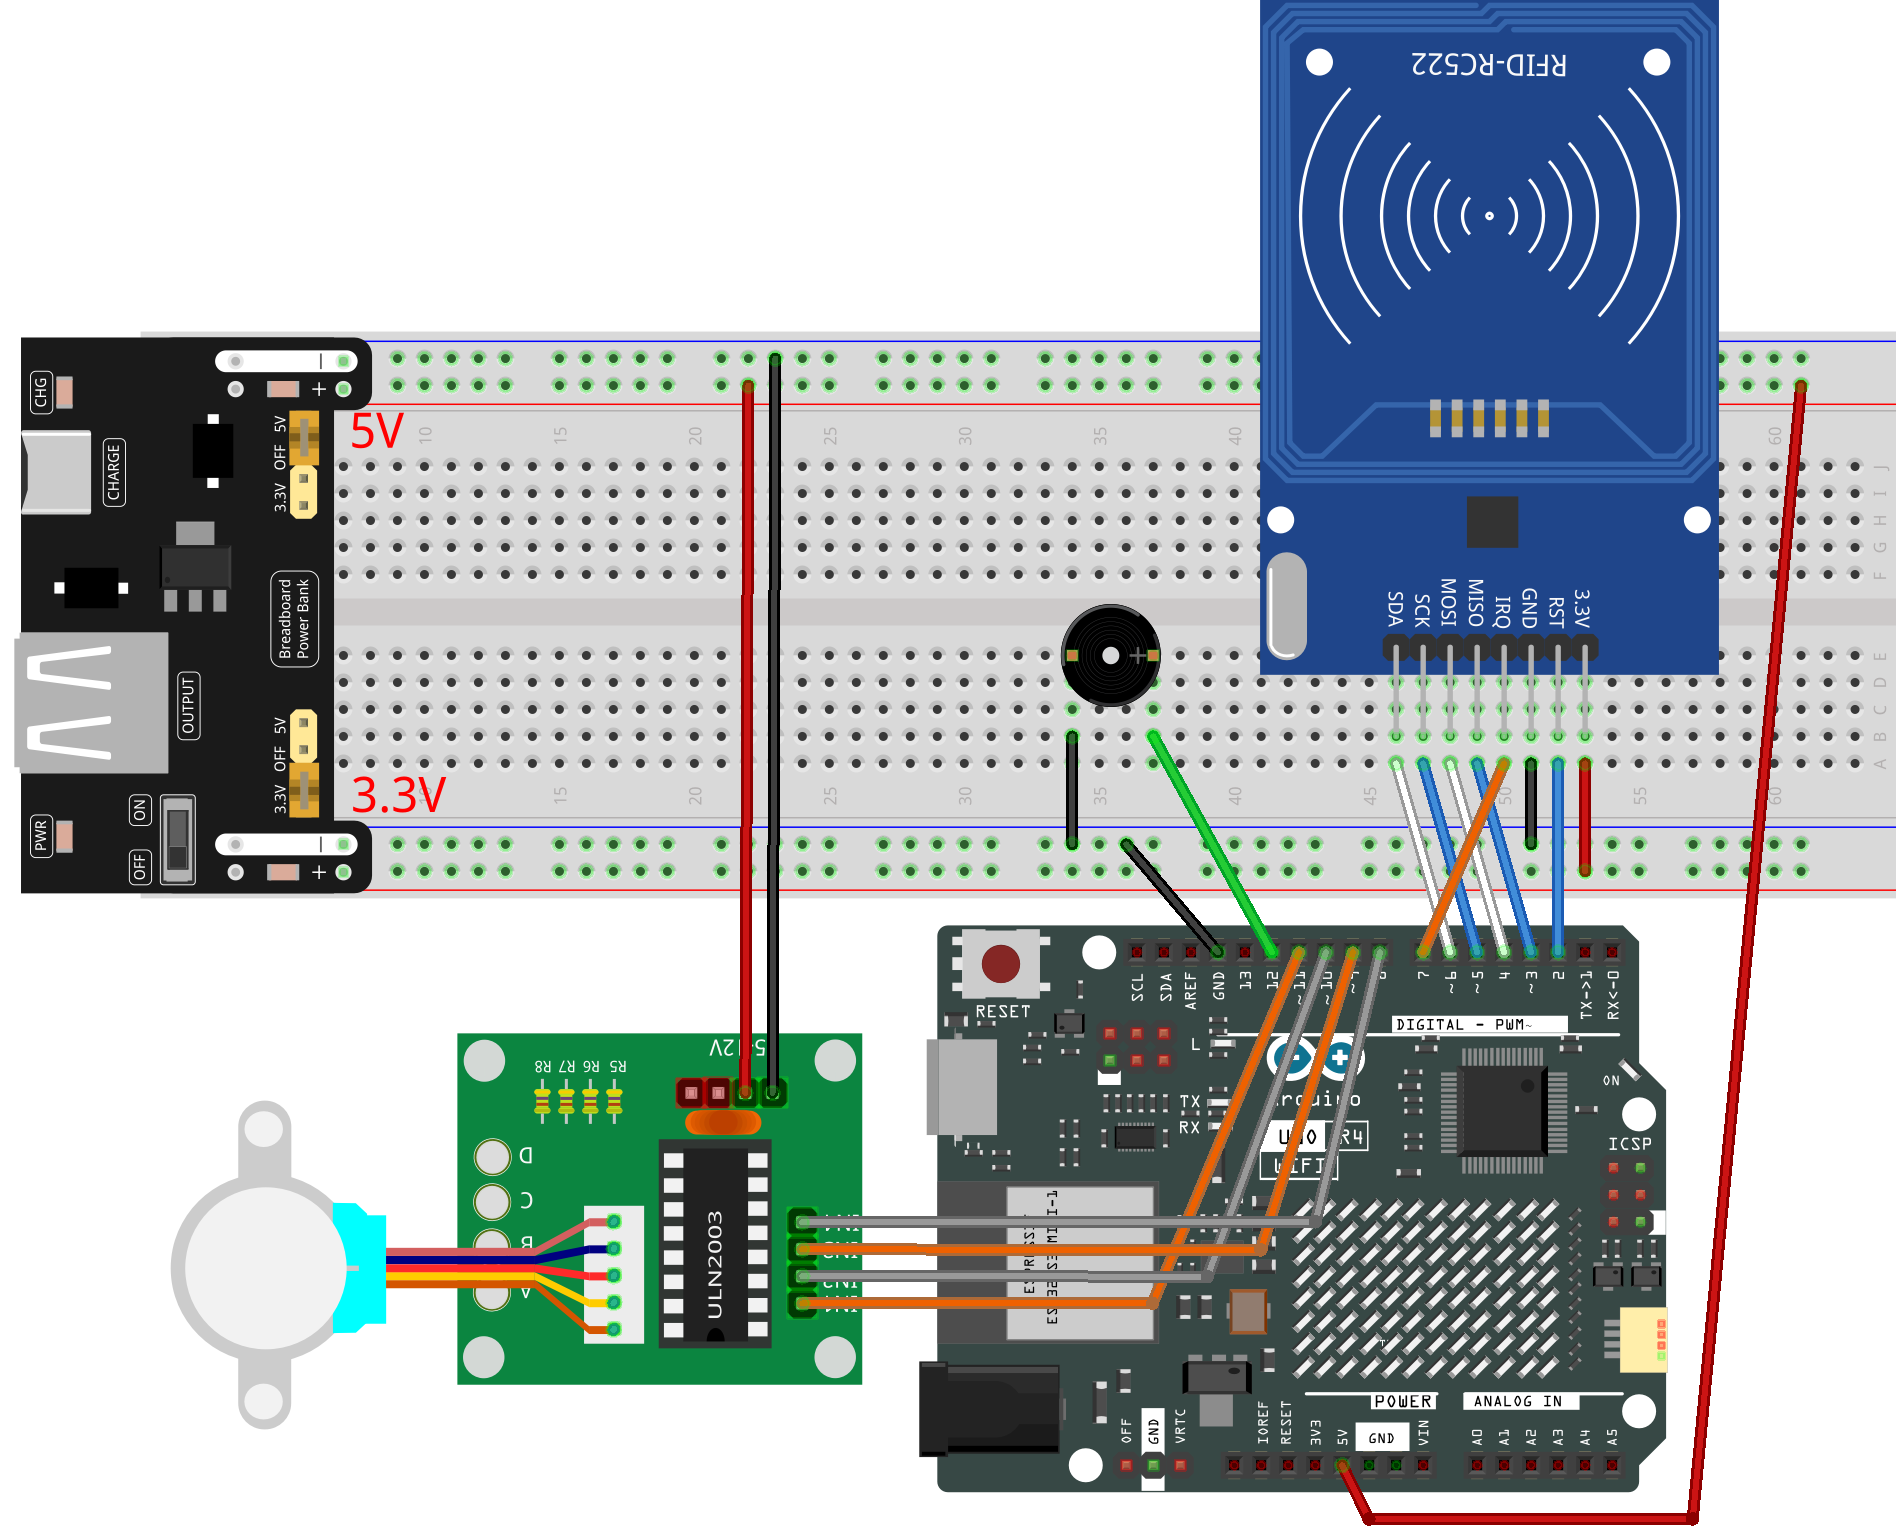
Wiring
Note
To protect the Power Supply Module’s Power Pack, please fully charge it before using it for the first time.
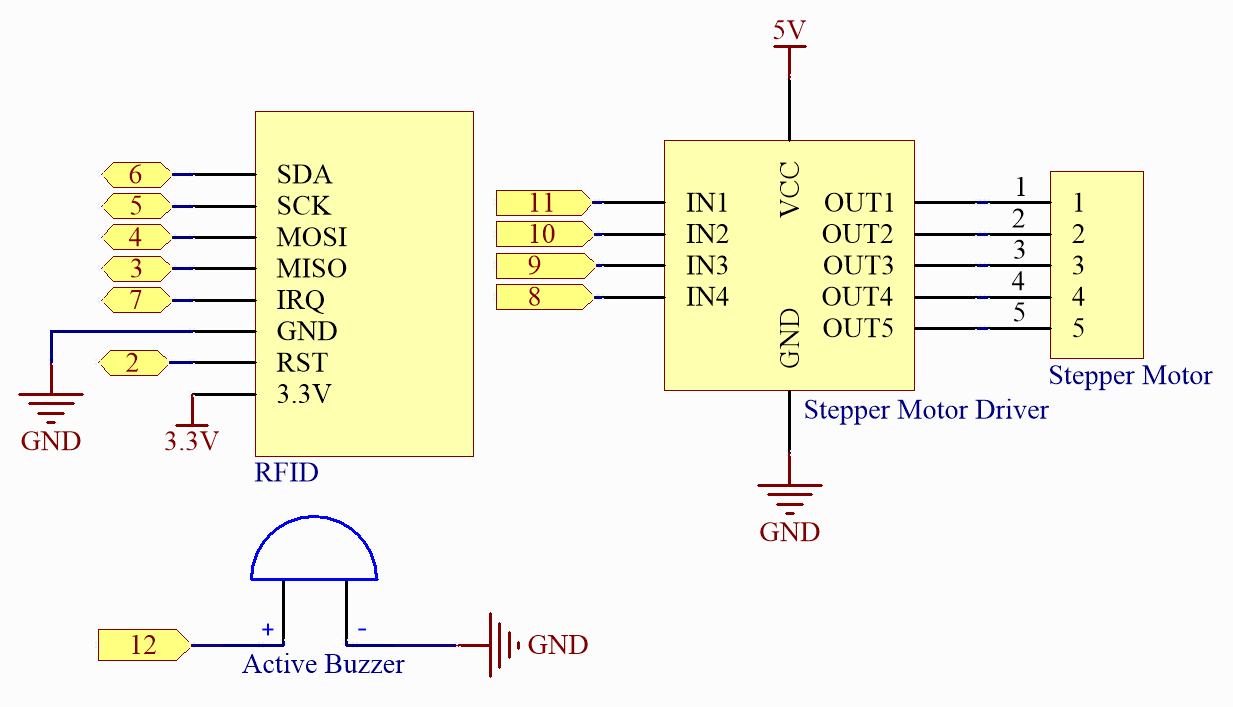
Schematic
Code
Note
You can open the file
09_access_control_system.inounder the path ofelite-explorer-kit-main\fun_project09_access_control_systemdirectly.Or copy this code into Arduino IDE.
Note
The
RFID1library is used here. The library can be found in theelite-explorer-kit-main/library/directory, or you can click hereRFID1.zipto download it. Refer to Manual Installation for a tutorial on how to install it.
  1/*
  2  The code is designed for an Arduino Uno R4 board and uses an MFRC522 RFID module,
  3  a stepper motor, and a buzzer. The system serves as an RFID-based door lock. It
  4  reads an RFID card and matches its ID with a pre-defined authenticated ID. If the
  5  ID matches, the stepper motor turns to open the door, and a buzzer beeps to indicate
  6  success. Otherwise, the buzzer beeps differently to indicate failure.
  7
  8  Board: Arduino Uno R4
  9  Component: MFRC522 Module, Stepper Motor and Buzzer
 10*/
 11
 12
 13#include <rfid1.h>
 14#include <Stepper.h>
 15#include <Wire.h>
 16
 17#define ID_LEN 4
 18
 19/*Stepper Motor*/
 20const int stepsPerRevolution = 2048;  // Steps per revolution for stepper motor
 21const int rolePerMinute = 16;         // Motor speed in RPM
 22const int IN1 = 11;
 23const int IN2 = 10;
 24const int IN3 = 9;
 25const int IN4 = 8;
 26
 27/*Buzzer*/
 28const int buzPin = 12;
 29
 30/*Authentication Parameters*/
 31uchar userIdRead[ID_LEN] = { "" };
 32uchar userId[ID_LEN] = { 0x36, 0xE2, 0xC4, 0xF7 };  // Authenticated ID
 33bool approved = 0;
 34
 35RFID1 rfid;  //create a variable type of RFID1
 36Stepper stepper(stepsPerRevolution, IN1, IN3, IN2, IN4);
 37
 38void setup() {
 39  Serial.begin(9600);
 40  stepper.setSpeed(rolePerMinute);
 41  pinMode(buzPin, OUTPUT);
 42  rfid.begin(7, 5, 4, 3, 6, 2);
 43  rfid.init();  //initialize the RFID
 44  Serial.println("start");
 45}
 46
 47void loop() {
 48  // If not approved, try to read RFID
 49  if (approved == 0) {
 50    approved = rfidRead();
 51    for (int i = 0; i < ID_LEN; i++) {
 52      userIdRead[i] = NULL;  // Clear read ID
 53    }
 54  }
 55  // If approved, open the door
 56  if (approved == 1) {
 57    openDoor();
 58    approved = 0;  // Reset approval flag
 59  }
 60}
 61
 62void beep(int duration, int frequency) {
 63  for (int i = 0; i < frequency; i++) {
 64    digitalWrite(buzPin, HIGH);
 65    delay(duration);
 66    digitalWrite(buzPin, LOW);
 67    delay(100);
 68  }
 69}
 70
 71void verifyPrint(bool result) {
 72  if (result == true) {
 73    beep(100, 3);
 74    delay(400);
 75  } else {
 76    beep(500, 1);
 77    delay(400);
 78  }
 79}
 80
 81void openDoor() {
 82  int doorStep = 512;  //This means the door will open to 90 degrees
 83  stepper.step(doorStep);
 84  for (int i = 0; i < 5; i++) {
 85    delay(1000);
 86  }
 87  stepper.step(-doorStep);
 88}
 89
 90bool rfidRead() {
 91  getId();
 92  if (userIdRead[0] != NULL) {
 93    return idVerify();
 94  }
 95  return 0;
 96}
 97
 98void getId() {
 99  uchar status;
100  uchar str[MAX_LEN];
101  status = rfid.request(PICC_REQIDL, str);
102  if (status != MI_OK) {
103    return;
104  } else {
105    status = rfid.anticoll(str);
106    Serial.println("");
107    Serial.print("Reading Card ID: ");
108    if (status == MI_OK) {
109      for (int i = 0; i < ID_LEN; i++) {
110        userIdRead[i] = str[i];
111        Serial.print("0x");
112        Serial.print(userIdRead[i], HEX);
113        Serial.print(", ");
114      }
115    }
116    delay(500);
117    rfid.halt();
118    beep(150, 1);
119  }
120}
121
122bool idVerify() {
123  for (int i = 0; i < ID_LEN; i++) {
124    if (userIdRead[i] != userId[i]) {
125      verifyPrint(0);
126      return 0;
127    }
128  }
129  verifyPrint(1);
130  return 1;
131}
How it works?
Below is a step-by-step explanation of the code:
Include Library Files: You have included three library files:
rfid1.h,Stepper.h, andWire.h. These libraries are used to communicate with the RFID module, stepper motor, and for I2C communication.Constant Definitions: You have defined some constants, including
ID_LEN(length of the ID),stepsPerRevolution(steps per revolution for the stepper motor),rolePerMinute(stepper motor’s speed), as well as the four stepper motor pins (IN1, IN2, IN3, IN4), buzzer pin (buzPin), and variables related to authentication.Variable Definitions: You’ve defined variables such as an array to store the read user ID (
userIdRead), authenticated user ID (userId), and a boolean variable (approved) to indicate successful authentication.Object Instantiation: You’ve created instances of two objects:
RFID1 rfidandStepper stepperfor interacting with the RFID module and stepper motor, respectively.setup(): In thesetup()function, you initialize the stepper motor’s speed, set the buzzer pin as an output, and initialize the RFID module.loop(): In theloop()function, your main logic runs. Ifapprovedis 0 (indicating not authenticated yet), it calls therfidRead()function to read data from the RFID module and then clears theuserIdReadarray. Ifapprovedis 1 (indicating successful authentication), it calls theopenDoor()function to open the door and resetsapprovedto 0.beep(): This function controls the buzzer sound based on thedurationandfrequencyparameters provided.verifyPrint(): This function produces different buzzer sounds based on theresultparameter to indicate whether authentication was successful.openDoor(): This function controls the stepper motor to open the door to a certain angle (doorStep) and then waits for a period before closing the door.rfidRead(): This function reads data from the RFID module, first callinggetId()to get the user ID and thenidVerify()to verify if the user ID matches the authenticated ID.getId(): This function retrieves the user ID from the RFID module and stores it in theuserIdReadarray. It emits a beep if reading fails.idVerify(): This function verifies if the user ID matches the authenticated ID and produces a sound indicating successful or failed authentication.