Note
Hello, welcome to the SunFounder Raspberry Pi & Arduino & ESP32 Enthusiasts Community on Facebook! Dive deeper into Raspberry Pi, Arduino, and ESP32 with fellow enthusiasts.
Why Join?
Expert Support: Solve post-sale issues and technical challenges with help from our community and team.
Learn & Share: Exchange tips and tutorials to enhance your skills.
Exclusive Previews: Get early access to new product announcements and sneak peeks.
Special Discounts: Enjoy exclusive discounts on our newest products.
Festive Promotions and Giveaways: Take part in giveaways and holiday promotions.
👉 Ready to explore and create with us? Click [here] and join today!
GAME - Escape
This game is called “Escape”. The player’s objective is to tilt the MPU6050 sensor to move a pixel on the LED matrix and attempt to maneuver it through an opening in the matrix border (the exit).
Required Components
In this project, we need the following components.
It’s definitely convenient to buy a whole kit, here’s the link:
Name |
ITEMS IN THIS KIT |
LINK |
|---|---|---|
Elite Explorer Kit |
300+ |
You can also buy them separately from the links below.
COMPONENT INTRODUCTION |
PURCHASE LINK |
|---|---|
- |
|
- |
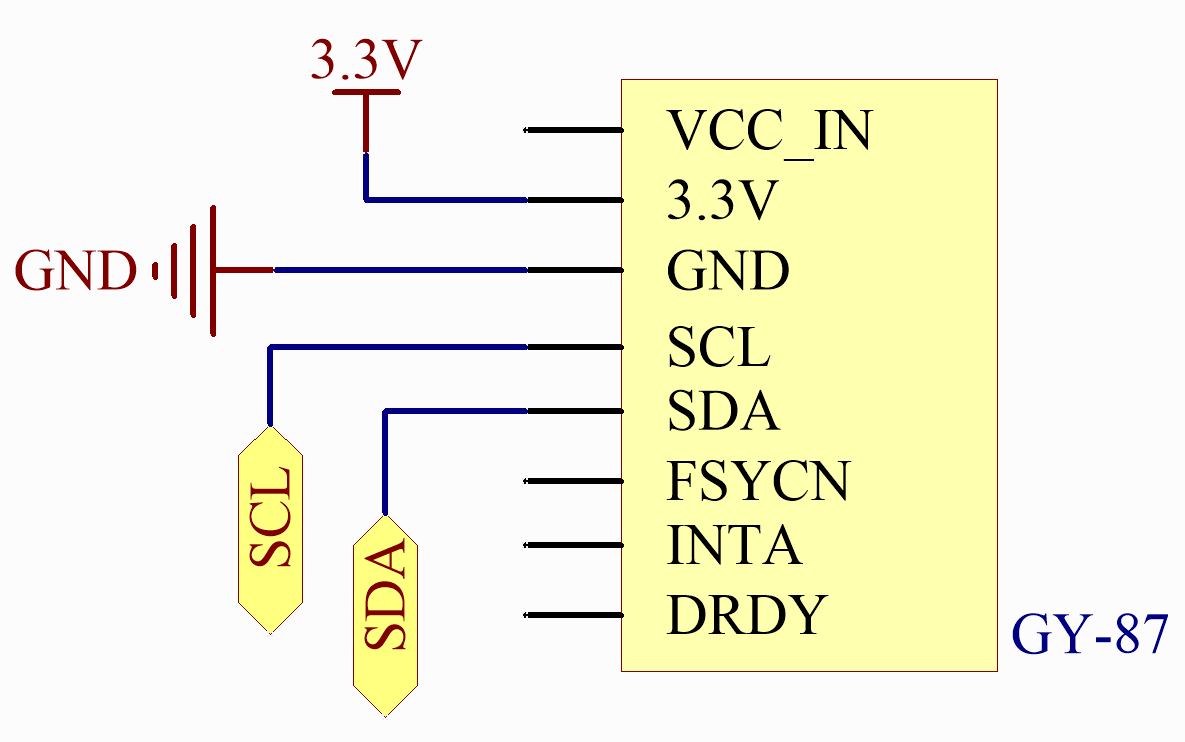
Wiring
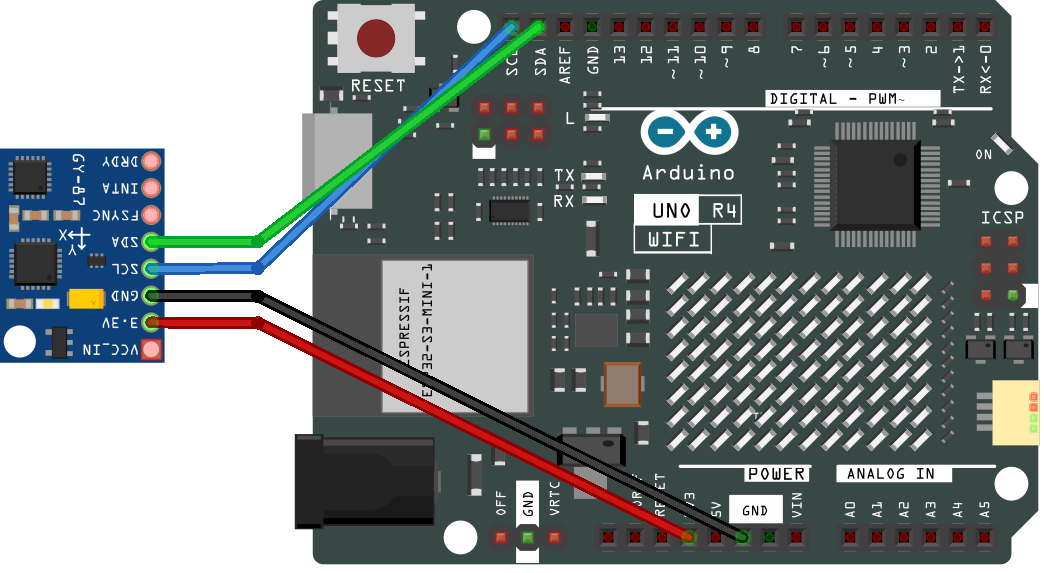
Schematic
Code
Note
You can open the file
11_escape_square.inounder the path ofelite-explorer-kit-main\fun_project\11_escape_squaredirectly.Or copy this code into Arduino IDE.
Note
To install the library, use the Arduino Library Manager and search for “Adafruit MPU6050” and install it.
  1/*
  2  The code utilizes an Arduino Uno and a GY-87 IMU module to create the "Escape" game.
  3  The goal is for the player to tilt the MPU6050 sensor, which controls the movement
  4  of a pixel on the LED matrix. The objective is to guide the pixel through an opening
  5  in the border of the matrix (the exit). Each successful passage through the opening
  6  raises the game level.
  7
  8  Board: Arduino Uno R4
  9  Component: GY-87 IMU module
 10  Library: https://github.com/adafruit/Adafruit_MPU6050  (Adafruit MPU6050 by Adafruit)
 11*/
 12
 13// Include necessary libraries
 14#include "Arduino_LED_Matrix.h"
 15#include <Wire.h>
 16#include <Adafruit_MPU6050.h>
 17#include <Adafruit_Sensor.h>
 18
 19// Create instances of sensor and matrix
 20Adafruit_MPU6050 mpu;
 21ArduinoLEDMatrix matrix;
 22byte frame[8][12];
 23
 24int gapStart = 0;
 25int side = 0;  // 0: top, 1: right, 2: bottom, 3: left
 26
 27int pixelX = 4;  // Initial position of the pixel in the center
 28int pixelY = 3;
 29int level =0;
 30bool pass = false;
 31
 32unsigned long gapLastUpdate = 0;
 33unsigned long pixelLastUpdate = 0;
 34
 35void setup() {
 36  //init matrix
 37  matrix.begin();
 38  drawSquareWithGap();
 39  matrix.loadPixels((uint8_t*)frame, 8 * 12);
 40  matrix.renderFrame(0);
 41
 42  //init mpu6050
 43  Serial.begin(9600);
 44  if (!mpu.begin()) {
 45    Serial.println("Failed to find MPU6050 chip");
 46    while (1) {
 47      delay(10);
 48    }
 49  }
 50  mpu.setAccelerometerRange(MPU6050_RANGE_2_G);
 51}
 52
 53void loop() {
 54  // movePixelBasedOnMPU();
 55  // moveGap();
 56
 57  unsigned long currentMillis = millis();
 58
 59  if (currentMillis - pixelLastUpdate >= 200) {
 60    movePixelBasedOnMPU();
 61    checkPixelPosition();
 62    pixelLastUpdate = currentMillis;
 63  }
 64
 65  if (currentMillis - gapLastUpdate >= 1020-level*100) {
 66    moveGap();
 67    gapLastUpdate = currentMillis;
 68  }
 69
 70  matrix.loadPixels((uint8_t*)frame, 8 * 12);
 71  matrix.renderFrame(0);
 72  if (pass){
 73    delay(1500); //delay for show
 74    pass=false;
 75    resetPixel();
 76  }
 77}
 78
 79
 80
 81
 82void drawSquareWithGap() {
 83  memset(frame, 0, 8 * 12);  // Clear the frame
 84
 85  for (int i = 0; i < 8; i++) {
 86    for (int j = 0; j < 8; j++) {
 87      if (i == 0 || i == 7 || j == 0 || j == 7) {
 88        frame[i][j] = 1;  // Set border pixel
 89      }
 90    }
 91  }
 92
 93  createGap();
 94
 95  // Redraw the pixel after drawing the square and gap
 96  frame[pixelY][pixelX] = 1;
 97}
 98
 99void createGap() {
100  switch (side) {
101    case 0:  // top
102      frame[0][gapStart] = 0;
103      frame[0][gapStart + 1] = 0;
104      // frame[0][gapStart + 2] = 0;
105      break;
106    case 1:  // right
107      frame[gapStart][7] = 0;
108      frame[gapStart + 1][7] = 0;
109      // frame[gapStart + 2][7] = 0;
110      break;
111    case 2:  // bottom
112      frame[7][7 - gapStart] = 0;
113      frame[7][6 - gapStart] = 0;
114      // frame[7][5 - gapStart] = 0;
115      break;
116    case 3:  // left
117      frame[7 - gapStart][0] = 0;
118      frame[6 - gapStart][0] = 0;
119      // frame[5 - gapStart][0] = 0;
120      break;
121  }
122}
123
124void moveGap() {
125  gapStart++;
126
127  if (side == 0 && gapStart > 5) {
128    gapStart = 0;
129    side = 1;
130  } else if (side == 1 && gapStart > 5) {
131    gapStart = 0;
132    side = 2;
133  } else if (side == 2 && gapStart > 5) {
134    gapStart = 0;
135    side = 3;
136  } else if (side == 3 && gapStart > 5) {
137    gapStart = 0;
138    side = 0;
139  }
140
141  drawSquareWithGap();  // Redraw the square with the moved gap
142}
143
144
145void movePixelBasedOnMPU() {
146  sensors_event_t a, g, temp;
147  mpu.getEvent(&a, &g, &temp);
148
149  frame[pixelY][pixelX] = 0;  // Clear current pixel
150
151  if (a.acceleration.x > 1.0) {
152    // pixelY++;
153    pixelY--;
154  } else if (a.acceleration.x < -1.0) {
155    // pixelY--;
156    pixelY++;
157  }
158
159  if (a.acceleration.y > 1.0) {
160    pixelX--;
161  } else if (a.acceleration.y < -1.0) {
162    pixelX++;
163  }
164
165  if (pixelX > 7 || pixelX < 0 || pixelY > 7 || pixelY < 0 || frame[pixelY][pixelX] == 1) {
166    resetPixel();
167  } else {
168    frame[pixelY][pixelX] = 1;
169  }
170}
171
172void resetPixel() {
173  pixelX = 4;
174  pixelY = 3;
175  frame[pixelY][pixelX] = 1;
176}
177
178void checkPixelPosition() {
179  bool isOnGap = false;
180
181  // Check if the pixel is on the gap
182  switch (side) {
183    case 0: // top
184      if (pixelY == 0 && pixelX >= gapStart && pixelX <= gapStart + 2) isOnGap = true;
185      break;
186    case 1: // right
187      if (pixelX == 7 && pixelY >= gapStart && pixelY <= gapStart + 2) isOnGap = true;
188      break;
189    case 2: // bottom
190      if (pixelY == 7 && pixelX >= 5 - gapStart && pixelX <= 7 - gapStart) isOnGap = true;
191      break;
192    case 3: // left
193      if (pixelX == 0 && pixelY >= 5 - gapStart && pixelY <= 7 - gapStart) isOnGap = true;
194      break;
195  }
196
197  if (isOnGap) {
198    if (level<=10){ level++;}
199    else {level=0;}
200    pass = true;
201  }
202
203  // Optionally, you can print out the level for debugging
204  // Serial.println("Level: " + String(level));
205}
How it works?
Here’s a detailed explanation of the code:
Library Imports and Global Variables:
Imported libraries include the LED matrix, Wire (for I2C communication), MPU6050 (motion sensor), and
Adafruit_Sensorlibrary. Initialization of MPU6050 and LED matrix objects. Definition of global variables such as pixelX and pixelY (pixel position), gapStart and side (start position of the gap and which side), level (game difficulty level), and more.setup():Initialize the LED matrix and draw the matrix with the gap. Initialize serial communication and check if the MPU6050 sensor is starting correctly, setting its acceleration range to 2g.
loop():Periodically update the position of the pixel based on MPU6050 sensor readings. Periodically move the gap’s position. Load the new pixel layout and render it on the LED matrix. Check if the pixel has passed through the gap. If it has, delay for 1.5 seconds to display the success, increase the game difficulty, and reset the pixel’s position.
Other Functions:
drawSquareWithGap(): Draw an 8x8 border and create a gap within it.createGap(): Create a gap of length 2 on the specified side.moveGap(): Move the gap’s position based on the current side and gapStart, changing the side when necessary.movePixelBasedOnMPU(): Read acceleration data from MPU6050. Move the pixel’s position based on the acceleration data (resetting if the pixel goes out of bounds or into walls).resetPixel(): Reset the pixel’s position to the center of the matrix.checkPixelPosition(): Check if the pixel is on the gap. If it is, increase the game’s difficulty level and set the pass flag to true.